Image Map
Showing posts with label Secret Recipe Club. Show all posts

Sunday, November 8, 2015

Spiced Cauliflower “Couscous”-Secret Recipe Club


One of the things I love most about Secret Recipe Club is that I get to visit a “sometimes” new-to-me blog and check it out in depth.  I always seem to find a great recipe or idea that makes me slap myself upside the head because I didn’t think of it myself.  Such was certainly the case when I visited Well Dined, a blog written by Sarah.

Sarah originally stated her blog to write restaurant reviews, but it soon morphed in to a food blog with great recipes.  Sarah likes to cook as seasonally and as healthy as she can.  I found two delicious recipes for this holiday season, Bourbon Bacon Whipped Sweet Potatoes with Brown Butter and Sage and Cranberry Custard Pie.  Other recipes on my to-make list are Maple Bourbon Glazed Chicken, Apple Butter Glazed Pork Loin and Snickerdoodle Surprise Cookies.

The recipe that made me do the slap myself upside the head thing mentioned above was Spiced Cauliflower “Couscous.”  What a great idea to chop cauliflower in the food processor until it resembles couscous.  The cauliflower cooks very quickly this way and can be seasoned with almost anything you want.  This is probably going to be my favorite way to cook cauliflower, and I am next going to use the technique to make the cauliflower and use some of the seasoning ideas that Sarah has in this post on cooking with couscous..

In the posted recipe, a middle east spice blend called Za’atar was used.  The only place that I could find this in my medium-sized, northwest town was at a local Greek restaurant that sells a small selection of middle east foods.  I had to purchase a large jar so I probably have enough Za’atar to last my life time, but this will give me incentive to use it in other recipes.  I am thinking of using it on a roast chicken.  If you have a Penzey's Spice store in your town, they have it there or you can get it online in a 1/4 cup amount.

I could not find raw cashews and had to settle for roasted, salted ones, so I left the salt out of the recipe.  I am not a fan of raisins but did go ahead and use them.  I plumped them in a little hot water so they would be softer.  My personal preference would be to use dried apricots, dates or dried cherries or cranberries in place of the raisins.

Unfortunately I have a hubby who will not touch cauliflower no matter how it is prepared so I only made half the recipe.  He doesn’t have any idea what he is missing with this one.  I love it, and I can’t wait to make another variation.  I thought it didn't taste anything like cauliflower, and I think you could serve this and people would have no idea they were eating cauliflower.

 Thanks so much for sharing, Sarah.  Go visit her blog and get some great recipes.


Spiced Cauliflower “Couscous”
From Well Dined and Food 52
1 large cauliflower (about 1 1/2 lbs. of florets)
5 oz. raw cashews (I had to use already roasted so skipped the cashew roasting step.)
5 T. olive oil
4 T. lemon juice
2 T. mined parsley
1/2 t. Za’atar (if you can’t find this, I would try Greek Seasoning)
1/2 t. cumin
1 clove garlic, crushed
1/4 t. finely shredded lemon zest
salt and freshly ground pepper to taste (I left out the salt as the cashews were salted.)

If using raw cashews, Heat a cast iron skillet over medium heat.  Reduce heat to medium low; add the cashews and toast for about about 8 minutes, until lightly golden and gently charred.  Stir frequently to make sure that they do not burn.  Let cool, then cut half of the cashews into smaller pieces.
Break the cauliflower into florets, making sure to leave behind as much of the stem as possible. Chop
the florets into smaller pieces.  Transfer part of the cauliflower into a food processor and pulse until the pieces are finely chopped and resemble couscous.  Be careful not to over-process.  Repeat with remaining cauliflower.
 Heat three tablespoons olive oil over medium heat.  Add the cauliflower to the pan, stir well to coal with the olive oil and cook about 7 minutes, stirring frequently.  Remove the couscous from the heat and let cool.
Add the raisins, cashews, Za’atar, cumin, parsley, garlic, lemon zest, lemon juice and the remaining two tablespoons olive oil.  Season to taste with salt and pepper.  Leave the couscous for about 15 minutes to allow the flavor to combine.  Serve at room temperature.  Serves 4-6.


Think you might want to join the fun.  You can find all the info here.

Sunday, September 13, 2015

House Dressing-Secret Recipe Club


Who could resist a visit to a blog called “Smells Like Brownies.”  This was my assigned blog for this month’s Secret Recipe Club.  Melissa has been blogging since 2011 and is the stay-at-home mom of two little ones.

Of course, cookie lover that I am, I headed straight for the cookie index.  I wasn’t disappointed and found recipes for Brown Sugar Shortbread, Oatmeal Butterscotch Chip Cookies, Gooey Vanilla Bean Tea Cakes and Double Chocolate Buttermilk Cookies which my husband is currently stealing from the cookie jar.  I also found Spicy Tuna Burgers and Pecan Crusted Salmon.  Melissa doesn’t eat meat or poultry, so there are a lot of great veggie and fish recipes on the site also.

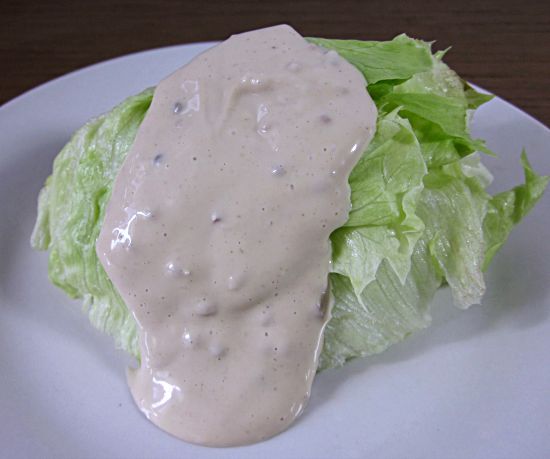
Now I was planning to post about one of the cookie recipes, but I came across a post that had a recipe that was so easy, so quick and so versatile that, after I made it,  I just knew that it had to be shared.  Melissa wrote about a dressing that she  loved which was served at a place called The Cheese Shop in Colonial Williamsburg.  Well, move over Ranch, I have a new love.

Now when I say I love this stuff, this is how I have already used it.


I had it on roasted cauliflower.


Then as a dip for chicken fingers.


With roasted potato slices.


And on zucchini patties.


Then actually as a dressing on a wedge of lettuce.
.
I have even been guilty of grabbing a spoon and taking a little bite directly from the jar.  From now on, I will always have this in my fridge.  If you like mustard at all, please give this wonderful recipe a try.

It is worth it to buy the mustard seeds for this if you don’t have them on hand.  The dressing does get more kick the longer you keep it.

Make this dressing/dip, then visit Smells Like Brownies, and get some great new cookie recipes.


“Cheese Shop” House Dressing
from It Smells Like Brownies

I c. high-quality regular or light mayonnaise (I used Best Foods)
1 T. high-quality Dijon mustard
1 T. Worcestershire sauce
1 large clove garlic, minced (I like garlic so may have used a bit more)
1 t. turbinado or light brown sugar (I  used the brown sugar)
pinch salt
pinch fresh ground black pepper
1 t. mustard seeds

Combine all ingredients except the mustard seeds in a food processor or blender.  (I used my mini food chopper).  Process until the garlic is smooth and the mixture is well blended.  Turn into a container with a lid.  Stir in the mustard seeds.  Chill several hours to allow flavors to blend.  Serve with crusty bread, raw or cooked veggies, chicken fingers, over lettuce, just wherever you want.  Makes a little over a cup.

If you would like to join in the fun of Secret Recipe Club, visit this page.


Sunday, August 9, 2015

Greek Yogurt Chicken-Secret Recipe Club


Ellie, who writes The Hobo Kitchen, my assignment for this month’s Secret Recipe Club, was born in The Bahamas, but has lived in the United States for some time.  She currently lives in Hoboken, NJ, and her blog’s name is a nod to that fact.  Ellie has been blogging since 2008, and until last year, her bog was called The Bitchin’ Kitchen.  That blog is still available over at Blogspot, but Ellie transferred all the recipes from there to The Hobo Kitchen blog.

Ellie writes a series of posts called Living the Life about life in the big city which is fun for this life-long rural/small town gal to read.

Of course, there are lots of delicious sounding recipes, several which use Nutella, one of my favorite things.  I considered making the Nutella Donuts, but it has been very hot here still so I am reluctant to use the oven.  I also want to make the Bahamian Macaroni and the One Pot Cheeseburger Casserole.

We eat lots of chicken at our house so I finally decided to make the Greek Yogurt Chicken even though I would need to use the oven.  What could be easier than putting chicken pieces in a baking pan, mixing some yogurt, seasoning and cheese together, spreading it on the chicken and shoving it in the oven?  Not much.  I am so glad that I made this.  It was delicious and will be appearing on our table often.  Great for any day, but also elegant enough for company.

I made two slight changes.  I did not have a chunk of Parmesan cheese the day I decided to make this, so used an already shredded Parmesan/Romano cheese blend.  I also used smoked paprika for the paprika.  I had a large container of Greek yogurt on hand so used 1/3 cup which I figured should be about the same as a 5-ounce container.  The yogurt acts as a binder for the seasonings and cheese.  I think that you could use sour cream in a pinch, but then it wouldn't be Greek Yogurt Chicken.

This topping  is the thing here, and I think that it could easily be used on chicken thighs and pork chops.  Ellie also suggests salmon and vegetables.  I suspect that the topping might also be very good spread on sturdy crackers and baked briefly in the oven for a great appetizer.


Greek Yogurt Chicken
from the Hobo Kitchen
4 boneless chicken breasts (about 1.75 lbs.)
1 t. seasoning salt
1/2 t. black pepper (I used coarse ground)
1/2 t. garlic powder
1/2 t. paprika
1/2 t. dried oregano
1/3 cup or one 5 oz. container Greek yogurt
1/2 c. freshly grated Parmesan cheese ( I used a Parmesan/Romano cheese blend)
extra cheese for topping

Preheat oven to 375 degrees.  Spray a 7x11-inch pan with cooking spray and place chicken breasts in pan.  Measure the seasoning salt, pepper, garlic powder, paprika and oregano in small bowl.  Stir in the yogurt and cheese mixing until everything is incorporated.  Cover the chicken breasts evenly with the yogurt mixture.  Sprinkle some additional cheese over the yogurt mixture.  Bake, uncovered, about 45 minutes or until the chicken is no longer pink in the center.  Makes 4 servings.


A visit to The Hobo Kitchen will be well worth your time.

If you are interested in joining in the fun of SRC, vist this page to learn more.

Sunday, July 12, 2015

Cornflake Marshmallow Cookies-Secret Recipe Club


Every month I look forward to getting the email with my blog assignment for Secret Recipe Club.  It means that I can go and secretly check out someone’s blog, choose some terrific recipes to try and post one here on Reveal Day.

My assignment this month was Sarah's Kitchen.  Sarah is a gal from Kent, England who now lives in Texas.  She became an American citizen in 2010.  Sarah has been blogging since 2008 so there were lots of wonderful recipes to choose from

Since we are great fans of cubed steak, I had to make Steak Fingers.  I made them with both beef and pork cubed steak, and we like them very much.

Always looking for new potato recipes, I found Fresno Potatoes and Greek Lemon Potatoes.  I also found No Knead Bread, Processor Danish Pastries, and Sweet Corn Tamale Cakes.  All of these recipes have something in common, and that is that they require baking in an oven.  Unfortunately, we have hade 100+ degree heat for some time now, and I certainly didn’t want to use the oven, so I won’t be making these until the heat cools down.

However, even though it is hot, the Cornflake Marshmallow Cookie recipe kept calling my name, and I finally succumbed even though it, too, requires the use of the oven.  I decided that I could make the Cornflake Crunch early in the day and bake the actual cookies late in the evening, which is what I did.

I had about 1 1/2 c. more Cornflake Crunch than I needed for the cookies.  It was very good just to munch on, but I have an idea to use it up which I will post later.  I was a little concerned about the amount of salt called for in the cookie part of the recipe so I reduced it to 3/4 t.

I used a 1/4 c. ice cream scoop to form my cookies so they were probably a bit smaller than Sarah’s cookies as she used 1/3 c. for each one.  I formed all my cookies and put them on a parchment-lined baking sheet and put that in the fridge to chill.  I put 4 cookies at a time on another parchment-lined baking sheet to bake.  The cookies spread a lot, so more than 4 cookies spread into each other.

It may have been my oven, but 375 degrees was too high, and the first pan of cookies burned.  I reduced the heat to 350 degrees, baked the cookies for 15 minutes and they came out perfect.  The cookies do need to sit a bit before they are removed from the pan.  I just very carefully slid the parchment paper with the cookies onto a counter, lined my baking sheet with a new piece of parchment paper and continued baking.  These are very BIG crispy, crunchy somewhat delicate cookies.  I suggest that they be served with a napkin to catch the crumbs.  They will certainly satisfy any cookie cravings you mightbe  having.

Go visit Sarah’s blog and find yourself some great recipes.

.
Cornflake Marshmallow Cookies
From Sarah’s Kitchen
Cornflake Crunch
5 c. corn flakes
1/2 c. dry milk powder
3 T. sugar
1 t. salt
9 T. butter, melted

Cookies
1 c. butter (2 cubes), softened
1 1/4 c. sugar
2/3 c. light brown sugar, firmly packed
1 egg
1/2 t. vanilla extract
1 1/2 c. flour
1/2 t. baking powder
1/2 t. baking soda
3/4 to 1 1/2 t. salt (you choose)
3 c. Cornflake Crunch
2/3 c. mini chocolate chips
1 1/4 c. mini marshmallows

To make the Cornflake Crunch, place cornflakes in a large mixing bowl and crush well with you hands. Add the milk powder, sugar and salt.  Pour in the butter and stir until well blended. Spread mixture onto a parchment paper-lined baking sheet.  Bake at 275 degrees for 20 minutes.  Remove from oven and let cool.  Then break up with your hands.

To make the cookies, put butter and sugars in the bowl of a stand mixer.  Cream together for 2 minutes.  Add eggs and vanilla and beat for 8 minutes  Combine flour, baking powder, baking soda and salt.  Stir to blend.  Reduce mixer speed to low and add dry ingredients, mixing just until combined.  Remove bowl from mixer and stir in Cornflake Crunch, chocolate chips and marshmallows with a spoon or spatula.

Line a baking sheet with parchment paper.  Scoop 1/4 to 1/3 c. mounds onto the baking sheet.  Cover with cling wrap and refrigerate for 1 hour.

Heat oven to 350-375 degrees.  Remove 4 cookie mounds from fridge and place on a parchment paper-lined baking sheet.  Bake for 15 to 18 minutes.  Let cool for at least  5 minutes before removing from baking sheet or carefully slide parchment paper onto a counter, cut a new piece of parchment paper and continue baking.

The cookies will be big-5 or 6 inches in diameter.  They are somewhat delicate so handle carefully.  Makes about 18 cookies.


You can find all the details about joining in the fun of Secret Recipe Club here.

Sunday, June 7, 2015

Creamy Carrot Soup-Secret Recipe Club


Time again for Secret Recipe Club where I get to visit someone’s blog, pick a recipe from there and share it here.  This month the blog I visited was Why I Am Not Skinny.  Isn’t that a fun name?  This blog is written by Maxie, who is a South African living in Belgium.  She shares great recipe and fun restaurant reviews with really awesome photos that make you very hungry.

One of my favorite restaurants where I live is Black Angus Steakhouse so I thought It was interesting that there is a Dale’s Black Angus Restaurant in Cape Town, South Africa.  Although my Black Angus is quite upscale, it appears that the Cape Town Black Angus may be even more so.

The challenge with picking a recipe from a European blog is that matter of recipe ingredient conversion which I am not very good at.  Maxie does have imperial measurements for at least part of many of her recipes.  I am anxious to make the 137 Year Old Dutch Apple Cake and love the idea of Banana Chocolate French Toast for breakfast.

The recipe I picked to make and share is Carrot Soup from Maxie’s post 6 Carrots, 1 Onion Soup……Close Enough.  I love cooked carrots (hubby does not) and have thought about making carrot soup from time to time, but had never actually done it.  I liked this recipe because of the added potatoes, and it looked simple and easy, which it was.

Since I was making soup just for myself, I halved the recipe but am giving Maxie’s full recipe.  I used my immersion blender to blend the soup right in the saucepan.  The soup was very good “as is”, but would also make a great “jumping off point” for the addition of some spices ( I am thinking curry powder next time I make this) and some cooked, crumbled bacon or diced ham for a heartier main dish.  I loved the wonderful orange color, and will be making this again from time to time.


Creamy Carrot Soup
1 medium onion, peeled and diced
2 large cloves garlic, peeled and minced
a blob of butter (I used a heaping tablespoon)
10 medium carrots, peeled and chopped
4 to 5 potatoes, peeled and chopped
6 cups chicken broth
salt and pepper to taste

Melt butter in large saucepan.  Add onion and garlic and cook over medium heat until onion is soft, about 5 minutes.  Add carrots and potatoes.  Cover with chicken broth and bring to a boil.  Reduce heat, cover and simmer about 20 minutes until carrots and potatoes are tender.  Blend until smooth using an immersion blender or carefully pouring into a blender jar (this may need to be done in batches).  Season with salt and pepper.  Maxie suggests serving this with fresh bread slathered with butter.  This seems to make 4 or so generous servings.


If you think that you would like to join in the fun of Secret Recipe Club, you can find information about it here.


Sunday, May 10, 2015

Spanish Rice Casserole-Secret Recipe Club


I hope that everyone had a wonderful Mother's Day, and now it is time for this month's Secret Recipe Club post.  I cannot even begin to express how thrilled I was when I received this month’s assignment.  Miz Helen's Country Cottage is one of my favorite blogs, and she is one of my blogging heroes.  I have subscribed to her blog for a number of years.  When I saw she was a blogger of a “certain age”, I thought maybe, me at my age,  could be a blogger, too.  She also cooks “down home” comfort food, just the kind I like.  Two great features of her blog are her weekly "What's for Dinner Next Week" post and her "Full Plate Thursday"  link-up.

I have used many of her recipes such as Spicy Cranberry Coffeecake and Slow Cooker Bar B Que Pork Roast.  My printed-out pile of “to try" recipes from her site is at least a half inch high.  It was very difficult to choose a recipe for this post as there were so many I wanted to do.

I finally settled on Spanish Rice Casserole for several reasons.  I like rice a lot, hubby not so much.  He was going to be out of town so I thought that was a chance to make something that only I liked.  We were gifted with a beef quarter for Christmas so I have a lot of good ground beef on hand.  The recipe made a lot so I could stick some of the casserole in the freezer for future use.

I made three slight changes to the recipe.  My ground beef is put up in 1 1/2 lb. packages, so I used that amount instead to the 2 lbs. Miz Helen used.  I don’t care for green peppers so used red peppers instead.  I always have Mexican Blend grated cheese on hand so I used that instead of the cheddar cheese, pepper jack cheese called for in the recipe.  I like to put a dollop of sour cream on top of my rice and serve it with corn chips.  Next time I make this, I think I will add a small can of green chilies to replace the green color I lost when omitting the green pepper.  Boy, was this ever good.  I am so glad that I am going to have some of this available in the freezer to take care of my Spanish Rice cravings.  This makes lots so would be a great dish to take to a party or potluck.  Thanks, Miz Helen for sharing one of your great recipes.


Spanish Rice Casserole
Miz Helen's Country Cottage
2 lbs. ground chunk (I used 1 1/2 lbs.)
1 T. olive oil
1 yellow onion, chopped
3 cloves garlic, minced
1 green pepper, chopped (I used a red one)
1 1/2 t. cumin
1 1/2 t. chili powder
1 t. salt
1 t. pepper
4 c. rice
1 (10 oz.) can tomatoes and green chilies (such as Rotel)
1 (14.5 oz.) can diced tomatoes
1 (15 oz.) can tomato sauce
4 c. chicken broth
1 c. sharp cheddar, shredded
1 c. pepper jack, shredded (I used shredded Mexican Blend cheese for the two cheeses)

Brown ground beef in a heavy, oven-proof Dutch oven.  Remove ground beef and drain if necessary.  Add olive oil to Dutch oven, heat and add the onion, garlic, and green or red pepper.  Cook until the onion is clear.  Add the cumin, chili powder, salt and pepper.  Stir and cook for about a minute.  Add the rice and cook and stir until the rice is just beginning to turn brown.  Add the tomatoes, tomatoes and green chilies and tomato sauce.  Add the chicken broth, pouring a little of the chicken broth into the tomato sauce can to clean it out before adding to the rice mixture.  Return the ground beef to the Dutch oven.  Bring the mixture to a boil, lower heat, cover and simmer 15 minutes, stirring several times to keep mixture from sticking to the bottom of the pan.  Remove cover and add the cheese to the top of the mixture.  Bake in a 350-degree oven for 20 minutes until the cheese is melted and the rice is fully cooked.  (Note:  because I was going to freeze the Spanish Rice, I did not add the cheese before baking.  I covered the mixture and will add cheese to the individual servings as I heat them.)  There wasn’t an amount of servings listed, but I am guessing this will serve at least 10-12.


To freeze individual servings of this recipe I put 1  1/2 cups of the casserole into zip-top sandwich bags and flattened them out.  I placed them flat on a jelly-roll pan to freeze so I could stack the bags inside a gallon freezer bag and stack them in the freezer to save space.


To learn how you can join in the Secret Recipe Club fun, visit the membership information page.

Sunday, April 12, 2015

Rhubarb Curd-Secret Recipe Club


This month my Secret Recipe Club assignment was Culinary Adventures with Camilla which is the blog written by our group B hostess, Camilla Mann.  What a delightful blog this is.  I especially enjoyed the posts where her boys are cooking.

Camilla started her blog in 2009  so there were many, many recipes to choose from.  There are numerous recipes that I want to try and some I did.  I made the Cabbage Steaks and enjoyed them very much.  Some of the many recipes I have on my list to make are:  Homemade Saltine Crackers, Honey Soy Drumettes, Snickerdoodle Buttermilk Muffins, and Smoldering Pants Brussels Sprouts.  You need to go read the post about that last one.

The recipe I picked to share today is Rhubarb Curd.  There are several reasons that I chose this recipe, number one being that I love rhubarb and can hardly wait until it is ready each spring.  I also love to find and share unique recipes that I believe deserve a wider audience.

Camilla used fresh rhubarb.  Unfortunately, it’s a bit too early where I live to get fresh so I used some of my frozen rhubarb.  This worked out OK, although I am sure fresh would be a bit better.  The only change I would make if I use frozen rhubarb next time will be to reduce the amount of water to 1/4 cup as my curd was not quite as stiff asI think it should be.  Camilla said that her curd did not keep its pink color.  Mine came out a very pale pink so I think that it depends on the variety of rhubarb that you use.  Unfortunately, unless you grow your own, you have no control over the variety of rhubarb that is available for purchase.  If you wanted it more pink, I suppose that you could add some red food color.

A couple of tips that may help in making this recipe:  grease your measuring cup when measuring the honey and separate the eggs while they are cold.  I use an egg separator as I can let the egg sit until all of the white has dripped off.

The curd was delicious.  I added a couple of tablespoons of sugar to reduce the tartness to my taste.  I see so many uses for this.  It can be used as a spread for bread, a topping for cake, ice cream or pudding, and it is good just spooned out of the jar.  Right now I am enjoying it over cream cheese spread on English muffins.  Since I got 3 cups curd when I made this, I am going to put some in the freezer and see how it freezes.  Do make this recipe, you won’t be sorry.

Thanks, Camilla, for a great addition to my recipe collection.  This is going on my list of ideas for gifts to make for Christmas.


Rhubarb Curd
from Camilla’s Culinary Adventures
6 c. rhubarb, fresh or frozen.
1/2 c. water (reduce to 1/4 c. if using frozen rhubarb)
zest from 1 lemon
1/3 c. honey
1/2 c. powdered sugar (a bit more if desired to you taste)
1/2 c. butter
8 egg yolks
juice from the lemon

In a medium saucepan, combine rhubarb, water, lemon zest and honey.  Cook gently over medium heat until rhubarb has softened, stirring often.  Meanwhile, in another saucepan, combine powdered sugar, butter and lemon.  Heat until the butter is melted and bring to a boil.  In a small bowl, beat the eggs very well.  Very slowly add 1/3 of the butter/sugar/juice mixture to the eggs while beating rapidly.  Now slowly add the egg mixture into the butter/sugar/juice mixture, beating rapidly.  Continue beating over medium heat (do not let it boil) until mixture thickens.  Add the rhubarb mixture to the yolk mixture and cook until thickened.  Spoon into clean container and store in the refrigerator.  I got about 3 cups curd.


Check out the links below to see what other group B bloggers made this month.  If you would like to join in the fun, you can find details here.

Sunday, February 8, 2015

Crispy Polenta-Crusted Chicken-Secret Recipe Club


For this month’s Secret Recipe Club post, I have the privilege of sharing the UK-based blog Searching for Spice.  Corina is the busy mom of two young children so many of her recipes are quick and easy.

With this blog being a UK blog, most of the recipes use metric measurements which makes conversion to imperial measurements a bit challenging.  I did a Google search for conversion help and found this page on Epicurious which give the math to make the conversion, but I still came out with some strange results.  I really want to make the Sticky Toffee Pudding recipe, but haven’t  yet because of that.  Luckily, some of Corina’s recipes are made with imperial measurements, such as the Microwave Chocolate Mug Cake, which I have made several times.  Both hubby and I have enjoyed this dessert very much.  It is the perfect thing when you want something sweet and chocolaty, and you want it Now!

My post, today, however, is for the Crispy Polenta Crusted Chicken.  We eat a lot of chicken so I am always looking for new ideas for what to do with it.  It also just so happened that there was a recent sale of boneless, skinless chicken breasts so I stocked up.  I also had dry polenta on hand.

I agree with Corina and liked the fact that this chicken recipe produced a nice crisp crust without the messiness of many coated chicken recipes.  The recipe is made up of only four simple ingredients-chicken breasts, buttermilk, dry polenta and a seasoning of your choice.

I ended up sort of guesstimating on the amount of buttermilk and think I needed twice the amount of polenta than in the original recipe to completely coat the amount of chicken that I used.  I did brush the foil-lined baking pan with olive oil and put it in the preheated oven for about 5 minutes while I coated the chicken.  I forgot the drizzle of olive oil over the top of the chicken before baking, but it turned out nice and crispy anyway
.
The polenta gave the chicken a little undercurrent of corn flavor which I really liked.  This recipe will be going in my regular rotation of chicken recipes.

Be sure to visit Searching for Spice.  There are lovely recipes there.


Crispy Polenta-Crusted Chicken
1 1/4 lbs. boneless, skinless chicken breasts cut into 1-inch thick chicken fingers
1/2 c. buttermilk (Corina used 100 ml)
1 c. dry polenta (Cornia used 100 g)
1 t. your favorite seasoning (Corina used 1/2 t.) (I used a French Fry Seasoning from Big Lots)
olive oil

Place chicken breast fingers in a zip-top bag.  Add buttermilk and massage bag to coat chicken pieces evenly.  Marinate at least 30 minutes in the fridge, turning bag over after 15 minutes.  Can be marinated longer if desired.  Mix the polenta and seasoning in a shallow pie pan.  Line a jelly-roll or cookie sheet with foil and brush with olive oil.  Place in a 350 degree oven while coating chicken.  Remove chicken pieces from bag, letting excess buttermilk drip off.  Roll chicken in polenta, covering the surface evenly.  Set aside on a sheet of wax paper.  When chicken pieces are all coated, remove heated pan from oven and place chicken on it.  Drizzle olive oil over the chicken.  Return to oven and bake for 20 to 25 minutes, turning chicken once.  Remove from pan and serve with your favorite dripping sauce if desired.  Makes 2 to 3 servings.


You can read what Secret Recipe Club is all about here.


Sunday, December 7, 2014

Taco Meatloaf-Secret Recipe Club


What a fun blog is An Affair from the Heart, my assignment for Secret Recipe Club this month.  Michaela is a mom of 4 who has been blogging regularly since 2011.  There is a wealth of great recipes and some fun party decorating ideas on her blog.

I actually made several of Michaela’s recipes.  They were all very good, and it was so hard to decide which one to feature on this post.  I made her Homemade BBQ Sauce and used it on some oven-barbecued country spareribs that I served recently.  I have several barbecue sauce recipes that I rotate through when making barbecue, and this one is definitely going into that rotation.

Because I recently scored a great buy on Jimmy Dean Sausage rolls, I tried the Pork Sausage Meatloaf using sage flavored sausage.  This was a very good, different main dish that will be great change from regular meatloaf.


I certainly noticed the sweets recipes and plan to make Almond Joy Brownies Bites and the Nutty Butter Acorns.  What a clever thing to do with a purchased cookie.  I also plan to give the Italian Style Prime Rib recipe to my daughter who does our prime rib for Christmas.

Because I found the idea so intriguing I chose to make the Taco Meatloaf for this post.  I don’t use commercial taco seasoning so used the Taco Seasoning recipe that Michaela had posted in the early days of her blog.  I did not use all of the made-up seasoning mix, I will use it all next time.  Since  there are only two of us, I use 1  1/2 lbs. of ground meat beef to make meatloaf.  The recipe called for 2 lbs. ground beef so I used 2 medium eggs and slightly less crushed corn chips then the recipe called for.  I crushed 2 cups of corn chips in my food chopper which made about 7/8 cup of crushed chips.  I did add a tablespoon of instant minced onion to the meatloaf mixture.

I served the meat loaf with Spanish Rice, whole kernel corn and salad along with salsa and sour cream.  I would have added black olives, but I was out and didn’t want to open a can since hubby doesn’t like them.  He put the Spanish Rice on his meat loaf slices and topped it with the salsa and sour cream.  We really enjoyed this as an alternative to regular meat loaf, it was great in sandwiches, and I will make it often.
 
Thanks for sharing some great recipes, Michaela.


Since most of my readers have larger households, I am posting Michaela’s original ingredients amounts.

Taco Meatloaf
From An Affair of the Heart
2 lbs. lean ground beef
1 (1 oz.) pkg. taco seasoning mix or use recipe here.
1 c. crushed corn chips (about 2 1/2 c. uncrushed)
1/2 c. sour cream
2 eggs
salt and pepper to taste
2/3 c. Mexican Blend or cheddar cheese

Place ground beef in a large mixing bowl  Sprinkle taco seasoning mix over beef.  Add corn chips and mix lightly until blended.  Measure sour cream into a 1 cup glass measuring cup.  Add eggs and mix well.  Pour egg mixture over ground beef, add salt and pepper to taste and mix until blended.  Place meat mixture in a well-greased loaf pan.  Cover with foil and bake at 350 degrees for 1 hour and 15 minutes.  Remove foil and sprinkle with cheese.  Bake until cheese is melted, about 5 minutes.  Serve with salsa, sour cream, olives and any other ingredients you would put in a taco.  Serves 6 to 8.


Click here to learn more about joining the fun that is Secret Recipe Club.  Also check out what other Group B bloggers made this month.

Blogger:

Sunday, November 9, 2014

Peanut Butter Bars-Secret Recipe Club


One of the nice things about getting my Secret Recipe Club assignment early like I do now is that I get the chance to delve deeply into my assigned blog.  Such was the case with this month’s blog,  Rebekah’s Family, Food, and Fun, which has been around since 2008.  I really enjoyed  going back and learning about her family as it grew and new children were added.  Of course, I was there to find recipes, and I certainly found many delicious sounding ones
.
Rebekah has a wide range of recipes on her blog.  I made the Cream Biscuits, but mine were ugly and not blog worthy.  I would encourage everyone to try the recipe though as the biscuits were delicious even warmed up in the microwave.

I found so many recipes that sounded wonderful that I could create a list here a mile long; but since it is holiday time, I thought I would point out some that would make great food gifts.  There is Praline Party Mix, Cinnabon Pop Corn, White Chocolate Popcorn and Caramel Glazed Apple Bread to mention just a few.  I am for sure going to add the apple bread to my Christmas quick bread list this year.


The recipe I ended up making Peanut Butter Bars which was among Rebekah’s early posts.  When I saw the recipe, I knew it was the one.  With graham crackers, peanut butter and chocolate among the ingredients, what is not to like?  These are a no-bake, quick and easy bar cookie which uses ingredients I always have on hand.  Again, what is not to like?  The only thing I might be tempted to do is call these Graham Peanut Butter Bars to reflect that they contain graham crackers.

I actually ended up making the recipe twice, much to my husband’s delight.  Sometimes when you make a recip,e you do what you have always done, and it is not the right thing to do for that recipe.  I always sift my powdered sugar, and did so when I made these the first time.  After the butter and peanut butter mixture was added to the graham cracker crumbs and sugar, the mixture was too soupy.  I crushed and added an additional 4 graham cracker rectangles for a total of 1 and 1/2 sleeves of graham crackers.  I then chilled the mixture and added the chocolate topping.  Though a bit soft, the bars were very good.

I kept thinking about what could have gone wrong and decided that it could only be two things.  I had use Skippy 100% Natural Super Chunk Peanut Butter and I had sifted the powdered sugar.  I made the bars again still using the 100% Natural Skippy, but not sifting the powdered sugar.  The sifting appeared to be the problem as the second mixture set up nicely right away.  I did chill them for a little while before adding the chocolate topping. 

I chose to use milk chocolate chips for the topping instead of semi-sweet as I like them better.  I would recommend that only brand name milk chocolate chips be used as I have had some challenges when melting store brand milk chocolate chips.  If you use semi-sweet chips, it probably doesn't matter.

The cookies remind me of Twix candy and are maybe more candy than cookie, but they are so worth making.  If you like any of the ingredients in these, do give them a try.  They will be in regular rotation at my house.

Rebekah has wonderful photos, great recipes (check out the gorgeous cakes),  and a fun blog to read.


Peanut Butter Bars from Rebekah's Family, Food and Fun
1 sleeve graham crackers, crushed (this is about 1  1/2 cups)
2 2/3 c. powdered sugar (do not sift)
1 c. butter
1 c. peanut butter, creamy or chunky
1 pkg. semi-sweet or milk chocolate chips
1/4 c. milk

Place graham crackers in a zip-top plastic bag and crush with the flat side of a meat mallet or use a rolling pin.  Place cracker crumbs in a medium mixing bowl and add powdered sugar.  Mix well, to eliminate any sugar lumps.  Set aside.  Combine butter and peanut butter in a microwave-safe bowl and microwave about 2 minutes at 50% power until butter is melted.  Beat to mix well.  Combine butter/peanut butter mixture and graham cracker/sugar mixture and mix until well blended.  Turn into a foil-lined 9x13-in pan.  Place in refrigerator and chill about 15 minutes.  Combine chocolate chips and milk and melt according to package directions.  Spread over peanut butter mixture and chill 10 minutes until set.  Remove from pan and cut into 1 x 1 1/2-inch bars (these are very rich).  Make about 60.


The way that Secret Recipe Clubs works is that each participant is assigned a blog that they are to visit, choose a recipe, secretly make that recipe and blog about it on a given date.  If you would like to be part of the fun, you can find all the information about joining here.


Sunday, September 7, 2014

Apple Oatmeal Cookies-Secret Recipe Club


The blog Mostly Food and Crafts was my assigned blog for this month’s Secret Recipe Club.  Danielle has been blogging since 2010 and co-hosts the Friday Frenzy blog hop.  She also does a post each week called, “What I Pinned This Week + Other Stuff” that is always fun to check out.

I have made several recipes from this blog including Slow Cooker Peking Chicken, Garlic Potato Fries, and Slow Cooker Char Sui Pork.  All were very good, and I will be making them again.  Some recipes that I want to try are Apple Meatloaf and Bread Machine English Muffins.

Since it is no secret how much I love cookies, since I live in the heart of apple-growing country, and since it is apple picking time, my recipe choice for this post was Apple Oatmeal Cookies.  The only changes I made was to double the recipe (When I make cookies, I want to make lots of them.) and I doubled the amount of spice since I like a spicy cookie.  I chose to use apple pie spice instead of the cinnamon.

The recipe did not state the type of oats to use so the first time I made the cookies, I used old-fashioned oats.  The cookies did not spread much and made somewhat small dome shaped cookies.


I made the cookies again using quick oats.  These cookies came out looking more like the ones in Danielle’s photo.  They were very tender and fell apart easier than the one made with the old-fashioned oats.  I may have needed to bake them a little longer.


Both batches of cookies were devoured very quickly, and I will be making them often.  I think that adding some toasted, chopped nuts would really send these over the top.

Great recipe, Danielle.  Thanks.  Be sure to check out Mostly Food and Crafts for delicious recipes and other fun stuff.

Apple Oatmeal Cookies
from Mostly Food and Crafts
1 c. butter, softened
3/4 c. brown sugar, packed
1/2 c. sugar
2 eggs
1 t. vanilla
1 c. plus 2 T. all-purpose flour
1/2 t. baking soda
1/2 t. salt
1 t. cinnamon or apple pie spice
2 c. oats, quick or old-fashioned
1 medium apple, peeled and diced

Combine butter and sugars in a large mixing bowl and cream together until light and fluffy.  Stir in the eggs and vanilla.  Combine flour, soda, salt and cinnamon or apple pie spice in a small bowl and mix well.  Stir flour mixture into sugar mixture and mix until well combine.  Add oats and apple.  Mix until well blended.  The dough will be somewhat stiff.  Using a teaspoon or a cookie scoop drop dough onto parchment paper-lined baking sheets.  Bake at 350 degrees for 8 to 10 minutes.  Let cookies cool slightly before removing from pan to cool.  Makes about 70 cookies.

To join in the fun, visit the Join SRC Page to learn the details and to apply.


Sunday, August 10, 2014

Snickerdoodle Blondies-Secret Recipe Club


Secret Recipe Club

Being the cookie lover that I am, how could I not love a blog called Secrets from the Cookie Princess, my assignment for August's Secret Recipe Club.  Colleen started her blog in 2010 when she baked 163 dozen (163 dozen, yes that is correct) cookies for Christmas gifts.  I often make cookies for Christmas gifts, but I have never baked 163 dozen.  When I started my blog, I was making 18 dozen cookies for a church fundraiser, and my first few blog posts were cookie recipes so Colleen and I have that in common.  Colleen's posts have very helpful step-by-step photos.

Although Colleen has branched out some and posted other delicious sounding recipes like her Crockpot Pork Tenderloin (Which I made for dinner today by the way.  It was moist and wonderful and a great dinner to make on a hot day.), Mom’s Picnic Potato Salad, Enchilada Casserole and Mexican Rice, her emphasis is on cookies and other baked goods.  That really pleases me, and I have added many new recipes to my ""must make" list.  The great sounding cookie recipes are just too numerous to mention by name, but besides the recipes I am posting today, I have also made the Avalanche Bars.  Delicious.  I must also soon make the Glazed Donut Muffins.

It has been very hot here, and I really wanted to bake, so I wanted to make a recipe that was quick, easy and didn’t need a lot of time in the oven.  I love Snickerdoodles so decided that the Snickerdoodle Blondie recipe filled the bill.

The only change I made was that I used the microwave and my large two-quart glass measuring bowl to melt the butter and mix in the sugar, eggs and vanilla.  This does make a very thick dough that is best mixed with a rubber spatula or a wooden spoon.  I turned the dough into a foil-lined baking pan and spread and patted it out with my clean hands.  I cut my bars smaller, and got 40 bars from the pan.  I transferred the bars to a zip-top plastic bag when they were cooled to keep them soft.

The brown sugar/cinnamon flavor really came through and the bars were soft, chewy and wonderful.  I am sure I ate too many.  If you like cinnamon, be sure to make these.  Colleen, thanks for a great recipe.

If you like cookies or bake for someone who does, be sure to visit Secrets from the Cookie Princess.


Snickerdoodle Blondies
from Secrets from the Cookie Princess
2 2/3 c. flour
2 t. baking powder
1/2 t. salt
1 c. butter
2 c. packed brown sugar
2 eggs
1 t. vanilla
1/4 c. white sugar
2 t. cinnamon

Combine flour, baking powder and salt in a small bowl and mix well.  Place butter in a large microwaveable bowl, cover and melt for 3 minutes at 50 percent power.  Stir to finish melting the butter, if necessary.  Add brown sugar to butter and beat well.  Beat in eggs and vanilla.  Add flour mixture and stir with a rubber spatula or wooden spoon until well blended.  The mixture will be very thick.  Transfer to a foil-lined 9x13-in. baking pan and spread and pat out to fill the pan with clean hands.  Combine white sugar and cinnamon in a small bowl and mix well.  Sprinkle evenly over the top of the dough.  Bake at 350 for 23-28 minutes.  Allow to cool until just warm.  Cut into bars.  Makes 24 to 40 bars depending on the size you cut.  Cool completely and transfer to a zip-top bag or other sealed container for storage.


If you would like to join in the fun, you can find all the necessary information on the Join SRC Page.


Sunday, July 13, 2014

Baked Egg Rolls, Regular and Mini-Secret Recipe Club

Secret Recipe Club

Amy’s Cooking Adventures was my assignment for this month’s Secret Recipe Club post.  Amy has been blogging here since 2010 and has another blog, Amy's Confectionery Adventures which she started in 2012.  The are both filled with wonderful recipes.

Recently, Amy, had been bravely and eloquently sharing her thoughts and feelings concerning the stillbirth of her daughter, Sarah Catherine, last December.  I have been touched reading them and know that the posts will be of help to others who are experiencing similar heartache.

A bunch of recipes have been added to my ever expanding “to-make” list.  Since I like to make homemade seasoning mixes, the Homemade “Lawry’s” Seasoning Salt is right at the top.  The list is long, but just a few of the others are Roasted Brussels Sprouts and Cauliflower with Bacon, Easy Thai Noodles; and since I am a cookie junkie, The Best Cookie Ever!

I have actually made two recipes.  The egg rolls I am posting today and the Sweet and Sticky Baked Chicken.  I made the chicken for dinner last Sunday.  (I used legs and wings.)  The chicken with potato salad and baked beans made a delicious summer meal.

I knew when I saw the Baked Egg Roll recipe that it was what I wanted to make and post for Secret Recipe Club.  I like to occasionally make a Chinese-inspired meal at home.  I have never made egg rolls because I am lazy and don’t like to do the deep frying.  I also think that the deep frying overshadows the flavor of the filling. When I read that the egg rolls could be frozen and baked later, I was sold.  I could make the egg rolls ahead and add them to any meal that I wanted.

Since I don’t like hand shredding and was too lazy to get out my large food processor, I cut the carrots into chunks and cut them up into tiny pieces in my Ninja chopper/blender.  This worked really well.


The day that I made the filling, I had used up all my green onion, so I added dried, minced onion to the soy sauce mixture and used that instead.  That was OK, but I would use the green onion if I had it.  Next time I make these I may add some finely chopped celery and red pepper.  The filling can be made a day or two ahead and refrigerated.

In her post, Amy, links to Steamy Kitchen for the photos on how to roll an egg roll.  When I was there I noticed that Jaden uses a mixture of 1 T. cornstarch or flour mixed with 1/4 c. water to seal the egg rolls wrappers instead of the beaten egg.  I think that is a good tip to know if you are low on eggs or making egg rolls for someone who cannot have egg.

I apparently did not put as much filling in the egg roll wrappers as I should have, as I had an whole sour cream container of filling left over when I had used the entire package of egg roll wrappers.  Since I had a package of wonton wrappers on hand, I decide to make mini egg rolls.  I was able to get about 35 mini egg rolls with the filling that was left over, so one recipe of filling would easily do two packages of wonton wrappers.  I think they turned out cute and would be great of make and have on hand for a party.


I still had a bit of filling left over when I got tired of rolling mini egg rolls, so I zapped the filling in the microwave and wrapped it in a lettuce leaf to eat it.  I was very good that way, too


Make this filling (used ground chicken or turkey if you are not a pork person), then make egg rolls, mini egg rolls, or lettuce wraps.  You won’t be sorry.  Thanks, Amy, for sharing a great recipes that I will be trying to make and keep in my freezer at all times.

Baked Egg Rolls
from Amy’s Cooking Adventures
1/4 c. reduced sodium soy sauce
2 T. rice vinegar or white wine vinegar
1 T. brown sugar
1/2 T. ground ginger or 1 T. grated fresh ginger (don’t be afraid of this amount, I thought that it might be too spicy, but it was just right)
2 T. vegetable oil
1 small Nappa cabbage, shredded, about 4 cups (I used all the cabbage I bought which was about 6 cups)
2 medium carrots, peeled and shredded (about 1 c.)
salt and pepper
4 cloves garlic, minced (about 1/2 T.)
1 lb. ground pork
5-6 green onions, thinly sliced
1 to 2 pkgs. egg roll wrappers or wonton wrappers
1 large egg, beaten

Combine soy sauce, vinegar, brown sugar and ginger in a small bowl.  Mix well to dissolve brown sugar.  Set aside.  Heat the vegetable oil in a medium frying pan until hot.  Add cabbage and carrots.  Season lightly with the salt and pepper.  Cook for about 5 minutes.  Add the garlic, pork and soy sauce mixture.  Cook, breaking up the pork, until the pork is cooked through and the liquid has reduced.  (I cooked mine until there was only about 2 T. of liquid remaining when I moved the pork mixture to one side of the frying pan.)  Stir in the green onions.  Spread mixture in a 10x15-inch baking pan or a cookie sheet.  Allow to cool for at least 15 minutes.  Once cool, press the mixture with paper towels to eliminate any excess moisture.  Place 2 to 3 T. of pork mixture slightly off center and toward the corner  of an egg roll wrapper or a wonton.  Tuck the nearest corner over the filling and make half a turn.  Bring the two side corners toward the center.  Brush the remaining corner with the beaten egg, roll tight toward the corner and seal.  Repeat with remaining filling and wrappers.  To freeze, place on a foil-lined baking sheet and freeze.  When frozen, transfer to a freezer bag.  Cook from frozen state, no need to thaw.  To bake immediately, brush egg rolls with the beaten egg.  Bake in a preheated 400-degree oven 10 minutes for mini egg rolls and 15 for regular egg rolls.  Increase time to 15 and 20 minutes if egg rolls are frozen.  Serve with you choice of sauce and/or hot mustard.


You can find the details for joining in the fun of Secret Recipe Club here.

Sunday, June 8, 2014

Baharat Spiced Chicken Thighs-Secret Recipe Club


My Secret Recipe Club assigned blog for June was Cafe Lynnylu.  Lynne has been blogging for awhile, and if you haven’t stopped by her blog, you should, if only to see her wonderful black and white photographs.  Of course, she has great recipes there, too.

I have apples to make Apple Butterscotch Oat Cookies later this week.  I also want to try the Baked Yeasted Doughnuts.  They sound delicious.

As I have mentioned before, I like to dig deep into the posts in a blog to see what I can find.  When I read the post for Baharat Roast Chicken with Brussels Sprouts and Carrots, I found two recipes that I think are real gems.  Within that post were recipes for Cumin Rice and Baharat Seasoning.  I made both the recipes.  I will post my version of Cumin Rice soon, but decided that I wanted to share the Baharat Seasoning recipe here for my Secret Recipe post.

I love to try new and exotic seasoning blends so am always excited when I find a recipe for a new one.  Lynne says that this is a North African spice blend. She used this on roast chicken, and I plan to make that meal when Brussels Sprouts are in season again.  Chicken thighs were what I had on hand so I made the spice blend and used it on them.  I had all the spices except for the coriander.  I made sure that it got on my grocery list for my next trip to the grocery store.

After using this spice blend on the chicken thighs, I know that it is one that I will used often.  It adds a wonderful flavor that you like, but can’t quite put your finger on what the flavors are.

Thanks for a useful new recipe, Lynne.
 

Baharat Spice Blend
from Cafe Lynnylu
2 T. freshly ground black pepper
2 T. paprika
2 T. ground cumin
1 T. ground coriander
1 t. freshly ground nutmeg (I did not have whole nutmeg so just used already ground)
1 t. ground cloves
1 t. ground cinnamon

Measure ingredients into a small bowl and mix well to combine. Stir before using. Use on meat, poultry or vegetables. Store tightly covered away from light.  Makes about 1/2 cup.


Baharat Spiced Chicken Thighs
2 T. butter
2 T. vegetable oil
6 chicken bone-in, skinned chicken thighs
1 egg
1 T. water
1 c. panko crumbs
2 t. Baharat Seasoning Blend, divided

Heat oven to 375 degrees.  Line a 10x15-inch baking pan with aluminum foil.  Place butter and salad oil in baking pan and place in oven until melted.  Meanwhile, beat egg and water together in a shallow pan.  Add 1 t. seasoning blend and mix well.  Place panko in another shallow pan.  Add 1 t. seasoning blend and mix well.  Dip chicken thighs in egg mixture, then roll in panko to coat.  Place on a sheet of waxed paper.  When butter mixture has melted, remove from oven and place chicken thighs in baking pan.  Bake 45 minutes to 1 hour, turning thighs over after 30 minutes.  Remove thighs from pan and place on a serving plate.  Makes 6 chicken thighs.

Note:  We did not eat these cold, but they were nice and crispy, and I think that they would be good cold also.


Be sure to visit Cafe Lynnylu and see those great photos.

To learn how you can join in the Secret Recipe Club fun, visit the info page here.

Related Posts Plugin for WordPress, Blogger...