Image Map

Wednesday, February 29, 2012

Ingredient Spotlight-Cheesy Garlic Crescent Rolls

I am almost embarrassed to even call this a recipe, but the subject for today’s Ingredient Spotlight is crescent rolls and other canned biscuits and rolls.  These are so good.  You bite into them and find ooey, gooey melted cheese inside.

Any kind of cheese can be used in these.  I use mozzarella when I make them for Italian type dishes, pepper jack when using with Mexican type dishes,  and cheddar with lots of different dishes.  The cheddar cheese rolls are really wonderful with tomato soup.

I buy cheese  by the loaf, so I make cheese “sticks” that are about 1/4-inch x 1/4-inch x 2 1/2 inches long to make these.  If sliced cheese is used, just cut slices into 1/4-inch strips and stack them until they are 1/4-inch tall.

I sometimes add other herbs such as oregano, basil, rosemary, etc. to these.

Crescents

Cheesy Garlic Crescent Rolls
1 can Crescent Rolls
3 T. butter
1/2 t. garlic powder
8 1/4-inch “sticks” cheese of your choice (see above)

Melt butter in a glass measuring cup.  Add garlic powder and let stand for 10 minutes to allow flavors to blend.  Open can of crescent rolls and unroll a triangle.  Brush  triangle with the melted garlic butter.  Place a “stick” of cheese along the large end of the triangle.  Roll triangle from large to small end, encasing the cheese inside the dough.  Place on foil-lined baking sheet.  Repeat with remaining dough.  Brush each roll with more garlic butter.  Bake at 375 degrees 11-15 minutes.  Remove from oven and brush rolls with any remaining garlic butter.   Makes 8 rolls.

Linking to:  Ingredient Spotlight

Tuesday, February 28, 2012

February Foodie Pen Pal Reveal Day

Foodie Penpals

Today is the day to share what we received from our February Foodie Pen Pal.  If you don’t know about this fun swap, this is how it goes:  Your are given the name  of a blogger to sent food/kitchen-related items to.  A different blogger is given your name to send to you.  The spending limit $15.  Postage usually runs me around $11.00  This is all hosted by Lindsey at The Lean Green Bean.  She has swaps for both the US and Canada.  If it sounds as if it would be fun, you can head on over here to get all the details.  Applications for the March exchange close on March 4th.  The swap is month-to-month so you can "sit out" any month that you want to.

This month the blogger who sent to me was Jessica from Fit Talker (and Eater).  She sent me such a great package that the only thing I could say when I opened it was WOW.  In her note, Jessica said she always tries to send packages that she would like to receive.  Well, believe me, I was happy to receive this one.

Spoons

Aren’t these just the cutest measuring spoon?  Jessica says one can never have too many, and I agree.  They go so nicely with my favorite silicone spatulas.  I have put up a special hook in my kitchen to hold these as they just make me smile when I look at them.

granola

Granola and dried fruit.  I like granola, but I don’t buy it because I am always going to make it myself.  Then I don’t, so I don’t have any.  I put the dried fruit and the granola together for a trail mix-like snack to take to work with me.  Very tasty.

Koppers

I did not open these right away because I Knew, Knew that when I did, I would not be able to stay out of them.  I did force myself to ration them out so was able to enjoy them over several days.  Jessica really had me here as I will eat almost anything that is chocolate covered.

Jers Squares

These little gems taste like a softer Butterfinger.  Butterfingers are a favorite of mine so I really loved these.  Through sheer will power, I actually have a couple of these left.

Chocolate Chip Bars

Chocolate Chip Brownie and Oat Bars.  Very good and a favorite of Jessica’s.  I can see why.  They have oats in them so that makes them healthy, right?

Card

Each package must contain something handwritten so here is Jessica’s note with some great mardi gras beads.  So fun, and she decorated my name up so cute.  Jessica, thank you so much.  It was all wonderful.

One fun thing about this exchange is receiving brands of goodies that are different from what you can buy locally.  This usually results in me going to the internet to see if they are available by mail.  This must be great for internet business.

My package went to The Crazy Cooking Couple who blog in the Washington DC area.  You can visit them to see what I sent.

If you are curious to see what other Foodie Pen Pals received just hop on over to The Lean Green to check them out.

Monday, February 27, 2012

Sausage Potato and Corn Chowder

Good Monday.  It appears there are no new followers to welcome this week.  I do want to say my usual thank you to all who take the time to read my blog.  I know that you all have busy lives, and I appreciate it.

Since February’s Foodie Pen Pal reveal is tomorrow and so is the start of SoupaPalooza, I decided to post a soup recipe today.  We love soup and have it often for lunch.  One type of soup that we especially love is potato soup.

When I posted the Confetti Potato and Ham Soup recipe, I said that it was one of my two favorite potato soups.  Sausage Potato and Corn Chowder is the other one.  This provides another use for breakfast sausage other than just cooking it for breakfast   If I can find it on sale, I love Jimmy Dean sausage in this, but any ground sausage will work.  I usually use a locally-made sausage that is sold for a very reasonable price.  The original recipe called for a can of low sodium chicken broth.  I have changed the recipe to use the water the potatoes are cooked in and Better than Bouillon chicken flavor.  Granulated bouillon may also be used.

This is a hearty chowder that makes a lot so it is a good choice for a “Soup Supper”.  Add some hot bread and a salad and you will be well fed at a very inexpensive price.

The chowder has a tendency to thicken up when it is refrigerated so a little more milk or water may need to be added upon reheating.  This soup actually gets better with age, so it is perfect to make ahead and reheat.

This recipe has been in the files on my computer for a very long time, and I do not know where it came from.

SP Chowder 1

Sausage Potato and Corn Chowder
5 to 6 medium potatoes, peeled and cubed
1 lb. pork sausage
1 medium onion, chopped
1/3 to 1/2 c. diced red pepper
1 large clove garlic, minced
1/2 c. flour
2 t. Better than Bouillon Chicken Flavor or granulated chicken bouillon
5 to 6 cups milk
1 (1 lb.) cans cream style corn
salt and pepper to taste

Place potatoes in a saucepan and cover with water.  Bring to a boil and cook until just crisp/tender, about 8 to 10 minutes.  Meanwhile brown sausage, onion, red pepper and garlic in a large cooking pot.  Do not drain.  Stir flour into sausage and cook for 1 to 2 minutes.  Add milk, 2 cups of the potato cooking water, and the Better than Bouillon.  Bring to a boil, stirring often to prevent scorching.  Boil 1 minute.  Remove from heat and add drained potatoes and the cream corn.  Return to heat and cook on low until ingredients are heated through.  Makes 6 to 8 servings.

Come join SoupaPalooza at TidyMom and Dine and Dish sponsored by KitchenAidRed Star Yeast, and Le Creuset” 

Linking to:  SoupaPalooza

Saturday, February 25, 2012

Apple Pecan Spice Cake

Sorry to have been MIA the last week or so.  Life or something like it, a minor accident, ISP issues and very windy weather have kept my time on the internet to a minimum.

I want to say welcome to any new followers.  Thank you for following my blog.  Thanks also to all who take the time out of their busy schedules to read this blog.  I hope that you find useful information here.

Everyone knows my sweet tooth so I am posting a cake recipe today.

A few weeks ago when I made the Red Velvet Cherry Bars, I took some to work to share with my coworkers.  A question came up as to whether or not one could take a spice cake mix and apple pie filling to make another version of the recipe.  Well, always Curious George, I had to find out.  I am glad to say that I was very pleased with the results.  I added pecans to the cake mixture, poked holes in the cake when it was baked, and poured a caramel glaze over the top.

Since the apple slices are bigger than cherries are, I dumped the apple pie filling on top of the cake mix; and, using my kitchen shears held vertically,  just sort of snipped at the apple slices until they were as small as I wanted.   I then beat and added the eggs and mixed everything until well blended.

Since, I, personally, am not a real fan of spice cake mixes I think that in the future I will use butter pecan or yellow cake mix to make this.  I took some of the cake to the spice-cake-loving person at work, and she pronounced it very good.

I will keep a cake mix and a can of apple pie on-hand so that I can whip this up at a moment's notice.

Apple Pecan Spice Cake

Apple-Pecan Spice Cake
1 pkg. Spice, Butter Pecan, or Yellow Cake Mix
1 (21 oz.) can apple pie filling
2 eggs, beaten
1 t. vanilla
1/2 c. chopped toasted pecans

Glaze
6 T. butter
6 T. white sugar
6 T. brown sugar
6 T. heavy cream or evaporated milk
1 t. vanilla

Place cake mix in a medium mixing bowl.  Pour the apple pie filling on top of the cake mix.  Holding them vertically, use kitchen shears to chop the apple slices into smaller pieces.  Add beaten eggs and vanilla and mix until very well blended.  Add pecans and mix well.  Turn into a greased 9x13-inch baking pan.  Bake at 350 degrees for 35 to 40 minutes or until a toothpick inserted near the center comes out clean.  Cool for 15 minutes.  With a barbecue skewer or other pointed instrument poke holes at 1-inch intervals or so all over the cake.  Combine glaze ingredients except vanilla in a small saucepan.  Cook and stir over medium  heat until mixture comes to a boil.  Boil 1 1/2 minutes, stirring constantly. Remove from heat and stir in vanilla.  Pour hot glaze over the top of the cake spreading evenly.  Let cake cool.  Makes one 9x13-inch cake.

Sunday, February 19, 2012

Cooking from the Blogs-What I Made

Recently I made a couple of blog recipes that I managed to take photos of.  Both of these were great and will go into my regular recipe rotation.

IMG_2357-1

Since I make lunch for hubby and me every day, I am always looking for something new that will provide more variety than my old standbys.  I had seen this recipe for French Dip Crescents and Easy Au Jus over at Mommy Loves Food and included it in one of my Friday Finds.  When I ran across deli roast beef at a great sale price, I bought some to make this.  I used cheddar cheese instead of  Swiss.  These were very good and hubby said that he would eat them from time to time.  I had two left over that I took for lunch at work.  Although the meat was a little dry, they reheated nicely in the microwave.  I liked the homemade au jus very much, but I would double the recipe next time so that I could put some in the freezer as we used all of it.

IMG_2370-1

In my last Cooking from the Blogs post, I had made Roasted Potato Stacks which were very good.  Those were made by stacking slices of potato in muffin pans.  This time I made Crisp Roast Potatoes from Amanda’s Cookin  which was her Secret Recipe Club recipe this month.  For this dish, you slice the potatoes thinly and place them on their edges in a baking pan.  She used shallots.  I didn’t have any so use red onion slices instead.  I halved the recipe since there were just the two of us and knew that there would still be leftovers.  I used a 7x11-inch baking dish and ended up using about nine medium potatoes to fill the dish.  I mixed some garlic powder with the butter and olive oil that is poured over the potatoes and used Spice Islands Rosemary Garlic Grinder as my seasonings.  Hubby said the these reheated well in the microwave when he fixed them for dinner the next night.  This was another fun way to serve potatoes, and I will make these often.

Thursday, February 16, 2012

Improv Challenge-Ginger Glazed Carrots with Pecans

Improv Challenge

Carrots and ginger are the ingredients for February’s Improv Challenge being hosted by Kristen at Frugal Antics of a Harried Housewife.  Since I love to make side dishes, I decided that is what I would go with for this challenge.  I teamed the carrots and ginger with butter, brown sugar, and pecans.  I can almost say that even “cooked carrot haters” might eat this dish.

I like to use baby carrots cut in half vertically but regular carrots cut into 2-inch sticks will work also.  If any of the baby carrots are thick, cut those into quarters.  I cut the pecans into lengthwise slivers also.

The carrot mixture can also be turned into a small casserole and heated in a 350-degree oven for 10 to 15 minutes.  Watch carefully and stir once or twice.

IMG_2326-1

Ginger Glazed Carrots with Pecans
1 lb. baby carrots
3 T. butter
3 T. brown sugar
1/2 t. ginger
1/2 c. vertically chopped pecans
Dash freshly ground pepper
Finely chopped green onions for garnish if desired

Cut carrots in half lengthwise and cook in boiling, salted water until crisp-tender.  Drain well.  Melt butter in the same saucepan that carrots were cooked in.  Add brown sugar and ginger and cook until sugar is melted.  Add pecans and cook over low 5 to 7 minutes, watching carefully and stirring often until pecans are well coated.  Return carrots to saucepan with butter/sugar/pecan mixture.  Cook over medium heat, watching carefully and stirring often until carrots are heated through.  Makes 4 servings.

IMG_2331-1

The ingredients for the Improv Challenge for March are potatoes and cheese (any kind).  To learn more about joining the challenge, head on over to Kristen's blog for the details.

Wednesday, February 15, 2012

Fruited Rice Pilaf


When Brenda at Meal Planning Magic sent an email about her new Let’s Eat the Alphabet monthly link-up, I though it would be loads of fun.  This month the letters were A and/or B.  We could link up any recipe containing a fruit or a vegetable whose name started with those letters.

I chose apricots and decided to make a side dish that used them.  My choice was to make a rice/vermicelli pilaf similar to a Rice-a-roni side dish.  With the rice/vermicelli I used butter, dried apricots, dried cranberries, dried minced onion, chicken broth, salt, allspice and almonds.

This is a versatile recipe and raisins or other dried fruit can be used with the apricots.  I have varied the seasonings in this and have used nutmeg, curry, cinnamon, and Chinese 5-Spice instead of the allspice.  Walnuts or pecans are good in this also.

I like Calrose rice for this as it doesn’t cook up as soft as long grain rice, but long grain rice can be used.

This makes a very pretty side dish.  I sometimes garnish it with some chopped green onion for additional color.  It is very nice with pork or chicken..

IMG_2344-1

Fruited Rice Pilaf
1 T. butter
1 c. Calrose rice
1/2 c. vermicelli
1/2 c. chopped dried apricots
1/4 c. chopped dried cranberries
1 T. minced onion
2 c. chicken broth (low sodium)
1 t. salt
1/2 t. allspice or other desired spice
!/2 c. sliced almonds, preferable toasted

Melt the butter in a medium size saucepan.  Add the rice and vermicelli and cook until vermicelli starts to turn golden brown.  Watch carefully and stir often.  Add the apricots, cranberries, onion, chicken broth, salt, and desired spice.  Bring to boil.  Cover, turn heat to low, and simmer 15 to 20 minutes or until rice is tender and liquid is absorbed.  Remove from heat; let stand 5 minutes.  Fluff with a fork and stir in sliced almonds.  Turn into a serving dish and garnish with more almonds and sliced green onion.  Serves 4.

IMG_2339-1

Sunday, February 12, 2012

Curried Raspberry Catalina Pork Tenderloin

I will be working Valentine’s Day evening so I made a special little dinner for hubby and me last night.  Every three or four months, Safeway sells Hormel Pork Tenderloins on Fridays for $5.  These weigh about 24 oz.  These usually sell for $10.99!  I NEVER buy them at that price, but I do get several when they are on sale.

IMG_2310-1

I like to play around with what I do with the tenderloins and never seem to make them the same way twice.  This time, I decided that I wanted to make something with a Valentine theme.  I couldn’t come up with any way to make the meat pink so decided I would try red.  I used black raspberry jam since that is what I had open in the fridge.  My red is very dark.

This is just a take-off of the apricot jam/Catalina or Russian dressing/onion soup mix chicken recipe.  I used raspberry jam and the ingredients that go into a homemade Catalina dressing recipe.  I make my own onion soup mix so used that, and I added curry powder just because I like it.  I liked the sauce with 1/2 c. sugar but some may not like it as sweet so start with 1/3 c.

Pork tenderloin cooks quickly so this was on the table in about an hour.  Be sure to use a foil-lined baking pan for this for easy clean-up.

As usual, I had no sunlight by the time this was cooked, so the photo was taken today and is the piece that was left over so no pic of the whole tenderloin.

Curried Raspberry Catalina Pork Tenderloin
1/3 to 1/2 c. sugar
1 t. salt
dash paprika (smoked if available)
1/4 t. chili powder
1/2 t. celery seed
1/4 t. dry mustard
1/2 t. garlic powder
1/2 to 1 t. curry powder
1/4 c. red wine vinegar
1/3 c. ketchup
1/4 c. vegetable oil
1 envelope dry onion soup mix (or make your own)
1 c. raspberry or black raspberry jam
1 24 oz. boneless pork tenderloin
1-2 T. vegetable or olive oil

In a medium saucepan combine sugar, salt, paprika, chili powder, celery seed, dry mustard, garlic powder, curry powder, vinegar, ketchup, vegetable oil, soup mix and raspberry jam.  Cook over medium heat until sugar dissolves and mixture begins to thicken, about 10 to 15 minutes.  Watch carefully and stir often.  While sauce is cooking, brown pork tenderloin on all sides in hot oil.  Place in a foil-lined baking dish.  Place part of the sauce in a small bowl and brush onto the meat.  Roast meat at 325 degrees for about 45 minutes, basting with the sauce every 10 to 15 minutes.  Remove from oven when temperatures reaches 155 to 160 degrees.  Let stand at least 5 minutes before slicing.   Leave sauce on very low heat and allow to thicken to desired consistency, stirring often.  Serve sauce to spoon over slices of meat.  Makes 4 generous servings.  This turned out pork that was very juicy and flavorful.


Friday, February 10, 2012

Friday Finds

Another week of being "all-over-the-map" with my Finds.  Some finds that I think will be great for lunches, some new potato recipes; and, of course, some cookies for Valentine's Day (or any other day for that matter).

Mommy Loves Food

This recipe uses deli roast beef, and I think this is a great idea for when you have a craving for French Dip, but want it quick and easy.  I usually have crescent rolls on hand, and this is a new-to-me thing to do with them.

Sausage and Pepperoni Pizza Puffs
Plain Chicken

I am always, always looking for new ideas for food that is pizza-flavored without actually being pizza.  This one looks really good and could be varied a lot according to one's likes and dislikes.


Oven Fried Potato Crisps
Little Mommy, Big Appetite

Not exactly potato chips but these well-seasoned crisps would be nice to serve with the French Dipped Crescents above.

Crispy Roast Potatoes
Amanda's Cookin

These potatoes would be a nice change for a side dish to serve with meat recipes that are being cooked in the oven.  I think these would be great with meat loaf.

Chocolate-Covered Cherry Bites
Six Sister's Stuff

White Chocolate Cherry M&M Cookies
Inside Bru Crew Life

I would just love it if my Sweetie brought me either of these cookies.  (Now he doesn't cook so it is not too likely that will happen.)  Chocolate and cherries are one of my favorite combinations.  The Chocolate Covered Cherry Bits would feel like extending Christmas.  I did not know that there were Cherry M& Ms.  I am on the hunt now to find some so I can make the White Chocolate Cherry M& M Cookies.  Both are perfect Valentine's Day sweet, I think.

That is my list for the week.  I will be linking up to Friday Favorite Finds and checking out all the goodies that other bloggers have found this week.

As always, the photos were taken by and are the property of the owners of the respective blogs represented.

Thursday, February 9, 2012

The Convenience of Ready Cooked Potatoes

IMG_0405-1

One of the most convenient things to have in your kitchen is some refrigerated, all-ready-cooked potatoes.  Of course, frozen potatoes have been available at the grocery stores for a long time, and refrigerated potatoes have shown up in recent years.  It doesn’t take much effort, however, to make a supply of all-ready-cooked potatoes yourself.  Russets, reds, and Yukon gold potatoes are all varieties that can be cooked up and kept on hand for a few days.

I like to select whole potatoes of a similar size and steam them until they are just tender, but the potatoes can also be boiled, and Russets can be baked in the oven or the microwave.  There is no need to peel that potatoes before cooking.  Reds and Yukon golds can be served with the skins on.  My hubby doesn’t like the skin on any type of potato, so I do peel them after cooking.  The potatoes can be grated for hash browns and cubed for soup and other dishes.

So with all-ready cooked potatoes, you can make country hash browns.  We all probably have our favorite recipe for these.

IMG_0418-1

You can make potato soup.  I posted one of my two favorite potato soup recipes here.

IMG_0409-1

You can use the potatoes to make sauced potatoes.  Just cube the potatoes and add them to white sauce, cheese sauce, curry flavored sauce or other flavors.  Make the amount of sauce necessary for the amount of potatoes you are using.

IMG_2275-1

One of my favorite things to do with all-ready cooked potatoes is to make a Meat, Potato, Egg Scramble.  As Rachael Ray says this can be served for breakfast, lunch or dinner.  The meat can be almost whatever you have on hand:  sausage, bacon, ham cubes, Italian sausage, ground beef, link sausage-just whatever you have on hand.  If you cook the meat ahead of time, this is very quick to put together.  It may be changed up by using different seasonings.  I use chili powder and cumin for southwest, Greek seasoning for Greek, Italian seasoning or oregano and fennel seeds for Italian.  I use other seasoning blends, mainly whatever I am in the mood for.

Meat, Potato, Egg Scramble
1/2 to1 lb. meat or bacon, cooked
or 6 slices bacon, cooked
3 T. bacon grease, butter, margarine, olive or salad oil
1/3 c. chopped onion
1/4 c. chopped red or green pepper (opt.)
6 potatoes, cooked and cubed
1 t. salt
1/2 t. freshly ground pepper
4 to 6 eggs, depending on how many people are eating
2 T. milk for 4 eggs and 3 T. milk for 6 eggs
Shredded cheese of your choice (opt.)

Heat bacon grease or other fat in a large skillet.  Add onion and pepper and cook about 5 minutes.  Add potatoes, salt and pepper and other seasonings of choice.  Cook until potatoes are golden brown, turning occasionally.  Add meat of choice and continue cooking until it is heated through.   In a bowl, mix eggs with milk until well blended.  Pour over potatoes and cook, stirring occasionally until the eggs have set.  Sprinkle cheese over the top and let melt or serve cheese on the side to sprinkle over individual servings.  Serves 6.  Reheat leftovers in the microwave or a skillet.

Linked to:  It's a Keeper Thursday
Tastetastic Thursday
What's Cooking Thursdays
Creative Juices
Low-Cost Food Challenge Link Up
Full Plate Thursday
Twisted Thursday

Wednesday, February 8, 2012

Ingredient Spotlight-Sesame or Sunflower Seed Toffee

IMG_2287-1
Sesame Toffee
There are lots of recipes around for toffee made with the more common nuts such as walnuts, almonds or pecans.  This toffee is made with sesame or sunflower seeds and is a nice, quickly-made, unusual candy that you might want to include in a Valentine’s Day candy box next week.  If you know someone who likes sesame or sunflower seeds, they will love it.

I clipped the recipe from the 1969 issue of Sunset magazine and have made it often.  Wrapped airtight, the candy will stay fresh and hard indefinitely.

A candy thermometer is necessary to make this recipe.  A nice metal one can be purchased for less than $10.  Each time a candy thermometer is used, it should be checked for accuracy.  Heat some water to a full rolling boil and place the thermometer into the water, but do not let it touch the bottom of the pan.  The thermometer should reach 212 degrees.  If the thermometer reads a lower or higher degree, adjust for the difference when making the candy.  Have the vanilla and salt containers open so they can be measured quickly when the candy reaches the desired temperature.

If you can only find salted sunflower seeds then pour the seeds into a cotton dish towel and rub the towel between your hands to remove as much salt as possible.  Lay the towel down and lift the seeds from it with a slotted spoon.  Discard the salt.  Omit the salt from the recipe.

To toast the sesame or sunflower seeds, spread out in a 10x15-inch jelly roll pan and toast at 350 degrees for 10 minutes, watching carefully and stirring frequently, until they are a pale golden color

IMG_2294-1
Sunflower Toffee
Sesame Seed or Sunflower Seed Toffee
5 oz. sesame seeds or sunflower seeds (about 1 c.)
1/4 c. butter
1/2 c. light corn syrup
1 c. sugar
12 t. vanilla
1/4 t. salt (omit if sunflower seeds are salted)  see above

Spray a large cookie sheet with nonstick spray.  Set aside.  Melt butter in a heavy 2-qt. saucepan; mix in corn syrup and sugar and cook over highest heat, stirring frequently until a candy thermometer reaches 290 degrees.  (This goes very quickly, about 5 to 10 minutes.)  Remove at once from heat and quickly stir in remaining ingredients.  Pour mixture into prepared pan spreading as evenly as possible.   Let stand until cool and hard.  The pan may be placed in the refrigerator to hasten cooling if necessary.  Break into bite-size pieces and store airtight until ready to serve.  Makes about 1 lb.

Linking to Ingredient Spotlight
Cast Party Wednesday
These Chicks Cooked
Wow Me Wednesday-Ginger Snap Crafts
Wow Me Wednesday-Polka Dots on Parade
We Did It Wednesday
Overflowing with Creativity
What Works for Me
Mrs. Fox's Sweet Party
Sweet Treats Thursday

Tuesday, February 7, 2012

Chocolate Ripple No-Machine Ice Cream

I planned to post this, this afternoon, but my somewhat unpredictable satellite internet connection was down and did not come up before I had to leave for work.  It is after 10 here on the west coast so most of you are already sleeping.  Anyway, even though very belated, here it is
.
After my Fudge Ripple Cake that didn’t ripple saga, I decided that I need to console myself by making some Chocolate Ripple No-Machine Ice Cream.

I wrote a whole post about the wonders of No-Machine Ice Cream last year, so I will post how I made the Chocolate Ripple here.

IMG_2282-1

Sorry about the photo.  This is a soft-serve ice cream, and it was trying to melt.

Chocolate Ripple No-Machine Ice Cream
1 pt. whipping cream
1 can (14 oz.) sweetened condensed milk
1 T. pure vanilla extract
chocolate syrup such as Hershey or use homemade.  I just squirt it straight from the container and use about 1/3 to 1/2cup.

Using an electric mixer, whip the whipping cream until soft peaks form.  Gently fold in the sweetened condensed milk and vanilla until thoroughly blended.  Pour into an 8-inch square pan or other 2 quart container.  Cover with plastic wrap.  Place in freezer for 2 to 3 hours until partially frozen.  Remove from freezer and squirt chocolate syrup in lines on the top of the ice cream.  Swirl the chocolate syrup through the ice cream using a fork.  Return to freezer.  Freeze until firm, about 6 hours.  Makes about 1 1/2 quarts.

Linking to:  Tasty Tuesday
Tip Me Tuesday
Tuesday Time Out
Tuesdays at the Table
Crazy Sweet Tuesday
Show Me What Ya Got
Totally Tasty Tuesday
Trick or Treat Tuesday

Crazy Cooking Challenge-Fudge Ripple Cake

Photobucket


When I saw 
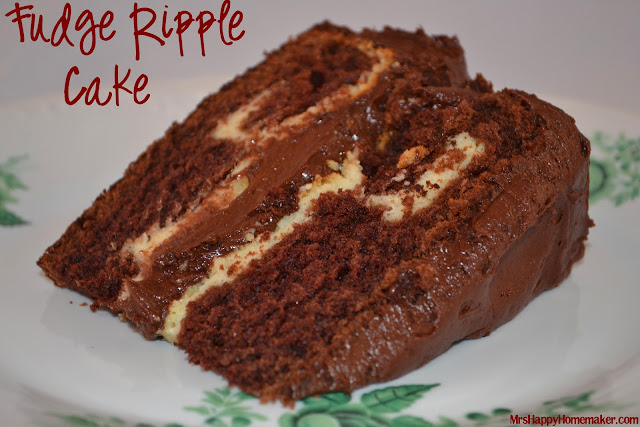
this cake at Mrs. Happy Homemaker, I knew that I had to make it.  Her cake looked wonderful and delicious.  I had only one problem (I thought), and that was that I did not have any layer cake pans.  I never make layer cakes and long ago disposed of my pans.  Nevertheless, I knew that I would forge on.  Thus begins the Saga of the Fudge Ripple Cake.

I gathered my ingredients and stirred up the cake.  I use Saco Cultured Buttermilk Blend so  I used that instead of liquid buttermilk.  I decided to use butter instead of the shortening that was used in the original recipe.  I lined a 9x13-inch pan with foil so that I could remove the cake from the pan easily.

Next I stirred up the cream cheese/sweetened condensed milk topping.  I make my own homemade sweetened condensed milk so I had made up a batch of that.  I poured the mixture over the cake batter and baked the cake.  When I took the cake from the oven I noticed that the top did not look like the pictures in Mrs. Happy Homemaker’s post.  It didn’t seem like a problem.

Since I was going to lose daylight to take pictures, I let the cake set overnight before I made the frosting.  The next day I made up the frosting.  I had only 1 cup of cocoa so used that instead of the 1 1/3 cups cocoa asked for.  The frosting was plenty chocolaty enough for me, but use the 1 1/3 cups if you are really into chocolate.

I removed the cake from the pan and put it in a jelly-roll pan to frost as I have nothing in which to store a rectangular cake that is not left in the pan.  Being far from a cake decorator, I did my best to apply the frosting.  I did have frosting left over which I froze to use another time.

IMG_2248-1

I cut my cake through the middle anxious to see the ripple.  Oh, my!  There were no ripples.  What there was, was a layer of cream cheese underneath the cake.  So what happened?  Well, perhaps two things.  When I made the homemade sweetened condensed milk, I almost burned it.  Since I wasn’t sure that I would be able to use that batch, I poured the whole batch into a plastic container instead of dividing it up like I always did in the past.  The milk may not have thickened up as much as it should have before I used it.  I used low-fat cream cheese.  Maybe I should have used the regular.  I may have forgotten the cornstarch.  At any rate, this is what the bottom of my cake looked like.

IMG_2273-1

Was all lost?  Of course not.  The cake is a moist chocolaty cake just the way I like it.  The frosting is firm and fudgy and stays in place.  And the cream cheese layer is a little surprise at the bottom.  In spite of what happened, this is a very good cake

 IMG_2267-1

So make this cake.  Ripple or no ripples you will be glad you did.  I am giving you the exact ingredients  Mrs. Happy Homemaker did.

Fudge Ripple Cake
Mrs. Happy Homemaker blog

For the cake:
1/2 cup shortening
1.5 cups sugar
2 large eggs
1 2/3 cups all-purpose flour
2/3 cup cocoa
1.5 teaspoon baking soda
1.5 cups buttermilk

For the Ripple:
1 (8 oz.) package cream cheese, softened
2 tablespoons butter, softened
1 tablespoon cornstarch
1 (14 oz.) can sweetened condensed milk
1 large egg
2 teaspoons vanilla extract

For the Frosting:
2/3 cup butter, softened
5 3/4 cups powdered sugar (I did put it through a sieve)
1 1/3 cups cocoa
1 heaping cup heavy cream

Grease and flour two (9-inch) round cake pans.  Beat shortening and sugar together with an electric mixer.  Add the eggs, beating on medium speed.  Combine flour, cocoa, baking soda and salt.  Add the flour mixture alternately with the buttermilk ending with the flour mixture.  Beat 3 minutes at high speed, stopping once to scrape down sides.  Stir in the vanilla.  Pour the batter into the prepared pans.

Beat cream cheese, 2 tablespoons butter, and cornstarch at medium speed until creamy.  Gradually add the sweetened condensed milk, beating well.  Mix in egg and vanilla.  Divide the cream cheese mixture between the two cake pans, pouring on top and spreading to evenly cover the cake batter.

Bake at 350 degrees for 40 minutes, or until a toothpick inserted in the center comes out clean.  After removing from the oven, use a large spatula or wide knife to press the cake down somewhat.  Cool in pans on wire racks for 10 minutes; remove from pans and cool completely on wire racks.

Using an electric mixer, beat 2/3 cup butter until creamy.  Add the powdered sugar, cocoa and heavy cream.  Stir in low until combined.  Beat at high speed until creamy.  Spread frosting between the cake layers and on top and sides of cake.  Slice.  Enjoy.  Repeat.

Since I did not get any ripples in my cake, I decided to make Chocolate Ripple No-Machine Ice Cream to serve with the cake.  I will be back with that post later today.

Be sure to check out the links below to see all the great chocolate cakes that other bloggers have made.

Monday, February 6, 2012

Nutella Raspberry Meringue Bars

Good Monday morning to all. Thanks for taking the time out of your busy lives to stop and read this blog. A warm welcome to my new followers. I am so glad that you are here. I hope that you find the information posted here useful.

When I was thinking about making something with Nutella, I thought of some things I liked: Nutella, of course; raspberries certainly; hazelnuts, sure.  So, with a nod to World Nutella Day,  which was Sunday, I offer up Nutella Raspberry Meringue Bars. This is a somewhat shortcake-like base with a layer of Nutella, covered with a layer of raspberry jam, and topped with hazelnuts in meringue.

This recipe uses eggs that are separated with the whites then being beaten. Eggs separate easier if they are cold, so separate the eggs and let the yolks and whites come to warm temperature. This takes about 30 minutes. If you are in a hurry, the containers that the eggs are in can be set in some warm water.

Before I get to the recipe, I want to say a few words in praise of the off-set spatula.  If you do not have one of these handy little gadgets, spend a few dollars and buy one. They will change your life in the kitchen.  This one is about a 4-inch size which I find so handy I don’t know what I would do without it. It was a very important tool in make these cookies. An off-set spatula gives you control that you cannot get with a regular metal or rubber spatula.

Now, on to the cookie recipe.

Nutella Raspberry Meringue Bars
2 eggs, separated and brought to room temperature
1 1/2 c. all-purpose flour
3/4 c. firmly packed brown sugar
1/2 c. butter, softened
3/4 c. Nutella (or more if desired)
1 c. raspberry jam (or more if desired)
1/8 t. cream of tartar
2/3 c. sugar
2 T. all-purpose flour
1/2 t. vanilla
1/2 c. chopped hazelnuts, toasted

In a large bowl combine flour and brown sugar. With a pastry blender, cut in butter until mixture resembles fine crumbs. Add egg yolks and continue cutting in until mixture again resembles fine crumbs. Press mixture into the bottom of an ungreased 9x13-inch pan. Bake at 350 degrees 15 minutes until lightly browned.  Remove from oven and let stand 10 minutes.

Turn measured-out Nutella into the center of the baked crust. As Nutella softens and melts spread with offset spatula from the center to the edges of the baked base. Let stand 10 minutes.

Measure jam into a glass measuring cup. Place in microwave and microwave 15-30 seconds to soften jam slightly. Stir. Turn out into the center of the Nutella topped base and spread with an off-set spatula from the center to the edges of the Nutella covered base.

While the base is cooling, beat egg whites and cream of tartar with an electric mixer until soft mounds form.  Gradually add sugar, beating until stiff peaks form. Gently fold in flour, vanilla, and hazelnuts. Spread meringue on top of jam layer. Return to oven and bake 10-15 minutes more until meringue is light brown.  Remove from oven and cool on wire rack. Cut into squares with a wet knife. These are very rich so you may want to cut them small. Makes about 36.


Sunday, February 5, 2012

Cooking from the Blogs-What I Made

It has been awhile since I did a “Cooking from the Blogs” post.  That is not because I haven't been using recipes that I have found on other’s blogs, but because I don’t always get pictures taken.

Here are three recipes that I did get pictures of:

IMG_2204-1

Roasted Potato Stacks from Little Momma Big Appetite.  When I saw these I knew that I had to try them.  I am always looking for new ways to fix potatoes.  These were a lot of fun to make and serve.  I had to take this photo after the potatoes were refrigerated for a couple of days, and my stacks are trying to fall over.  I did vary the recipe by adding a thin slice of onion in the center of the stack.  There are many ways that the recipe could be varied by using different spices and blends.  The next time I make these, I am going to sub butter for half the olive oil and reduce the total fat to 1/4 cup.  I will be making these often.  Thanks Little Mamma.

IMG_2230-1

Enchilada Verdes from Mom’s Crazy Cooking.  I have a enchilada recipe we like that is made with ground beef and red enchilada sauce.  When I saw this I knew that I wanted to make this variation.  Most enchilada recipes call for ingredients that my hubby doesn’t care for, but this one did not.  I did not have any pimientos on hand so I added red peppers to the filling ingredients and used my Homemade Cream Soup for the cream of chicken soup.  When I rolled the tortillas, I added a spoon full of cheese sauce to the filling.  We though these were great, and hubby had them for dinner the following two nights that I was at work.  These will be on our table often.  My apologies to Tina, I took the enchiladas out of the fridge to take this photo so they were cold.

IMG_2238-1

Pizza Soup from Lynn’s Kitchen Adventures.  I made this for lunch yesterday.  So simple and easy.  I had only 1/2 pound of Italian sausage, so I upped the macaroni to 1 1/2 c. to have a bit more "stuff" in the soup.  I cooked onion and red peppers with the sausage.  Lynn puts the cheese right into the soup, but I opted to sprinkle it on each bowl.  I served this with crescent rolls that I had wrapped around a quarter inch piece of cheese cut from a block of mozzarella. You can see a bit of cheese seeping out of the roll in the photo.   Next time I will use two cans or jars of spaghetti sauce and not so much water.  This soup will be going in the soup recipe rotation.

Last weekend I hit a bifecta (I know, that is not a word.)  I made two meals hubby absolutely loved.  I made the pork roast I posted on Monday and Bourbon Chicken on Sunday.  I took the Bourbon Chicken leftovers to work on Monday and never did get a picture.  This recipe is here and there around the net, but I first found it at Blog Chef.  I used chicken thighs and boned them myself.  That is what you get if you order this at most mall Food Courts.  I did dust the chicken with cornstarch before browning it.  Also, I used sherry in place of the apple juice as I did not want to open a big bottle which is all I had.  (note toe self:  pick up a six-pack of small cans of apple juice.)  The chicken was all everyone has said it was and was a nice change from sweet and sour.  I served this with fried rice.

Friday, February 3, 2012

Friday Finds

Since the Super Bowl is on Sunday, it seems everyone is thinking about snacks and recipes for Super Bowl parties.  So, If I was going to watch the Super Bowl, and If I was going to have a party, here are some links to recipes that I would make.

Accidentally Wonderful

This would be great for lunches as well as snacks.  Crescent rolls, string cheese, and pepperoni.  This idea has lots of possibilities.

I just recently subscribed to 4 Little Fergusons, and what a wonderful blog it is.  When I visited, I could barely tear myself away.  Tonya has many great recipes, period, but some are really great for a Super Bowl Party.  I could not pick just one, but I did settle for three.

Corn Dip
4 Little Fergusons

There are a number of Corn Dip recipes around, but I don't think there are any that are simpler than this:  Onion Dip, Mexicorn, and Rotel Tomatoes.  Can you get simpler than that?  Keep these three ingredients on hand, and you are ready for a party at any time.

Cheddar Bacon aka Crack Dip
4 Little Fergusons

Sour cream, cheese, bacon bits and Ranch dip mix.  Be still my heart.  No wonder this one's neckname is "Crack" dip.  This is another one that could be rustled up in a hurry if the ingredients are on hand.

Coyote Poo 
4 Little Fergusons

You know that I love recipes with unusual names.  How fun is this one?  This is essentially caramelized crunchy Cheetos.  We are not big on potato chips, but we do like our cheese snacks.  If there was a list of the top 10 Ultimate Junk Foods, this surely would be near the top.  Even so, I definitely have to try this one.

My favorite part of a chicken is the wing.  If I were having a Super Bowl Party, I would certainly have to serve wings.  Here are a couple of ideas I found that look just great.

The Noble Pig

Pocket Change Gourmet

I would also need some potato skins.

Pocket Change Gourmet

Last, but definitely not least, I would have to make this cake.

Mrs. Happy Homemaker

Of course, if I made all of the above, I would be too tired to enjoy a party and would probably just want to take a nap.  Have fun if you are going to watch the game and party.

The photos were taken by and are the property of the owners of the respective blogs represented.

I am sure that there will be many more great recipes links shared today at Friday Favorite Finds over at Finding Joy in My Kitchen.
Related Posts Plugin for WordPress, Blogger...