Image Map
Showing posts with label cocoa. Show all posts

Sunday, December 21, 2014

Velveeta Fudge-12 Days of Easy Sweets


When I was growing up, my mother always had a box of Velveeta in the fridge.  It was what our grilled “cheese” sandwiches were made from.  Mom also made Velveeta fudge at Christmas time.  In recent years, in my effort to try to eat more healthy, I have rarely purchased Velveeta.  Recently, however, I picked up a box to use in making Pork Sausage Meatloaf.  I had some left over and decided to make some fudge in memory of my mom.

This fits under the quick and easy recipe category that I like.  The Velveeta serves to make the fudge smooth and creamy.  There is no “cheesy” taste to the fudge, so no one will ever know that Velveeta is in there if they are not told.  I took a pan of this to work, and it was gone before my 4-hour shift was over.


Velveeta Fudge
1 c. (2 sticks ) butter, cut into 8 slices each
8 oz. pasteurized process cheese, Velveeta, cubed
1 1/2 lbs. confectioners’ sugar, about 5 c.unsifted.
1/2 c. unsweetened cocoa
1/2 c non-fat dry milk
2 t. vanilla extract
1 c. toasted, chopped walnuts or pecans

Place butter and Velveeta cubes in a large, heavy saucepan.  Place over medium-low heat and cook until butter and cheese are both melted, stirring frequently.  Meanwhile, measure and sift  confectioners’ sugar into a large mixing bowl.  Add cocoa and dry milk and mix well.  When butter and cheese are melted, remove saucepan from heat and add vanilla.  Mix well.  Stir in sugar/cocoa/dry milk mixture and mix until very well blended.  Add nuts and mix well.  Turn into a 9-inch square pan that has been lined with foil.  Chill in fridge until firm.  Cut into 1-inch squares.  Makes about 64 pieces.  Store tightly covered in refrigerator.


Friday, December 13, 2013

Chocolate Cherry Surprise Cookies-Christmas Cookie Recipe Swap

Again this year I am participating in the Christmas Cookie Recipe Swap hosted by the three great bloggers listed above.  In this swap you are matched with another person, then you exchange a cookie recipe, make cookies from the recipe and blog about it on a certain day.  Well, today is that day.

I was matched with Leena from Pink Cherub Moon.  I was very excited when I received her recipe.  Ever since I was a child, my favorite Christmas-time candy has been chocolate covered cherries.  I would wait patiently until the candy became available; and after I got them, I would ration them by eating only one a day so that they would last longer.  Well, Leena's recipe was for chocolate covered cherries in cookie form.  I could not wait to try them.

The cookies were very easy to make, although a bit more work than most cookies.  I did get only 39 cookies when I made them and not the 42-48 that the recipe said.  I may have rolled the balls a bit bigger than I needed to.

I would recommend not adding any additional cherry liquid to the frosting.  When I used the 4 t. of cherry liquid as listed in the recipe, the frosting was a bit harder to spread but the cookies came out like this.


When I added 2 additional t. cherry liquid the cookies came out like this.


I make homemade sweetened condensed milk and freeze it in 1/2 c. amounts to use in recipes such as this.  That way I do not need to try to figure out what I am going to do with the rest of a can of milk.  Instead of heating the chocolate pieces and milk together on the stove top, I put them in a 2-cup glass measuring cup and heated it in the microwave.  I heated the ingredients for 1 minute at 70 percent power, stirring it very well.  I then heated it in 10-second intervals, stirring each time.

Hubby loved these and said he would like the cookies even without the cherries in them.  I plan to include these in my Christmas cookie trays.  Thanks, Leena, for a great recipe.

I am reprinting the recipe as I received it from Leena.


 Chocolate Cherry Surprise Cookies
Makes 42-48 cookies.  Oven 350 degrees

Ingredients

1 (10 ounce) jar Maraschino Cherries
1/2 Cup butter or margarine
1 Cup sugar
1/4 teaspoon baking powder
1/4 teaspoon baking soda
1 egg
1 1/2 teaspoon vanilla
1/2 Cup unsweetened cocoa powder
1 1/2 Cups all-purpose flour
1 (6 ounce) package semisweet chocolate pieces
1/2 Cup sweetened condensed milk or low-fat sweetened condensed milk

Directions

Drain cherries, reserving juice.  Halve any large cherries.  In a medium mixing bowl, beat butter with an electric mixer on medium to high speed for 30 seconds.  Add the sugar, baking soda, baking powder and 1/4 teaspoon salt.  Beat until combined, scraping sides of the bowl.  Beat in egg and vanilla until combined.  Beat in cocoa powder and as much of the flour as you can.  Stir in remaining flour using a wooden spoon.  Shape dough into 1-inch balls.  Place balls about 2 inches apart on an ungreased cookie sheet.  Press your thumb into the center of each ball.  Place a cherry in each center. For frosting, in a small saucepan combine chocolate pieces and sweetened condensed milk.  Cook and stir over low heat until chocolate is melted.  Stir in 4 teaspoons of reserved cherry juice.  Spoon 1 teaspoon frosting over each cherry, spreading to cover (frosting may be thinned down with more juice if needed).  Bake in a 350-degree oven for 10 minutes or until edges are firm.  Cool 1 minute on cookie sheet before transferring to wire cooling racks and let cool.  Note:  do not use imitation chocolate pieces.

Wednesday, October 16, 2013

Butterfinger Peanut Butter Bars-12 Weeks of Christmas Treats


The recipe for week 4 of 12 Weeks of Christmas Treats, hosted by Brenda over at Meal Planning Magic, is one that I have been making for at least 40 years.  The original recipe came from a Better Homes and Gardens cookbook called “Homemade Cookies.”  These were a favorite of my children when they were growing up.  The book is taped together in places and food stained from all the years of using it.  A few years ago, I misplaced the cookbook and did not know what had happened to it.  Believe me, I was one happy gal when the book turned up.

The cookies have always reminded me a bit of Butterfinger candy bars, so some time back I decided to play that up and started sprinkling crushed Butterfinger bars over the top before the dough was baked.  This adds a nice little extra when you bite into a cookie.  I use 2 to 4 regular size Butterfinger bars, depending on my mood.

The cocoa frosting is one of my favorites.  It is easy to make and takes ingredients that I always have on hand.  It is much like the frosting that is on the chocolate bars (like maple bars) that you can get at grocery store bakeries.

The bars are sturdy enough to go well in a lunch box but elegant enough to add to a Christmas cookie tray.

The original recipe used shortening, but I have always used butter with no problem.  If not using unsalted butter, omit the salt.

Butterfinger Peanut Butter Bars
1/2 c. unsalted butter
1/2 c. peanut butter, creamy or crunchy
1.2 c. sugar
1/2 c. brown sugar, firmly packed
1/2 t. vanilla
1 egg
1/4 c. milk
1 c. all-purpose flour
1/2 t. soda
1/2 t. salt (omit if not using unsalted butter)
1 c. quick-cooking oats
2 to 4 regular size Butterfinger candy bars, crushed
2 c. sifted confectioner’s sugar
1/4 c. cocoa
3 T. melted butter
1/2 t. vanilla
2 to 3 T. hot water

Cream together butter, peanut butter, sugar and brown sugar until well blended.  Add vanilla, egg and milk; beat well.  Stir together flour, soda and salt.  Add to creamed mixture, mixing just until well blended.  Stir in oats.  Spread dough in a foil-lined and non-stick sprayed 9x13-inch pan.  Sprinkle crushed Butterfinger candy bars evenly over to the top of dough.  Bake at 350 degrees for 20 minutes.  Cool in pan on wire rack.  Measure sifted confectioner’s sugar into a small bowl.  Sift cocoa into sugar or put through a sieve with the back of a spoon.  Mix sugar  and cocoa together until well blended.  Combine melted butter, vanilla and 2 T. of the water.  Mix well.  Add to the sugar/cocoa mixture and beat until smooth.  If mixture seems a bit stiff, add an additional tablespoon of hot water.  Spread frosting evenly over the cooled pan of bars.  Let frosting set and cut into bars.  Makes about 36 bars.

 There is still plenty of time to join us and share some of your favorite Christmas Treats.  Just go to this post at Meal Planning Magic to sign up.  To see what other bloggers have created this week, check out the links below.

Show and Share Wednesday
Wow Me Wednesday at Polka Dots on Parade
Whimsy Wednesday
Wow Me Wednesday at Ginger Snap Crafts
Wake Up Wednesday
Cast Party Wednesday
Creative Muster Party
Whatever Goes Wednesday
Show and Share Party
Show Off Your Stuff Party
What I Whipped Up Wednesday
Your Whims Wednesday
Wednesday Whatits
Wonderful Wednesday


Wednesday, September 25, 2013

Graham Cracky Bars-12 Weeks of Christmas Treats


12 Weeks of Christmas Treats hosted by Brenda from Meal Planning Magic has come around for 2013, and I am so excited.  This is the third year that I have participated so my Christmas Treat recipe file is overflowing.  I can’t wait to add to it with this year's goodies.

If you read my blog or check out my recipe index, you will see that I love, love, love (did I say love!) bar cookies.  Why do I love bar cookies so much:  they are easy to make, and you only need to bake one pan thus saving on electricity; they can be “down home” or “uptown” depending on the recipe; you can freeze them without cutting them into bars, thaw and then cut them for fresh cookie taste.

Because I love bar cookies so much, I have decided that my 12 Christmas treats for 2013 will be bar cookies.  Each week I will share a different bar cookie recipe.  Some will be for 9x13-inch pans and some for 10x15-inch pans.  I hope that each of you finds one or two new favorites in the bunch.

This first bar cookie was adapted from a Pillsbury Bake-Off recipe that was submitted sometime in the first 18 years of the Bake-Off.  That would have been from the late 1940’s to the late 1960’s.  The recipe comes from Pillsbury”s Bake-Off Cookie Book.  My copy is well-used, missing its covers and half the index.

This is a cookie for the person who cannot make up their mind what they want.  Want a brownie, it’s in there; want a graham cracker, it’s in there, want a chocolate chip cookie, it’s in there.  No matter what you’re craving this cookie has you covered.

I used Hershey's Special Dark Cocoa for a deep chocolate flavor, but regular cocoa is OK.  I also used mini semi-sweet chocolate chips because I wanted chips in every bit, but regular chips are OK, too.

Graham Cracky Bars
1 3/4 c. all purpose flour
1/2 t. salt
1/4 t. baking soda
3/4 c. butter, softened
1 c. sugar
1/3 c. milk
2 eggs
1 t. vanilla
2 T. cocoa (I used Hershey’s Special Dark)
1 T. vegetable oil
3/4 c. chopped toasted pecans or walnuts
15 single graham crackers
1 c. mini semi-sweet chocolate chips (regular can be used instead)

In the bowl of an electric mixer, combine flour, salt, soda, butter, sugar, milk, eggs and vanilla.  Mix at medium speed until well blended.  Remove half of the dough to a medium mixing bowl.  Mix together the cocoa and the vegetable oil.  Add to the dough in the mixer bowl and mix at medium speed until cocoa mixture is well blended in.  Stir in pecans or walnuts by hand and spread chocolate mixture evenly in the bottom of a foil-lined and greased 9x13-inch pan.  Arrange the graham crackers over the chocolate dough.  Add the chocolate chips to the dough in the medium bowl and mix until well blended.  Drop dough by tablespoons over the crackers and spread carefully and evenly to cover.  It may help to use a metal spatula that has been dipped in water to do this.  Bake at 350 degrees for 25 to 30 minutes.  Do not overbake.  Cool and cut into bars.  Makes about 36 bars.


To see the other treats that fellow bloggers have shared this week, check out the links below.  If you would like to join us for the next 11 weeks or whenever you can, the information about joining the fun is here.

Linking to these great parties:

Thursday, August 15, 2013

Chocolate and Vanilla Waffle Cookies-Improv Challenge

I am back with my post for the other challenge I participate in.  The ingredients Kristen, from Frugal Antics of a Harried Homemaker, chose for this month's Improv Challenge were chocolate and vanilla.

There is chocolate and vanilla in many recipes, but I decided that I would play the combination up a bit by adapting a Chocolate Waffle Cookie recipe to be a two-tone cookie with one side being vanilla flavored.  Although the baking process is a bit time-consuming, waffle cookies are a great treat to make in the summer time when it is hot, and you don't want to use the oven.  Waffle cookies make a more cookie-like cookie than many no-bake recipes.  These cookies are soft and cake-like.  My waffle iron makes 4 cookies at a time.  If you have a family-size waffle iron, you can probably make 8 at a time.

Chocolate and Vanilla Waffle Cookies
1 c. sugar
2/3 c. butter, softened
2 eggs, at room temperature
2 t. vanilla, divided
1 1/2 c. flour plus 3 T.
1/4 t. baking powder
1/4 t. salt
1/2 c. milk
3 T cocoa powder
1/2 c. chopped nuts (optional)
1 c. sifted powdered sugar
3 T. water or milk

In large mixing bowl, combine sugar and butter and beat until creamy.  Add egg and vanilla and beat well.  Combine flour, baking powder and salt.  Add 1/3 of the flour mixture to sugar/egg mixture mix well.  Add 1/2 of the milk and beat well.  Continue adding flour mixture and milk in this manner ending with the flour mixture.  Divide dough, placing half of it in a small mixing bowl.  Add cocoa powder to one of the bowls of dough mixing until well blended.  Add 1 t.vanilla and the 3 T. flour to the other half of the dough and mix well.  Add chopped nuts, if using, dividing them evenly between dough halves.  Heat waffle iron according to the manufacturer’s instructions.  Drop a teaspoon of chocolate dough into two opposite corners of each waffle grid.  Drop a teaspoon of white dough next to the chocolate dough.  Close lid and cook until the waffle iron indicates cookies are done.  Gently remove the cookies with a fork and transfer to a wire rack to cool.  Combine powdered sugar and water to make a smooth glaze.  Brush glaze over the cookies.  Let set.  Transfer to a zip-top bag to store.  Makes about 3 dozen.

September's Improv ingredients are pasta and cheese.  If you would like to join in the fun, you can find all the details on Kristen's Improv Page.

To see what other bloggers have made with chocolate and vanilla, check out the links below.

Linking to these great parties:
Friday Flair
Freaking Awesome Friday
Strut Your Stuff
Weekend Potluck
Weekend Bloggy Reading
I'm Lovin' It
Link Party Palooza
Saturday Spotlight
Share Your Creativity
Party Junk


Wednesday, August 7, 2013

Basic Cake with Variations

Basic Cake with Variations is a handy recipe to use if you don’t have time to make Homemade Cake Mix and you don’t want to use a commercial mix.  With all the mixing done with an electric mixer, the cake is quick and easy to prepare.

Beside a yellow cake, a white cake, chocolate cake, spice cake and pineapple upside-down cake can be made with this recipe.  The spice cake can be personalized by using your favorite combination of spices.  I am sharing two combinations to start with.  Personally I like to use Chinese 5-Spice to make a spice cake.

Slicing the softened butter into the mixing bowl will make it easier to blend until smooth.

Basic Cake with Variations
3 c. all-purpose flour
1 1/2 c. sugar
1 T. baking powder
1 1/2 c. milk
1.2 c. butter or margarine, softened
1 1/2 t. vanilla
2 eggs

In the bowl of an electric mixer combine flour, sugar and baking powder.  Add milk, butter and vanilla.  Beat with mixer on low speed until well combined.  Beat on high speed for 2 minutes.  Add eggs and beat 2 minutes more.  Pour into a greased and floured 9x13-inch baking pan.  Bake in a 375-degree oven 25 to 30 minutes or till a toothpick inserted near the center comes out clean.  Cool thoroughly on wire rack.  Frost as desired or use as a base for other desserts.  Serves 15.

White Cake: Prepare as for the basic cake recipe except use 3 egg whites for the 2 whole eggs. Whites may be beaten separately and added for a lighter cake.

Chocolate Cake: Add 1/4 c cocoa powder to the  flour mixture.

Spice Add 1 tsp. cinnamon, 1/4 tsp. ground cloves, and 1/4 tsp. ground allspice to the flour mixture OR 1 t. ground cinnamon, 1/4 t. ground nutmeg, 1/4 t. ground cloves, and 1/4 t. ground ginger to the flour mixture OR 1 t. Chinese 5-spice powder.

Pineapple Upside down cake: Melt 1/2 butter in the bottom of a 9X13 pan. Add 2/3 cup brown sugar, stirring into the  butter. Arrange well-drained pineapple slices from a 20-oz. can on the butter/brown sugar mixture.  (Save any leftover slices and juices for another use.)  Spread batter for yellow cake over the pineapple slices.  Bake 30-35 minutes.  Invert to serve.

Linking to these great parties:
Show and Share Wednesday
Cast Party Wednesday
What's Cookin' Wednesday
What's In Your Kitchen Wednesday
Whimsy Wednesday
Create and Share
Wicked Good Wednesday

Saturday, July 27, 2013

Spiced Chocolate Zucchini Bars-Saturday Sweet

I may have mentioned in an earlier post, that last fall one of my daughters and her family moved from 50 miles away to just 5 or 6 miles down the highway from us.  She put in a garden and is sharing her bounty with us.  She planted zucchini so you all know what that means.  I am sure that there will be a number of zucchini recipes here on the blog in the next few weeks.

I thought that I would start off with a recipe for a sweet, Spiced Chocolate Zucchini Bars.  Unlike most recipes, this one calls for chopped and not shredded zucchini.  If you want it totally hidden, it can be peeled.  I never bother with peeling it myself.  Although I use buttermilk, this is one instance where the 1/2 t. lemon juice or vinegar to 1/2 c. milk works fine.  I top the bars with a simple chocolate glaze.

This an adaptation of a recipe from The Zucchini Cookbook by Paula Simmons, 1974.  This is a cookbook that belonged to my mother.

Spiced Chocolate Zucchini Bars
adapted from The Zucchini Cookbook by Paula Simmons, 1974
1/2 c. butter softened
1/2 c. vegetable oil
1 3/4 c. sugar
2 eggs at room temperature
1 t. vanilla
1/2 c. buttermilk
2 1/2 c. unsifted flour
1/4 c. cocoa
1/2 t. baking powder
1 t. baking soda
1/2 t. cinnamon
1/2 t. cloves
1/2 t. salt
2 c. finely diced zucchini
1/4 c. butter, melted
1 c. sifted confectioner’s sugar
1 T. cocoa
1 t. vanilla
1-2 T. hot water

Cream butter, vegetable oil and sugar in a large mixing bowl until well blended.  Beat in egg, vanilla and buttermilk.  In a small bowl combine flour, cocoa, baking powder, baking soda, cinnamon, cloves and salt.  Add to sugar mixture and stir until well blended.  Stir in diced zucchini.  Spoon batter into a greased and floured 9x13-inch baking pan.  Bake at 325 degrees for 40 to 45 minutes.  Remove from oven and place pan on a wire rack to cool.  When cool, combine butter, confectioner’s sugar, cocoa and vanilla until well blended.  Stir in enough hot water to make a glaze consistency.  Spread evenly over the top of cooled bars.  Let glaze set up, then cut into bars.  Makes about 36 bars

 Do you have a favorite sweet recipe that uses zucchini as an ingredient?

Linking up to these great parties:
Weekend Potluck
Share Your Creativity
Weekend Bloggy Reading
Saturday Spotlight
Strut Your Stuff
I'm Lovin' It
Sugar and Slice Sunday 
What'd You Do This Weekend


Thursday, June 13, 2013

Double Berry Giant Éclair-Dessert Challenge


The two ingredients for this Month’s Dessert Challenge, hosted by Sheryl over at Lady Behind the Curtain, were raspberries and strawberries.

After thinking about it for some time, I decided that I wanted to make a giant éclair and put the raspberries and strawberries in the filling.  I also wanted to make a dish that could be easily adapted to low or no sugar so that I could serve it to people with diabetes.  By using sugar-free pudding mix, sugar-free whipped topping, and substituting sugar-free chocolate syrup for the glaze, this can be
done.

There is some challenge to splitting the baked éclair base in half, so don’t worry if you get a hole or two.  An easier alternative is to just spread the filling on top of the éclair base and drizzle some chocolate ice cream topping over the filling.

This dessert needs to chill, but it keeps well for several days, so it makes a great make-ahead dessert for a get-together or party.

Double Berry Giant Éclair
1 c. water
1/2 c. (1 stick) butter or margarine
1 c. flour
4 eggs
1 t. vanilla

Bring water and butter or margarine to a boil.  Lower heat and add the flour, stirring until the mixture is smooth and leaves the sides of the pan to form a soft ball.  Remove from heat and allow to cool slightly.  Beat in eggs, one at a time until each one is very well blended in.  Add vanilla with the last egg.  Line a 10x15-inch jelly roll pan with aluminum foil.  Spread dough out to about a 8x12-inch rectangle.  Place in a 400 degree oven and bake for 30 minutes or until lightly browned.  Remove from oven and carefully flip the éclair  base over.  Bake an additional 10 minutes.  Remove from oven and allow to cool completely.  With a sharp knife slit the éclair base all the way around.  Working from the outside edge in, continue slicing until the éclair base is cut in half.  Carefully remove the top half to a baking sheet until needed.  Prepare filling:

1 small pkg. cheesecake flavor instant pudding, regular or sugar-free (vanilla or white chocolate can also be used)
1 c. milk
half of an 8-oz. carton frozen whipped topping, thawed, regular, lite, or sugar-free
1 (6 oz.) container fresh raspberries
2 c. sliced fresh strawberries, cut in half horizontally if large

Combine milk and pudding in a medium mixing bowl and beat with a whisk for 2 minutes.  Add whipped topping and mix until very well blended.  Fold in raspberries and strawberries gently to avoid crushing raspberries.  Spread filling evenly over the éclair base.  Top with the other half of the éclair base.  Spread with the chocolate glaze:

1/4 c. milk
1/4 c. unsweetened cocoa powder
3/4 c. sugar
2 T. butter
1 t. vanilla

In a saucepan combine milk, cocoa powder and sugar and mix well.  Place over medium-high heat and bring to a full-rolling boil, stirring constantly.  Boil 1 minutes.  Remove from heat; add butter and vanilla.  Mix well and allow to cool slightly.  Spread over top of éclair.  Place in refrigerator to chill.  Cut into squares to serve.  Garnish with additional raspberries and strawberries if desired.  Makes about 15 servings. 

To see what other bloggers have dreamed up with raspberries and strawberries check out the links below.  If you are interested in joining in the fun, visit Sheryl's Dessert Challenge Page.

Linking to these great parties:

Saturday, May 25, 2013

Chocolate Sugar Crisps-Saturday Sweets

I though that today, I would take a break from posting recipes using rhubarb, and share something chocolate.  I made cookies, of course.

I have always liked the texture of cookies made with a butter/vegetable oil and granulated/powdered sugar combination in the ingredients, so I was glad to run across this chocolate version.

I have adapted it from a recipe I found in one of those little cookbooks found at checkout in the grocery store.  This one was called, “Chocolate Lovers Cookies & Brownies” from 1989.

Since the cookie needs to chill at least  30 minutes but can refrigerated up to a week, this is a good dough to make ahead.

Chocolate Sugar Crisps
1/2 c. butter or margarine softened
1/2 c. vegetable oil
1/2 c. powdered sugar
1/2 c. granulated sugar
1 egg
1 t. vanilla
2 c. all-purpose flour
1/4 c. unsweetened cocoa
1/2 t. baking soda
1/2 t. cream of tartar
1/4 t. salt
1/2 c. finely chopped pecans
granulated sugar

Cream butter, oil, powdered sugar, granulated sugar, egg and vanilla in a large mixing bowl until light and fluffy.  Combine flour, cocoa, baking soda, cream of tartar and salt in a small bowl.  Mix together well.  Add to creamed mixture, stirring until dough is smooth.  Stir in pecans until well blended.  Cover and chill at least 30 minutes.  Shape dough into balls the size of marbles and place 2-inches apart on a parchment-lined baking sheet.  Flatten cookie balls with bottom of a glass dipped in granulated sugar.  Bake at 350 about 10 minutes or until firm.  Remove to wire racks to cool.  Makes about 5 dozen.

Linking to:
Weekend Potluck
Party Junk
Weekend Bloggy Reading
Share Your Creativity
Strut Your Stuff
I'm Lovin' It
What'd You Do This Weekend

Thursday, December 20, 2012

Chocolate Graham Marshmallow Drops


This is my favorite no-bake cookie/candy/confection whatever you want to call it.  I must confess that I posted the non-chocolate version last year as part of 12 Weeks of Christmas Treats 2011.

In that post I said to make a chocolate version simply use chocolate graham crackers.  That certainly works.  However chocolate graham crackers are not that easy to find in my area any more; and if found, are usually the brand names ones which are more expensive.

When chocolate and marshmallows were the ingredients for December’s Improv Challenge, hosted by Kristen from Frugal Antics of a Harried Homemaker, I decided to develop a chocolate version using regular graham crackers and cocoa.  So today, I present Chocolate Graham Marshmallow Drops.

As I said in my original post the recipe came from Better Homes and Gardens magazine many, many years ago, and I have never seen it anyway else since.

I takes about six double graham crackers to make the 1 1/4 cups.  Be sure that the eggs are at room temperature.  Place them in a bowl of warm water for 10-15 minutes if you did not remember to remove them from the refrigerator.

Chocolate Graham Marshmallow Drops
adapted from Better Homes and Gardens magazine
1/2 c. butter or margarine
1 c. sugar
2 T. cocoa
2 well beaten eggs
1 t. vanilla
1 1/4 c. graham cracker crumbs
2 c. mini Marshmallows
1/2 c. chopped walnuts
1/2 c. flaked coconut

In heavy saucepan, melt butter.  Stir in sugar and cocoa and mix until well combines.  Remove from heat.  Add well beaten eggs slowly, stirring constantly.      Return to heat; cook and stir over medium heat till mixture is thickened and bubbly.  Remove from heat; let stand 25 minutes at room temperature, stirring once or twice.  Add vanilla and stir.  Add graham cracker crumbs and mix well.  Blend in marshmallows, nuts, and coconut.  Drop from teaspoon onto waxed paper.  Let set.  Makes 3 1/2 doz.

January's Improv Challenge is bananas and nutmeg.  If you would like to join in next year for this fun link up, you can get all the details on Kristen's Improve Page.  You are not committed to participate every month.

Linking to Improv Challenge


Saturday, December 8, 2012

Holiday Cookie Mix Brownies


Although I have posted my favorite homemade brownie mix in the past, it is nice to be able to make brownies from the Holiday Cookie Mix.  That is this week's Saturday sweet.

There are cake-like, rather milk chocolate flavored bars, made crunchy with chopped walnuts.  The recipe makes 16 to 20 brownies which can be dressed up with frosting if desired.

Other recipes using the Holiday Cookie Mix have been posted on Thursdays since September 27 as part of 12 Weeks of Christmas Treats.

 Holiday Cookie Mix Brownies
3 c. Holiday Cookie Mix
1/4 c. cocoa
2 eggs, at room temperature
2 T. water
2 t. vanilla
1/2 c. chopped, toasted walnuts

Measure cookie mix into a large mixing bowl.  Add cocoa and mix until well blended.  Break eggs into a small bowl and beat well.  Add water and vanilla.  Stir and add to cookie mix.  Stir until all of mix is moistened.  Add the walnuts and stir.  Mixture will be somewhat stiff.  Turn batter into a greased 8 or 9-inch square baking pan.  Bake at 350 degrees 30 minutes.  Place pan on rack to cool.  Cut into 16 or 20 bars.  Store tightly covered to prevent the brownies from drying out.

Linking to these great parties:
Weekend Potluck
I'm Lovin' It
Seasonal Inspirations
Weekend Bloggy Reading
Saturday Nite Special

Saturday, November 24, 2012

Cocodoodles


Some people like chocolate, some people like Snickerdoodles.  Today’s Saturday sweet is a cookie for those people who like both.  A chocolate cookie rolled in cinnamon sugar.

The dough needs to chill for at least one hour, but can be kept chilled several days, so it can be made ahead and baked later.  This makes it a convenient cookie to make at holiday time.

Cocodoodles
3/4 c.  butter, softened
1 1/3 c. sugar
1 egg
2 T. milk
1 t. vanilla
1 3/4 c. flour
1/4 c. cocoa
1/2 t. baking powder
1/4 c. sugar
1 t. cinnamon

Cream together butter and sugar until fluffy.  Break egg into a small bowl.  Add milk and vanilla and mix well.  Add to butter/sugar mixture.  Combine flour, cocoa and baking powder.  Mix well.  Add to liquid mixture.  Stir until well blended.  Dough will be somewhat stiff.  Cover and chill 1 hour.  (Dough can be placed in a zip top bag and chilled several days.)  Combine sugar and cinnamon in a small bowl shallow bowl and mix well.  Shape dough into 1-inch balls.  Roll bowls in the cinnamon/sugar mixture.  Place balls on a parchment-lined baking sheet.  Flatten with a glass that has been dipped in the cinnamon/sugar mixture.  Bake at 375 degrees for about 10 minutes.  Let stand on cookie sheet 1 minute before removing to rack to cool.  Makes about 3 dozen.

Linking to these great parties:
Seasonal Inspiration
Strut Your Stuff
Saturday Nite Special
Weekend Bloggy Reading
Ingredient Spotlight

Saturday, October 13, 2012

Chocolate Cottage Bars

If you read this blog regularly you know that I a participating in 12 Weeks of Christmas Treats hosted by Brenda over at Meal Planning Magic.

This year I decided to do something a little different and share a wonderful homemade cookie mix and all the different cookie variations that can be made from it.  Since there are more than 12 cookie variations that can be made from this mix, I cannot get them all included in the blog party.  I have decided to post the rest of them here for Saturday Sweets.

I am going to repost the basic recipe today with a recipe for Chocolate Cottage Bars.  These have the unusual ingredient of cottage cheese in them.  They make a not-too-sweet, great after-school snack.

Since I love nuts, I always add them when I can.  Other optional ingredients that can be added to the bars are:  1/2 c. shredded carrots,  1/2 c. diced zucchini, 1/4 c. wheat germ, 1/2 c. chopped candied cherries, 1/2 c. miniature marshmallows.  One or more of these may be added as desired.

Holiday Cookie Mix
8 c. flour
2 c. white sugar
2 1/2 c. brown sugar
2 t. salt
4 t. baking powder
1 1/2 t. baking soda
3 c. shortening or butter
In a very large bowl, combine flour, white sugar, brown sugar, salt, baking powder and baking soda.  Mix until thoroughly blended.  Cut in shortening or butter until mixture looks like coarse cornmeal.  Transfer to zip top bag or bags or a tightly covered container.  Store in the refrigerator if using butter.  Makes about 12 cups mix.

 Chocolate Cottage Bars
3 c. Holiday Cookie Mix
1/2 c. quick oats
1/4 c. cocoa
2 eggs
2 T. water
2 t. vanilla
1 c. cottage cheese
1/2 c. chopped, toasted nuts (I used walnuts)

Combine mix, oats and cocoa and mix well.  Combine eggs, water and vanilla.  Stir in to mix/oat mixture and blend well.  Stir in cottage cheese and nuts until well blended.  Mixture will be stiff.  Turn into a foil-lined 9x13-inch baking pan.  Pat out evenly with wet hands.  Bake at 375 degrees for 20-25 minutes.  Cool and cut into bars.  Store tightly covered to  keep soft.  Makes about 32 bars.


Saturday, September 1, 2012

Frozen Chocolate Coconut Almond Joy

Here is another sweet recipe for a Saturday.  When I received my Foodie Penpal package this month, I received a package of these cookies.

IMG_3431-1

I did not even know that coconut Oreos were available.  Well, I ate a few, and they were very good.  So good I decided that I wanted to make a dessert with some of them.  Chocolate and almonds always go well with coconut so I created this.

IMG_3536-1 

I used the cookies to make the bottom crust, then added a layer of cream cheese, powdered sugar, whipped topping and coconut.  I topped this layer with sliced almonds and then put chocolate no-machine ice cream on the top.  Tried this on hubby, and he approved.

Although this is a very easy recipe, there is chilling time involved, and it must be made ahead.

You won’t need the entire package of the cookies, so feel free to eat the excess.

Frozen Chocolate Coconut Almond Joy
1 pkg. Coconut Oreos (make 1 3/4 c. cookie crumbs)
1/4 c. butter, melted
1 pkg. (8 oz.) cream cheese, softened (I use 1/3 less fat)
1 c. powdered sugar, sifted
2 c. frozen whipped topping, thawed
1 to 2 t. coconut extract (optional, but I use it)
3/4 c. sweetened flaked coconut, toasted in oven until moisture has evaporated (watch carefully)
3/4 c. sliced almonds
2 c. whipping cream
1 can (14 oz.) sweetened condensed milk (can be fat free and you can make your own.
2 to 3 T. cocoa, depending on how chocolatey you like your ice cream

Combine crushed cookies and melted butter until well blended.  Press into the bottom of a 9x13-inch pan.  Chill 30 minutes.  Combine softened cream cheese and powdered sugar until well blended.  Fold in whipped topping.  Stir in coconut extract and coconut.  Spread cream cheese mixture on top of chilled cookie crust.  Sprinkle sliced almonds over the cream cheese mixture.  Press almonds into cream cheese mixture carefully with your hand.  Chill at least 30 minutes.  Whip cream with an electric mixer until stiff peaks form.  In another bowl combine sweetened condensed milk and cocoa until well blended.  Fold whipped cream into condensed milk mixture.  Spread whipped cream mixture over cream cheese mixture.  Cover and place in freezer at least 6 hours before serving.  This is very rich and will serve at least 12 to 15 people.  Enjoy.

Linking to Weekend Potluck
Sweets for a Saturday
Strut Your Stuff Saturday
Weekend Bloggy Reading
I'm Lovin' It Party
Busy Monday

Tuesday, February 7, 2012

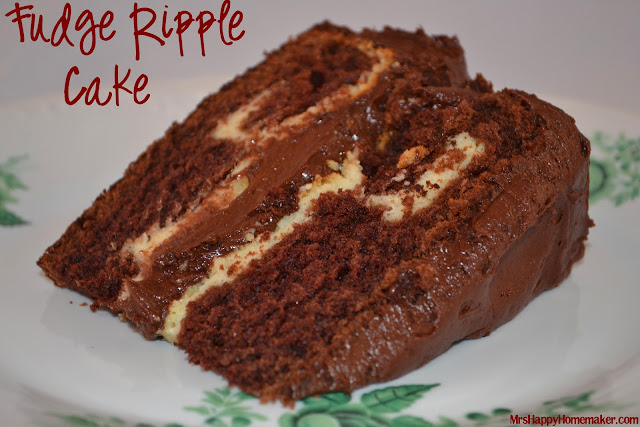
Crazy Cooking Challenge-Fudge Ripple Cake

Photobucket


When I saw this cake at Mrs. Happy Homemaker, I knew that I had to make it.  Her cake looked wonderful and delicious.  I had only one problem (I thought), and that was that I did not have any layer cake pans.  I never make layer cakes and long ago disposed of my pans.  Nevertheless, I knew that I would forge on.  Thus begins the Saga of the Fudge Ripple Cake.

I gathered my ingredients and stirred up the cake.  I use Saco Cultured Buttermilk Blend so  I used that instead of liquid buttermilk.  I decided to use butter instead of the shortening that was used in the original recipe.  I lined a 9x13-inch pan with foil so that I could remove the cake from the pan easily.

Next I stirred up the cream cheese/sweetened condensed milk topping.  I make my own homemade sweetened condensed milk so I had made up a batch of that.  I poured the mixture over the cake batter and baked the cake.  When I took the cake from the oven I noticed that the top did not look like the pictures in Mrs. Happy Homemaker’s post.  It didn’t seem like a problem.

Since I was going to lose daylight to take pictures, I let the cake set overnight before I made the frosting.  The next day I made up the frosting.  I had only 1 cup of cocoa so used that instead of the 1 1/3 cups cocoa asked for.  The frosting was plenty chocolaty enough for me, but use the 1 1/3 cups if you are really into chocolate.

I removed the cake from the pan and put it in a jelly-roll pan to frost as I have nothing in which to store a rectangular cake that is not left in the pan.  Being far from a cake decorator, I did my best to apply the frosting.  I did have frosting left over which I froze to use another time.

IMG_2248-1

I cut my cake through the middle anxious to see the ripple.  Oh, my!  There were no ripples.  What there was, was a layer of cream cheese underneath the cake.  So what happened?  Well, perhaps two things.  When I made the homemade sweetened condensed milk, I almost burned it.  Since I wasn’t sure that I would be able to use that batch, I poured the whole batch into a plastic container instead of dividing it up like I always did in the past.  The milk may not have thickened up as much as it should have before I used it.  I used low-fat cream cheese.  Maybe I should have used the regular.  I may have forgotten the cornstarch.  At any rate, this is what the bottom of my cake looked like.

IMG_2273-1

Was all lost?  Of course not.  The cake is a moist chocolaty cake just the way I like it.  The frosting is firm and fudgy and stays in place.  And the cream cheese layer is a little surprise at the bottom.  In spite of what happened, this is a very good cake

 IMG_2267-1

So make this cake.  Ripple or no ripples you will be glad you did.  I am giving you the exact ingredients  Mrs. Happy Homemaker did.

Fudge Ripple Cake
Mrs. Happy Homemaker blog

For the cake:
1/2 cup shortening
1.5 cups sugar
2 large eggs
1 2/3 cups all-purpose flour
2/3 cup cocoa
1.5 teaspoon baking soda
1.5 cups buttermilk

For the Ripple:
1 (8 oz.) package cream cheese, softened
2 tablespoons butter, softened
1 tablespoon cornstarch
1 (14 oz.) can sweetened condensed milk
1 large egg
2 teaspoons vanilla extract

For the Frosting:
2/3 cup butter, softened
5 3/4 cups powdered sugar (I did put it through a sieve)
1 1/3 cups cocoa
1 heaping cup heavy cream

Grease and flour two (9-inch) round cake pans.  Beat shortening and sugar together with an electric mixer.  Add the eggs, beating on medium speed.  Combine flour, cocoa, baking soda and salt.  Add the flour mixture alternately with the buttermilk ending with the flour mixture.  Beat 3 minutes at high speed, stopping once to scrape down sides.  Stir in the vanilla.  Pour the batter into the prepared pans.

Beat cream cheese, 2 tablespoons butter, and cornstarch at medium speed until creamy.  Gradually add the sweetened condensed milk, beating well.  Mix in egg and vanilla.  Divide the cream cheese mixture between the two cake pans, pouring on top and spreading to evenly cover the cake batter.

Bake at 350 degrees for 40 minutes, or until a toothpick inserted in the center comes out clean.  After removing from the oven, use a large spatula or wide knife to press the cake down somewhat.  Cool in pans on wire racks for 10 minutes; remove from pans and cool completely on wire racks.

Using an electric mixer, beat 2/3 cup butter until creamy.  Add the powdered sugar, cocoa and heavy cream.  Stir in low until combined.  Beat at high speed until creamy.  Spread frosting between the cake layers and on top and sides of cake.  Slice.  Enjoy.  Repeat.

Since I did not get any ripples in my cake, I decided to make Chocolate Ripple No-Machine Ice Cream to serve with the cake.  I will be back with that post later today.

Be sure to check out the links below to see all the great chocolate cakes that other bloggers have made.

Monday, February 6, 2012

Nutella Raspberry Meringue Bars

Good Monday morning to all. Thanks for taking the time out of your busy lives to stop and read this blog. A warm welcome to my new followers. I am so glad that you are here. I hope that you find the information posted here useful.

When I was thinking about making something with Nutella, I thought of some things I liked: Nutella, of course; raspberries certainly; hazelnuts, sure.  So, with a nod to World Nutella Day,  which was Sunday, I offer up Nutella Raspberry Meringue Bars. This is a somewhat shortcake-like base with a layer of Nutella, covered with a layer of raspberry jam, and topped with hazelnuts in meringue.

This recipe uses eggs that are separated with the whites then being beaten. Eggs separate easier if they are cold, so separate the eggs and let the yolks and whites come to warm temperature. This takes about 30 minutes. If you are in a hurry, the containers that the eggs are in can be set in some warm water.

Before I get to the recipe, I want to say a few words in praise of the off-set spatula.  If you do not have one of these handy little gadgets, spend a few dollars and buy one. They will change your life in the kitchen.  This one is about a 4-inch size which I find so handy I don’t know what I would do without it. It was a very important tool in make these cookies. An off-set spatula gives you control that you cannot get with a regular metal or rubber spatula.

Now, on to the cookie recipe.

Nutella Raspberry Meringue Bars
2 eggs, separated and brought to room temperature
1 1/2 c. all-purpose flour
3/4 c. firmly packed brown sugar
1/2 c. butter, softened
3/4 c. Nutella (or more if desired)
1 c. raspberry jam (or more if desired)
1/8 t. cream of tartar
2/3 c. sugar
2 T. all-purpose flour
1/2 t. vanilla
1/2 c. chopped hazelnuts, toasted

In a large bowl combine flour and brown sugar. With a pastry blender, cut in butter until mixture resembles fine crumbs. Add egg yolks and continue cutting in until mixture again resembles fine crumbs. Press mixture into the bottom of an ungreased 9x13-inch pan. Bake at 350 degrees 15 minutes until lightly browned.  Remove from oven and let stand 10 minutes.

Turn measured-out Nutella into the center of the baked crust. As Nutella softens and melts spread with offset spatula from the center to the edges of the baked base. Let stand 10 minutes.

Measure jam into a glass measuring cup. Place in microwave and microwave 15-30 seconds to soften jam slightly. Stir. Turn out into the center of the Nutella topped base and spread with an off-set spatula from the center to the edges of the Nutella covered base.

While the base is cooling, beat egg whites and cream of tartar with an electric mixer until soft mounds form.  Gradually add sugar, beating until stiff peaks form. Gently fold in flour, vanilla, and hazelnuts. Spread meringue on top of jam layer. Return to oven and bake 10-15 minutes more until meringue is light brown.  Remove from oven and cool on wire rack. Cut into squares with a wet knife. These are very rich so you may want to cut them small. Makes about 36.


Monday, November 28, 2011

DIY Groceries-Homemade Brownie Mix

Good Monday and Welcome to my new followers.  I want to thank everyone who takes time out of your busy life to read this  blog.  I hope that the information that is posted here is helpful to you.  Have a great week.

Last week I said that I was putting theme posting days on hiatus, and that is true.  I did, however, want to get these Homemade Brownie Mix recipes up before the holidays.  Even though brownie mix is one of the most heavily promoted groceries products and can often be purchased for around $1.00, it is just as cheap or cheaper to make you own.  Additionally, homemade mix does not have any of the additives and preservatives of the commercial kind.  A batch of homemade brownie mix or any other homemade mix makes a nice gift for a busy mom.  Tie it up with a pretty bow and include any nonperishable ingredients needed to make up the brownies.

I have Brownie Mix recipes from several different sources.  The only difference between the recipes is in the amount of flour and cocoa used.  I am going to post three recipes with the varying amounts.


Brownie Mix from "The Thrifty Cook" 1974
8 c. sugar
4 c. flour
2 1/2 c. unsweetened cocoa powder
4 t. baking powder
4 t. salt
2 c. vegetable shortening


Brownie Mix from "Make Your Own Groceries" 1979
8 c. sugar
4 c. flour
2 2/3 c. unsweetened cocoa powder
4 t. baking powder
4 t. salt
2 c. vegetable shortening

Brownie Mix from "Make a Mix Cookery" 1978
8 c. sugar
6 c. flour
1 (8 oz.) can unsweetened cocoa (about 3 1/2 cups)
4 t. baking powder
4 t. salt
2 c. vegetable shortening

For all recipes, combine dry ingredient in a large bowl and mix well.  With a pastry blender or two knives, cut in shortening until mixture looks like chocolate corn meal.  Place in a large airtight container.  Label and store in a cool, dry place.  Makes about 16 to 17 cups Brownie Mix.  Use within 4 months.

Brownies
2 c. Brownie Mix
2 eggs, beaten
1 t. vanilla
1/2 c. chopped nuts

Place Brownie Mix in a large bowl.  Beat eggs and add vanilla.  Blend into Brownie Mix combining well.  Mixture will not be smooth.  Stir in nuts.  Spread in greased and floured 8-inch square pan.  Bake at 350 degrees 20 to 25 minutes, until slight imprint remains when lightly touch with finger.  Cool in pan set on rack for 10 minutes or cool completely in pan.  Cut into 2-inch squares.  Makes 16.

Rich Brownies:  Add 1/4 c. melted and cooled butter or margarine to eggs.  Mix well and stir into Brownie Mix.  From "Make Your Own Groceries"

Coconut-Pecan Brownies:  In a small saucepan, combine 1/3 c. sugar, 1/3 c. evaporated milk, 1 beaten egg yolk and 3 T. butter or margarine.  Cook over medium heat about 5 minutes, stirring constantly, until mixture comes to a boil.  Remove from heat and stir in 1/4 t. vanilla, 2/3 c. flaked coconut and 1/2 c. chopped pecans.  Cool 10 minutes.  Spread on cooled brownies.  From "Make a Mix Cookery"

Quick Brownie Cake
3 eggs, separated
3 T. milk
1 t. vanilla
2 c. Brownie Mix

Beat egg yolks; stir in milk, vanilla and Brownie Mix.  Beat egg whites until stiff and fold into batter.  Spread in greased and waxed-paper lined 8-inch square pan.  Bake at 350 degrees 35 minutes.  Cool on rack.  Cut in square and spoon Fudge Sauce over cake.  Makes 6 to 8 servings.  From "The Thrifty Cook"

Fudge Sauce
1 c. Brownie Mix
1/2 c. water

Blend Brownie Mix and water in saucepan.  Cook over medium heat, stirring constantly, until mixture reaches a full boil.  Reduce heat.  Cover and simmer until sauce is thick and smooth.  From "The Thrifty Cook"

Next week I will post additional recipes that can be made with Brownie Mix as a base.

Linking to:  Melt in Your Mouth Monday
Must Try Monday
On the Menu Monday
Mangia Monday
Made by You Monday
Ingredient Spotlight

Thursday, November 3, 2011

12 Weeks of Christmas Cookies-Chocolate Bar Cookies

Note:  for those of you who may have read about my mother being hospitalized in my Tuesday post, I am happy to report that she was released Wednesday.  I appreciate your thoughts and any prayers you may have said on her behalf.  Now, onto the business at hand today.

I cannot believe that we are at the half-way point of 12 Weeks of Christmas Cookies and Sweets. Time has certainly flown.  I look at my list of things I wanted to post and find I have more than 6 left; so there will have to be some goodie posts outside of the blog hop, I think.  Brenda at Meal Planning Magic continues to do a great job of hosting this blog hop.  It is not too late to join in the fun, just head on over an get the details. 

IMG_1622-1

I clipped this recipe from Sunset magazine many years ago.  It has become a favorite and is one of my “go-to” recipes when I need a quick, simple but impressive cookie.

These are thin bars with a light chocolate flavor, a texture somewhat like shortbread and toasted nuts on the top.  They are a very additive cookie.  I don’t make them as often as I did when my children were growing up for that exact reason.

Any kind of toasted nuts can be used in this, even chopped, dry roasted peanuts.  Because the nuts are on the top of the cookies, a half cup goes a long way.  Even though they do take a half pound of butter, these are a somewhat inexpensive cookie to make.   You may use half butter/half margarine if desired, but with so few ingredients the butter contributes major flavor to the cookies.

I unwrap my butter and place it on a microwave safe dish and soften it in the microwave in 20 second intervals as I never remember to take it from the refrigerator ahead of time.  It is easier to separate the egg if it is done as soon as it is removed from the refrigerator.  The separated egg will warm to room temperature while you are mixing the butter and sugar.

The dough for this will be stiff, and you may need to do the last little mixing with your hands.  I then divide the dough in half and plop half on each half of the baking pan.  I find this is easier for getting the dough spread out in the pan than trying to spread it from one big glob in the center.  The recipe says to wet your hands, and that is a trick that will work with other recipes where the dough must be spread or patted into the pan with your hands.

IMG_1617-1

Chocolate Bar Cookies
Sunset Magazine
1 c. butter or margarine or 1/2 c. of each
1 c. sugar
1 egg. separated
1 1/2 c. unsifted flour
2 T. cocoa
1/2 c. chopped, toasted nuts

Cream butter by itself until it is smooth.  Add sugar and cream together until fluffy.  Beat in the egg yolk.  Combine flour and cocoa and mix well.  Add to creamed mixture.  Mix until well combined.  Dough will be stiff.  Divide dough in half and put half on each side of a greased 10x15-inch baking pan.  With moistened hands spread and pat dough evenly over bottom of baking pan.  Beat egg whites until foamy.  With pastry brush, brush egg white over dough, covering it well.  You may not need all the egg white.  Sprinkle top evenly with the nuts.  Bake at 325 degrees 25 minutes or until edges pull away from sides of pan.  Remove from oven and let cool 10 minutes.  Cut into 1x31/2-inch bars.  Makes 45

These are just the thing to have with a nice tall glass of cold milk!

IMG_1630-1

Be sure to hop around and check out all the other great recipes posted today.

Thursday, September 29, 2011

12 Weeks of Christmas Cookies-No-Bake Peanut Butter or Chocolate Drops


IMG_1257-1

I am so excited to be part of 12 Weeks of Christmas Cookies.  I followed along last year but was not blogging then.

At Christmas time back in the 80’s I had a cookie baking business that I ran for the people I worked with.  Every year I would scour my cookbooks and choose 12 to 15 different recipes to make.  I would write up a page with the recipe names and a description of each, hand them out to my coworkers, and  they would preorder what they wanted. 

I have never shared all those recipes, but this year I am sharing them.  A number of the recipes are ones that I have not seen anywhere on the web; and I do not want them to become “lost”.  Hopefully sharing the recipes here will help preserve them for the future.

Before I post today’s recipes here are a few tips I learned from making many cookies at Christmastime.

1.  Make bar cookies.  There are so many different recipes out there, and you can just mix up the batter and stick them in the oven.
2.  Use cookie recipes that make big batches or double your regular recipes.  It takes the same amount of time to mix up dough that makes 3 dozen cookies as it does to mix up dough that makes 6 dozen.  Being the Cookie Monster’s grandmother, I never make recipes that will yield only 16 or 24 cookies.
3.  Make cookie recipes that can be formed into large “logs” and then sliced after baking.  Several of the recipes that I will post are this type.
4.  Make recipes that you can keep in the refrigerator or freezer and then just slice and bake.
5.  Make “no-bake” cookies.  Saves time and you are not paying for having the oven on.

The first recipes I am sharing are "no-bake”.   A very popular “no-bake” cookie is made with cocoa, peanut butter and oatmeal.  These cookies are either Peanut Butter OR Chocolate.  I have been making these for over 35 years and no longer remember where the Peanut Butter recipe came from.  The Chocolate recipe came from Land O Lakes.

Any kind of nut can be used in the chocolate cookies.  They should be toasted for the best flavor.  A nice change is to used toasted almonds and sub 1/2 to 1 t. almond extract for the vanilla.

The method for making both cookies is the same so I will list the ingredients for each and then the method.

Peanut Butter Oatmeal Drops
1/2 cup butter
2 cups light brown sugar, firmly packed
1/2 cup milk
pinch of salt
1/2 cup peanut butter  (I like crunchy)
1 t. vanilla
3 c. quick-cooking rolled oats

Chocolate Oatmeal Drops
1/2 c. butter
1 1/2 c. sugar
1/2 c. milk
1/4 to 1/2 c. cocoa
pinch salt
1/2 t. vanilla
3 c. quick-cooking rolled oats
1/2 c. toasted nuts
1/2 to 1 c. coconut (optional)

Cut a piece of waxed paper at least 3 ft. long and place on counter or table.  In a large, heavy saucepan combine butter, milk, white or brown sugar, salt and cocoa if using.  Bring mixture to a full-rolling boil over medium heat, stirring occasionally.  Without stirring, let mixture boil for 3 minutes.  Immediately remove from heat.  Stir in peanut butter (if using) and vanilla.  Stir until peanut butter is melted.  Add oats and mix well.  Stir in nuts and coconut if using.  Using two teaspoons drop mixture onto waxed paper.  Use one spoon to scoop up mixture and the other to slide it onto the waxed paper.  Let set until firm, about 30 minutes.  Makes about 4 dozen.

If you have an eagle eye, you may have noticed that there are no nuts in the chocolate cookies in the photo.  I forgot to put them in.

Linking to:  Fall Blog Crawl
I'm Lovin' It
Ingredient Spotlight


Tuesday, September 6, 2011

Cooking with the Journal-Easy Cocoa Syrup


IMG_0038-1


IMG_1049-1


Sometimes I like a little hot cocoa or chocolate milk.  This is a quick and easy syrup that will make either hot cocoa or cold chocolate milk.  It keeps in the refrigerator indefinitely and has no high fructose corn syrup which is in many commercial bands of chocolate syrup.

This recipe certainly falls under the DIY groceries category, but since it is a Farm Journal recipe, I am posting it here.  It comes from “The Thrifty Cook”.

I have adapted the original directions to make use of the microwave.

Easy Cocoa Syrup
The Thrifty Cook
Farm Journal Books, 1974

4 c. water
2 c. unsweetened cocoa
4 c. sugar
1/2 t. salt
4 t. vanilla

Place the 4 c. water in a microwave-safe container (I use a quart measuring bowl).  Microwave water on high until boiling, about 5 minutes.  Meanwhile sift cocoa into a large saucepan.  You may rub cocoa through a sieve with the back of a spoon if you do not have a sifter.  Add sugar and salt and mix well.  Gradually add boiling water, stirring until mixture is smooth.  Cook over medium heat, stirring, until mixture comes to a boil.  Boil 1 minute without stirring.  Remove from heat and cool; stir in vanilla.  Pour into glass jar or other container.  Store, covered, in refrigerator.  Makes about 5 cups.  Recipe is easily halved.  To use, mix 2 T. syrup with 1 c. cold or heated milk.  Stir well and enjoy.

Linking to Tuesday Talent Show
Totally Tasty Tuesday
Tuesday Time Out Link Party
Tasty Tuesday
Cast Party Wednesday
Whisking Wednesday
These Chicks Cooked
Foodie Wednesday
Related Posts Plugin for WordPress, Blogger...