Image Map
Showing posts with label peanut butter. Show all posts

Tuesday, December 15, 2015

Peanut Butter Gems-12 Days of Christmas Treats


Making this cookie is a little more involved than some of the previous posts for this year's Christmas Treats, but it is well worth it.  This is a buttery, thumbprint type cookie with the thumbprint filled with a peanut butter topping.  It makes an attractive and different addition to a Christmas cookie tray.

You need to plan ahead to make these as both the cookie dough and the filling need to be chilled. They both can be chilled longer than 2 hours, but you may need to let the cookie dough warm up a bit to make rolling the dough into balls easier.   I use my cookie scoop to measure out the dough.

While the cookies are doing their first baking, I use a half-teaspoon measuring spoon to scoop out the dabs of  filling onto waxed paper and then just pick them up to put them in the indentations in the cookies.  The cookies do not get brown.


Peanut Butter Gems
1/4 c. peanut butter
3/4 c. packed brown sugar
2 t. light corn syrup
2 t. hot water
1 c. butter or margarine, softened (I always use butter)
3/4 c. sugar
1 egg
1 t. vanilla
2 1/2 c. all-purpose flour, unsifted
1/2 t. baking powder
1/2 t. salt

In a small bowl, combine peanut butter, brown sugar, corn syrup and hot water to make a
smooth, thick paste.  Cover and refrigerate.  In a large mixing bowl combine butter and
sugar until well blended; beat in egg and vanilla.  Combine flour, baking powder and salt
in a small bowl and mix well.  Add to butter mixture and mix well.  Cover and chill 2
hours.  Form dough into 1-inch balls.  Place about 2 inches apart on a greased baking
sheet and with your finger make a depression in the center of each ball.  Bake at 400
degrees for 6 minutes.  Remove from oven and place 1/2 teaspoon of the peanut butter
mixture into each depression.  Return cookies to oven and continue baking until topping
is bubbly, about 5 minutes longer.  Cool.  Makes about 4 dozen cookies.


Friday, December 19, 2014

Vanilla Chex Millionaire Bars-12 Days of Easy Sweets


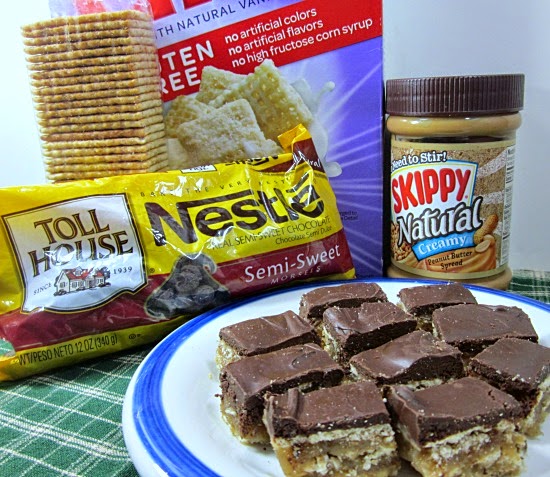
The original version of this recipe has been around for awhile and has had various names such as Millionaire Bars, Heavenly Bars, and Homemade Kit Kat Bars.  Some people consider it a no-bake cookie, some consider it a candy.  No matter which, most people love this treat.

I decided to experiment with crushed Vanilla Chex cereal, using it instead of crushed graham crackers when I made this last.  I also upped the amount of vanilla for better vanilla flavor.

These will fit right in on either a cookie or candy plate.  They are very rich so I cut them small.

.
Vanilla Chex Millionaire Bars
72 rectangular crackers such as Club Crackers (this is about half of a box)
1 c. (2 sticks) butter
1/2 c. milk
1 c. firmly packed brown sugar
1/3 c. white sugar
2 c. crushed Vanilla Chex cereal (about 3 1/2 c. uncrushed) or graham cracker crumbs
2 t. vanilla
1 (12 oz.) pkg. semisweet chocolate chips
2/3 c. creamy peanut butter

Line a 9x13-inch baking pan with aluminum foil, letting it extend over the edges.  Grease or spray foil with non-stick spray.  (I use non stick foil.)  Place 24 crackers in the pan, laying them so long edges go across 9-inch width of pan.  Set aside.  Melt butter in a large, heavy saucepan.  Stir in milk, brown sugar, white sugar, and crushed cereal.  Bring mixture to a boil, watching closely and stirring frequently.  Reduce heat and boil 5 minutes, stirring constantly.  Remove from heat and add vanilla.  Mix well.  Pour half of mixture over crackers in prepared pan.  Add a second layer of crackers.  Pour remaining mixture over crackers.  Cover with a final layer of crackers.  Combine chocolate chips and peanut butter in a small saucepan and cook over low heat, stirring frequently, until chips are melted and mixture is smooth.  Spread chocolate mixture over the top layer of crackers.  Cover with foil and chill until firm, about 4 hours.  Lift from pan and cut into 1x1 1/2-inch bars.  Makes about 72


Sunday, November 9, 2014

Peanut Butter Bars-Secret Recipe Club


One of the nice things about getting my Secret Recipe Club assignment early like I do now is that I get the chance to delve deeply into my assigned blog.  Such was the case with this month’s blog,  Rebekah’s Family, Food, and Fun, which has been around since 2008.  I really enjoyed  going back and learning about her family as it grew and new children were added.  Of course, I was there to find recipes, and I certainly found many delicious sounding ones
.
Rebekah has a wide range of recipes on her blog.  I made the Cream Biscuits, but mine were ugly and not blog worthy.  I would encourage everyone to try the recipe though as the biscuits were delicious even warmed up in the microwave.

I found so many recipes that sounded wonderful that I could create a list here a mile long; but since it is holiday time, I thought I would point out some that would make great food gifts.  There is Praline Party Mix, Cinnabon Pop Corn, White Chocolate Popcorn and Caramel Glazed Apple Bread to mention just a few.  I am for sure going to add the apple bread to my Christmas quick bread list this year.


The recipe I ended up making Peanut Butter Bars which was among Rebekah’s early posts.  When I saw the recipe, I knew it was the one.  With graham crackers, peanut butter and chocolate among the ingredients, what is not to like?  These are a no-bake, quick and easy bar cookie which uses ingredients I always have on hand.  Again, what is not to like?  The only thing I might be tempted to do is call these Graham Peanut Butter Bars to reflect that they contain graham crackers.

I actually ended up making the recipe twice, much to my husband’s delight.  Sometimes when you make a recip,e you do what you have always done, and it is not the right thing to do for that recipe.  I always sift my powdered sugar, and did so when I made these the first time.  After the butter and peanut butter mixture was added to the graham cracker crumbs and sugar, the mixture was too soupy.  I crushed and added an additional 4 graham cracker rectangles for a total of 1 and 1/2 sleeves of graham crackers.  I then chilled the mixture and added the chocolate topping.  Though a bit soft, the bars were very good.

I kept thinking about what could have gone wrong and decided that it could only be two things.  I had use Skippy 100% Natural Super Chunk Peanut Butter and I had sifted the powdered sugar.  I made the bars again still using the 100% Natural Skippy, but not sifting the powdered sugar.  The sifting appeared to be the problem as the second mixture set up nicely right away.  I did chill them for a little while before adding the chocolate topping. 

I chose to use milk chocolate chips for the topping instead of semi-sweet as I like them better.  I would recommend that only brand name milk chocolate chips be used as I have had some challenges when melting store brand milk chocolate chips.  If you use semi-sweet chips, it probably doesn't matter.

The cookies remind me of Twix candy and are maybe more candy than cookie, but they are so worth making.  If you like any of the ingredients in these, do give them a try.  They will be in regular rotation at my house.

Rebekah has wonderful photos, great recipes (check out the gorgeous cakes),  and a fun blog to read.


Peanut Butter Bars from Rebekah's Family, Food and Fun
1 sleeve graham crackers, crushed (this is about 1  1/2 cups)
2 2/3 c. powdered sugar (do not sift)
1 c. butter
1 c. peanut butter, creamy or chunky
1 pkg. semi-sweet or milk chocolate chips
1/4 c. milk

Place graham crackers in a zip-top plastic bag and crush with the flat side of a meat mallet or use a rolling pin.  Place cracker crumbs in a medium mixing bowl and add powdered sugar.  Mix well, to eliminate any sugar lumps.  Set aside.  Combine butter and peanut butter in a microwave-safe bowl and microwave about 2 minutes at 50% power until butter is melted.  Beat to mix well.  Combine butter/peanut butter mixture and graham cracker/sugar mixture and mix until well blended.  Turn into a foil-lined 9x13-in pan.  Place in refrigerator and chill about 15 minutes.  Combine chocolate chips and milk and melt according to package directions.  Spread over peanut butter mixture and chill 10 minutes until set.  Remove from pan and cut into 1 x 1 1/2-inch bars (these are very rich).  Make about 60.


The way that Secret Recipe Clubs works is that each participant is assigned a blog that they are to visit, choose a recipe, secretly make that recipe and blog about it on a given date.  If you would like to be part of the fun, you can find all the information about joining here.


Thursday, October 16, 2014

Peanut Butter ChocolatePudding Cake-Improv Challenge


I have been MIA from the Improv Challenge for a while, but when I saw that the ingredients for October’s challenge were chocolate and peanut butter, I knew I wanted to participate.   These are two of my favorite foods.

For Improv Challenge, you are assigned two ingredients each month, you make a recipe that contains those ingredients that is new to your blog, and post about it on the third Thursday.  Recently Lesa from Edesia's Notebook assumed hosting of the challenge from Kristin at Frugal Antics of a Harried Homemaker.  I have subscribed to Lesa's blog for some time.  She has great recipes there.

One of my "go to" desserts is pudding cake, the dessert that bakes up with a cake on the top and a sauce on the bottom.  I have several different recipes for these, but have never had a recipe that combined chocolate with peanut butter.  Since I had a recipe for a chocolate pudding cake and one for a peanut butter pudding cake, it seemed reasonable that I could take part of each recipe and make a chocolate peanut butter pudding cake.  Because of the way pudding cakes are made it seemed best to make a peanut butter cake with the sauce being the chocolate.


The chocolate mixture left a little residue on the cake top which gave it a sort of mottled appearance which I liked.  This can be served slightly warm, at room temperature or chilled.  We liked it just slightly warm with the sauce spooned over the top with a scoop of vanilla ice cream.


Peanut Butter Chocolate Pudding Cake
1 c. all-purpose flour
2/3 c. brown sugar
2 t. baking powder
1/2 t. salt
1/2 c. milk
1/3 c. chunky peanut butter
2 T. vegetable oil
1 t. vanilla
3/4 c. brown sugar
1/4 c. unsweetened cocoa
1 1/2 c. hot water

Combine flour, 2/3 c . brown sugar, baking powder and salt in a medium mixing bowl.  Stir to mix well.  Add milk, peanut butter, oil and vanilla and beat with a wire whisk until well blended.  Turn batter into a well-greased 8x8-inch baking dish.  In a separate bowl combine 3/4 c brown sugar, cocoa.  Mix well.  Add hot water and  stir until sugar and cocoa are dissolved.  Carefully pour over batter in pan.  Bake at 350 degrees for 30 minutes or until a toothpick inserted in cake part comes out clean.  Serve warm, at room temperature or chilled.  Top with whipped cream or ice cream, if desired. Store tightly covered in the refrigerator.  Makes 6 to 8 servings.


If you think that Improv Challenge sounds like fun, you can find all the information about joining in on the Improv Challenge page.  You will find the list of ingredients through 2015 there, and you are not obligated to participate every month.

Saturday, October 4, 2014

Gooey Peanut Butter Smore Brownies-12 Weeks of Christmas Treats


Last week marshmallows played a supporting role in the Marshmallow Blondes.  Now they are moving front and center for Gooey Peanut Butter Smore Brownies for week 2 of 12 Weeks of Christmas Sweets hosted by Brenda over at Meal Planning Magic.


This bar cookie is composed of peanut butter, chocolate brownies, marshmallows, graham crackers, chocolate chips and marshmallows.  What more could one ask?

I make a double batch of brownie batter from my Homemade Brownie Mix, but a commercial mix or a from-scratch brownie recipe for a 9x13-inch pan can also be used.

This is a tall and rich cookie so I cut them small.  The cookie needs to cool completely and are best cut with a sharp knife that has been dipped in hot water.  It may be necessary to dip the knife several times when cutting the cookies.

These make a nice gift when baked in a new pan, and the pan with brownies wrapped and given as a gift.


I adapted these from a recipe I found on a Western Family Marshmallow package.

Gooey Peanut Butter Smore Brownies
1/3 c. butter, softened
1/2 c. peanut butter
1/2 c. brown sugar, packed
1/2 c. granulated sugar
2 eggs
1 t. vanilla extract
1 c. flour
1 t. baking powder
1 box brownie mix with ingredients to make brownies
2 graham cracker squares
1/2 c. chocolate chips
3 c. miniature marshmallow
1 c. chopped peanuts, optional

In a large mixing bowl, combine butter, peanut butter, brown sugar and granulated sugar.  Beat well.  Add eggs and vanilla and mix until light and fluffy.  Combine flour and baking powder in a small bowl.  Mix well and add to wet ingredients.  Stir until well blended.  The mixture will be somewhat stiff.  Spread mixture in a 9x13-inch foil-lined baking pan.  Set aside.  Prepare brownies mix according to package directions.  Evenly spread brownie mixture on top of peanut butter mixture.  Lightly swirl the two mixtures together.  Coarsely break graham crackers and scatter over the top.  Bake at 350 degrees for 50 to 55 minutes until a toothpick inserted in the center comes out clean.  Remove from oven.  Scatter chocolate chips over the top, then cover with marshmallows until evenly covered.  Sprinkle peanuts over if using.  Return to oven and bake 7 to 10 minutes more until marshmallows are lightly browned.  Remove pan to a rack and let cool.  Lift brownies from pan and cut with a knife that has been dipped in hot water.  It may be necessary to clean and dip the knife several times.  These are very tall and rich, so I cut them small, about 1 1/2-2-inch squares.  Makes about 36.


I am linking up to 12 Weeks of Christmas Treats.  Click on over for a great Peppermint Treat Roundup.

Saturday, February 1, 2014

Chocolate Peanut Butter Bars-Saturday Sweet

I seemed to have let January slide by without posting a Saturday Sweet.  Shame on me.  I am going to do better in February
.
Chocolate and Peanut Butter Bars just may become my new favorite.  It is interesting, that with all the cookie recipes I have seen, I had not come across this one before.  It is from a little cookbook called Favorite Bars and Cookies-50 All Time Best Recipes from Better Homes and Gardens published in 2002.

These delicious bars have an oatmeal toffee crust, some of which is saved for the topping, a peanut butter/condensed milk filling, and a topping of the reserved crust ingredients and chocolate chips.  Chopped peanuts were included in the original recipe.  Since I am having a challenge eating nuts right now, I left them out.  I used milk chocolate chips in the topping, but semi-sweet or peanut butter chips would be great, too.

Because my hands don’t work the way they used to, I make the crust in my Kitchen Aid Mixer using the whipping attachment.  I put all the dry ingredients in the mixer bowl and combine them well.  I slice the butter into thin slices and add them a little bit at a time while the mixer is running on low, letting the mixer run until that butter is well blended.  The dough will be clumpy, not crumbly.

The bars are baked in a 10x15-inch pan, so the recipe makes a lot.  The cookbook says the recipe makes 48 bars, but they are very rich so I cut mine a bit smaller and got 60 bars
.
If you are a chocolate/peanut lover, give these a try.  I think you will like them.


Chocolate Peanut Butter Bars
2 c. quick-cooking rolled oats
1 3/4 c. brown sugar, firmly packed
1 c. all-purpose flour
1/2 c. whole wheat flour (or use all-purpose flour)
1 t. baking powder
1/2 t. baking soda
1 c. butter
1 egg, beaten
1 (14 oz.) can sweetened condensed milk (or make your own)
1/3 c. creamy peanut butter
1 (11-12 oz.) pkg. milk chocolate chips, semi-sweet chocolate chips or peanut butter chips
1/2 c. chopped peanuts (optional)

Combine oats, brown sugar, all-purpose flour, whole wheat flour, baking powder, and baking soda in a large mixer bowl.  Place bowl on mixer and mix well on low speed.  While mixer is still running, slice butter into thin slices and carefully add to mixer bowl a few at a time.  Mix until butter is well blended and the mixture is clumpy.  You may also use a pastry blender to mix ingredients.  Remove 1 3/4 cups of mixture and place in a medium mixing bowl.  Set aside.  Add egg to remaining mixture in large bowl.  Mix well.  Press into a foil-lined 10x15-inch pan.  Bake at 350 degrees for 15 minutes until golden brown and bubbly.  Meanwhile, combine sweetened condensed milk and peanut butter until smooth.  Remove  crust from oven.  Pour peanut butter mixture over the hot crust, carefully spreading evenly.  Add chocolate chips and peanuts (if using) to reserved crust mixture.  Sprinkle over peanut butter mixture.  Return to oven and bake an additional 12 to 15 minutes, until edges or lightly browned.  Don’t overbake or crust will become hard.  Remove from oven and cool on a rack.  Cut into bars while still slightly warm.  Makes 48 to 60 bars.  Store tightly covered in a zip-top bag.


Wednesday, October 16, 2013

Butterfinger Peanut Butter Bars-12 Weeks of Christmas Treats


The recipe for week 4 of 12 Weeks of Christmas Treats, hosted by Brenda over at Meal Planning Magic, is one that I have been making for at least 40 years.  The original recipe came from a Better Homes and Gardens cookbook called “Homemade Cookies.”  These were a favorite of my children when they were growing up.  The book is taped together in places and food stained from all the years of using it.  A few years ago, I misplaced the cookbook and did not know what had happened to it.  Believe me, I was one happy gal when the book turned up.

The cookies have always reminded me a bit of Butterfinger candy bars, so some time back I decided to play that up and started sprinkling crushed Butterfinger bars over the top before the dough was baked.  This adds a nice little extra when you bite into a cookie.  I use 2 to 4 regular size Butterfinger bars, depending on my mood.

The cocoa frosting is one of my favorites.  It is easy to make and takes ingredients that I always have on hand.  It is much like the frosting that is on the chocolate bars (like maple bars) that you can get at grocery store bakeries.

The bars are sturdy enough to go well in a lunch box but elegant enough to add to a Christmas cookie tray.

The original recipe used shortening, but I have always used butter with no problem.  If not using unsalted butter, omit the salt.

Butterfinger Peanut Butter Bars
1/2 c. unsalted butter
1/2 c. peanut butter, creamy or crunchy
1.2 c. sugar
1/2 c. brown sugar, firmly packed
1/2 t. vanilla
1 egg
1/4 c. milk
1 c. all-purpose flour
1/2 t. soda
1/2 t. salt (omit if not using unsalted butter)
1 c. quick-cooking oats
2 to 4 regular size Butterfinger candy bars, crushed
2 c. sifted confectioner’s sugar
1/4 c. cocoa
3 T. melted butter
1/2 t. vanilla
2 to 3 T. hot water

Cream together butter, peanut butter, sugar and brown sugar until well blended.  Add vanilla, egg and milk; beat well.  Stir together flour, soda and salt.  Add to creamed mixture, mixing just until well blended.  Stir in oats.  Spread dough in a foil-lined and non-stick sprayed 9x13-inch pan.  Sprinkle crushed Butterfinger candy bars evenly over to the top of dough.  Bake at 350 degrees for 20 minutes.  Cool in pan on wire rack.  Measure sifted confectioner’s sugar into a small bowl.  Sift cocoa into sugar or put through a sieve with the back of a spoon.  Mix sugar  and cocoa together until well blended.  Combine melted butter, vanilla and 2 T. of the water.  Mix well.  Add to the sugar/cocoa mixture and beat until smooth.  If mixture seems a bit stiff, add an additional tablespoon of hot water.  Spread frosting evenly over the cooled pan of bars.  Let frosting set and cut into bars.  Makes about 36 bars.

 There is still plenty of time to join us and share some of your favorite Christmas Treats.  Just go to this post at Meal Planning Magic to sign up.  To see what other bloggers have created this week, check out the links below.

Show and Share Wednesday
Wow Me Wednesday at Polka Dots on Parade
Whimsy Wednesday
Wow Me Wednesday at Ginger Snap Crafts
Wake Up Wednesday
Cast Party Wednesday
Creative Muster Party
Whatever Goes Wednesday
Show and Share Party
Show Off Your Stuff Party
What I Whipped Up Wednesday
Your Whims Wednesday
Wednesday Whatits
Wonderful Wednesday


Saturday, September 28, 2013

Club Cracker Bars aka Homemade Twix-Saturday Sweet

This no-bake bar cookie has probably made its way around the net several times, but if you don’t know about it, you should.  It has been called Homemade Twix bars because it resembles that candy.  Whatever you call it, it is really good.

When I make these, I line the 9x13-inch pan with foil and spray the foil with nonstick spray.  After the pan has cooled, I remove the uncut  bars and flip them over onto a piece of waxed paper or a jelly roll pan.  I then can see the Club crackers on the bottom and use them as guides to cut the cookies.  Because these are very, very rich cookies, I usually cut the crackers in half.

Smooth or chunky peanut butter may be used for this recipe.  I prefer super chunky peanut butter so that I get some peanut pieces in the frosting.  One package of crackers will make two recipes of bars.

Club Cracker Bars
54 Club Crackers (about half a box)
1 c. graham cracker crumbs
3/4 c. brown sugar
1/2 c. sugar
1/3 c. milk
1/2 c. butter
2/3 c. peanut butter (smooth or chunky)
1 c. chocolate chips (may be semi-sweet or milk chocolate)

Line a 9x13-inch baking pan with aluminum foil and spray the foil with non-stick spray.  Lay 3 club crackers end to end across the width of the pan.  Repeat down the length of the pan.  You should have about 9 rows.  Combine graham cracker crumbs, brown sugar, sugar, milk and butter in a large saucepan.  Bring to a boil, watching carefully and stirring often.  Boil for 5 minutes, stirring constantly.  Pour mixture over crackers in pan.  Cover with another layer of crackers.  In a microwave or double  boiler, melt peanut butter and chocolate chips, stirring often until smooth.  Pour peanut butter/chocolate mixture over the top layer of crackers, spreading until smooth and even.  Refrigerate about a hour or until cool.  Remove pan from oven, flip over onto a piece of waxed paper or a jelly roll pan.  Remove the foil.  Using the bottom layer of crackers as a guide, cut into bars then cut bars in half, making 54 squares.

Linking to these great parties:
Weekend Potluck
Saturday Sharefest
Saturday Spotlight
Strut Your Stuff
Weekend Bloggy Reading
Link Party Palooza
Party Junk
I'm Lovin' It
Share Your Creativity

Tuesday, September 3, 2013

Nutella Swirl Peanut Butter Brownies

Welcome to my new followers.  It is so nice to have you here.  Thanks to all who stop by and read this blog.  Hope everyone has a wonderful week.

Well, this thing called life has taken precedence over blogging the last few days (as it should), so I am posting what was supposed to be the Saturday Sweets post today.

I have been making the Peanut Butter Brownie part of this recipe over 40 years.  When our children were growing up, we were very much involved in showing ponies and horses.  We spent many a weekend day at an arena somewhere in the area.  I got the recipe from another horse-and-pony mother who brought them to one of the shows.

Shortening is an ingredient in this recipe.  I try not to use shortening when I can and have tried to substitute butter.  The butter makes a much drier brownie than the shortening so I do use shortening when I make these.

There is a range for the sugar in this recipe.  The original recipe called for the 2 cups.  I have gradually reduced the amount to 1 1/2 cups.  I used 1/2 cup Nutella for the swirl.  I put the Nutella in a glass measuring cup, added 2 t. vegetable oil and microwaved it at 30-second intervals, stirring it between, until it was a thick pouring consistency.

Nutella Swirl Peanut Butter Brownies
1/2 c. shortening
1/4 c. peanut butter, creamy or crunchy
1 1/2-2 c. sugar
3 eggs, room temperature and beaten
1 1/2 c. flour
1 1/2 t. baking powder
1/2 t. salt
1/2 c. salted peanuts (optional)
1/2 c. Nutella
2 t. vegetable oil

Melt shortening and remove from heat.  Add peanut butter and stir until melted.  Add sugar and stir until well blended and mixture has cooled slightly.  Add the beaten eggs and mix well.  Combine flour, baking powder and salt.  Stir into peanut butter mixture until well blended.  Add peanuts if using.  Spread mixture in a foil-lined 9x13-inch baking pan.  Measure Nutella into a glass measuring cup.  Add vegetable oil and microwave for 1 minutes at 50 percent power.  Remove from microwave and stir.  Continue to microwave and stir until Nutella reaches a thick pouring consistency.  Pour the Nutella over the peanut butter dough in a crisscross pattern.  Using a knife draw swirls to incorporate the Nutella into the peanut butter dough.  Bake at 325 degrees 25 to 30 minutes.  Let cool, and remove from pan.  Cut into bars.  Makes about 36 brownies.

Saturday, August 10, 2013

No-Bake MandM Brownie Bites-Saturday Sweet

With no water for a day due to having our pump go out, a flooded kitchen floor, and Blogger acting up for me so I could not post my Friday Finds, I was really ready to post a sweet today.  All is well now, and all those things were but a blip on the radar of life, but I really want sweets when I am stressed (and even when I am not).

No Bake MandM Brownie Bites is a bit different recipe for no-bake cookies as it uses a brownie mix instead of sugar and cocoa.  You can use Homemade Brownie Mix or a commercial mix.  These go together quickly and are great to make on a hot day when you are craving chocolate.  The bites remain soft and do not harden up like some no-bake chocolate cookies do.

With the specialty MandM’s that are available for holidays, these are nice for parties.  I still had some Christmas MandM’s left in my fridge, (I know unbelievable with my sweet tooth) so I used them.

Some helpful hints for making these are:  pre-measure all your ingredients ahead so they are ready to add to the mixture, cut the cube of butter into 4 or 5 slices so it melts quicker, and use a wooden flat bottom spatula to stir the mixture as it scrapes the bottom of the pan as you stir helping to prevent burning.  The well-used one I have is from Pampered Chef.

This recipe has been in my recipe files on my computer a long time.  I do not know the original source.

No-Bake MandM Brownie Bites
1 box (18 or 19 oz.) brownie mix or Homemade Brownie Mix
2/3 c. milk
1/2 (1 cube) butter, cut into 4 or 5 slices
1 c. creamy peanut butter
1 t vanilla
3 c. quick cooking oats
1/2 c. chopped walnuts
1 c. MandM's

Cover your work surface with waxed paper.  You will need two good-size lengths.  In a very large saucepan or Dutch oven combine brownie mix, milk and butter.  Cook and stir over medium heat until mixture comes to a full boil, stirring constantly.  Boil 2 minutes, stirring constantly.  Remove from heat and add peanut butter and vanilla.  Quickly stir to blend well.  Stir in oats and walnuts.  Carefully stir in M& M’s.  Quickly drop by teaspoonsful onto the waxed paper.  Let cool completely.  Store in a zip-top plastic bag.  Makes about 7 dozen.

Linking to these great parties:

Thursday, July 25, 2013

Double Peanut Crunch

I have a confession to make.  I really love Peanut Butter Captain Crunch Cereal.  It is just about the only cold cereal that I purchase to eat as cereal.  Other cereals I purchase, I usually use in recipes.  Now I know that Peanut Butter Captain Crunch is really just breakfast candy.  So if it is really breakfast candy, might as well make something candy-like with it.  Right?

Double Peanut Crunch is just Peanut Butter Captain Crunch Cereal and peanuts with a candy coating.  If you are not the fan of this cereal that I am, any other round or doughnut-shaped cereal may be used instead.  Change the nuts or not as you wish.

A word of warning.  Don’t make this unless there are other people around to help eat it.  If you do, you may find that it is gone and that it was you who ate it.

Double Peanut Crunch
1/2 c. butter
2/3 c. brown sugar
1 T. corn syrup
1 c. salted peanuts
2 c. Peanut Butter Captain Crunch Cereal

Melt butter in a 3-qt. non-stick saucepan.  Add brown sugar and corn syrup.  Heat and stir over medium heat until mixture reaches a full rolling boil.  Boil and stir 1 minutes.  Quickly stir in peanuts and cereal and mix well.  Turn out onto a waxed paper-lined baking sheet and smooth into a single layer.  Let cool.  Break up if necessary.  When cool, store in an air-tight container or zip-top bag.  Makes about 3 cups.

Linking to these great parties:
Full Plate Thursday
Catch a Glimpse Party
Thursday's Treasures
Showcase Your Talent Thursday
Tasty Thursday
Fantastic Thursday

Saturday, June 8, 2013

Marbled Peanut Butter Brownies-Saturday Sweet

Today’s Saturday Sweet, Marbled Peanut Butter Brownies, is for the lover of both peanut butter and chocolate.  An unusual chocolate ingredient is marbled through peanut butter dough, and the whole thing is topped with coarsely chopped salted mixed nuts for a bit of a sweet/salty taste.

I have used both creamy and crunchy peanut butter when making these.  Either one seems to work just fine.  I have not used the reduced fat ones.  The unusual ingredient is chocolate-flavored syrup.  The recipe  calls for one cup, but I always just squirt the syrup  onto the batter until it is lightly covered.  This saves a little on the dishwashing.  I posted a recipe for DIY Chocolate Syrup sometime back.

These should be stored tightly covered, provided, of course, there are any left to store after the first day.

Marbled Peanut-Butter Brownies
1/2 c. butter or margarine, softened
1/4 c. peanut butter
1 c. light brown sugar, lightly packed
1/2 c. sugar
3 eggs, at room temperature
1 t. vanilla
2 c. all-purpose flour
2 t. baking powder
1/8 t. salt
1 c. chocolate-flavored syrup
3/4 c. coarsely chopped salted mixed nuts

Cream together butter or margarine and peanut butter until well blended.  Beat in brown and granulated sugar until well blended.  Beat in eggs, one at a time, until batter is light and fluffy, adding vanilla with the last egg.  Combine flour, baking powder and salt in a small bowl.  Stir into creamed mixture.  The dough will be somewhat stiff.  Spread half the batter into a lightly greased 9x13-inch pan.  Spread syrup over the top.  (I just drizzle it from the bottle until the surface is covered.)  Spoon remaining batter over syrup and spread out carefully to cover.  Swirl with knife or spatula to a create a marbled effect.  Sprinkle the chopped nuts over the top.  Pat into batter lightly with your hand.  Bake 35 to 4 minutes or until lightly browned and a toothpick inserted in center comes out clean.  Cool in pan on rack.  Cut into bars.  Makes about 36.  Store tightly covered.

Linking to these great parties:

Wednesday, June 5, 2013

DIY Hoisin Sauce-The Battle

It is no secret that I am delighted when I find I can make a homemade version of a commercial product.  Several months ago I found a recipe for Hoisin Sauce in a microwave book.  The author indicated that the recipe had come from Recipezaar which is now Food.com.

I thought I would go check the recipe out on the site.  When I got there I found that there were two very different recipes for making Hoisin Sauce.  The one in the book which makes quite a bit and another one that made a smaller amount.

I decided to make both recipes and see if I liked one better than the other, and, of course, I had to make my own changes, too.  The results were mixed.  They were both easy to make and used ingredients that I keep on hand.   I didn’t really like one that more than the other one.  The shortcomings in both recipes were that, as written, neither of them had the thick, paste-like texture like the commercial Hoisin sauces I have purchased.  I have adjusted my recipes for that.

So, try them both.  If you need just a little Hoisin Sauce make the recipe the yields the smaller amount.  The recipe that makes the larger amount says that it keeps 2 weeks.  For longer storage, I don’t see why the sauce can not be frozen, so I would dollop recipe amounts out on a parchment paper-lined pan, flash freeze, and put the dollops in a freezer bag or container.

The first recipe uses black bean sauce or peanut butter.  I used peanut butter since I always have that on hand.  One recipe said 1 T., one recipe said 2 T.  I used 1 T.  I think that the peanut butter flavor may be a little too much with 2 T.

DIY Hoisin Sauce-small quantity
1/4 c. low-sodium soy sauce
1-2 T. black bean paste or creamy peanut butter
1 T.  molasses, honey, or brown sugar, firmly packed (I used molasses)
2 t. unflavored rice wine vinegar, white wine vinegar, or white vinegar (use use rice wine vinegar)
2 t. sesame oil
1 clove garlic, minced or 1/4 t. garlic powder (I used the powder)
1/8 t. onion powder
2 t. cornstarch
20 drops hot sauce, preferably Chinese (I did not use this much)
1/8 t. black pepper

Combine soy sauce, peanut butter, molasses, vinegar, sesame oil, garlic, onion powder in a glass measuring cup.  Microwave on high 30 seconds to melt peanut butter for easier mixing.  Beat with a wire whisk until well blended  and cool.  Stir in cornstarch, beating until well blended.  Microwave 30 seconds to 1 minute until mixture is thickened.  Stir well.  Add hot sauce and black pepper.  Makes about 1/3 cup.

DIY Hoisin Sauce-large quantity
1 c. beef broth (low sodium if possible)
1/2 c. low-sodium soy sauce
1/3 c. dry sherry
2 T. cornstarch
2 T.  molasses
2 T. brown sugar
2 T. tomato paste
1-2 cloves garlic, crushed
1/2 t. ginger
black pepper to taste

Combine all ingredients in a 1 qt. glass measuring cup or microwave-proof bowl.  Stir with a whisk to dissolve cornstarch.  Partially cover with plastic wrap.  Microwave on high 2 minutes.  Stir with a whisk.  Microwave 1 1/2 to 2 more minutes until thickened.  Stir again with a whisk until smooth.  Let cool and store in refrigerator up to 2 weeks.  Ingredients may also be put in a small saucepan, and mixture cooked on the stove until boiling and thickened.  Makes about 2 cups.

Linking to these great parties:
Cast Party Wednesday
Wicked Good Wednesday
Show and Share Wednesday
Work It Wednesday
Wow Me Wednesday

Monday, October 15, 2012

Secret Recipe Club-123 Cookies

Happy Monday and welcome to my new followers.  As always thanks to all who take time from their busy lives to read this blog.  I hope the information I post here is useful.

My assignment for October Secret Recipe Club was Close to Home.  This blog which was started in 2009 is a very versatile blog that covers many areas:  recipes, reviews, crafts, giveaways.  There is something there for everyone.  Maria hosts Tiptoe Tuesday which is a giveaway blog hop and Friday Food Frenzy, which, of course, is a recipe blog hop.

There are many sweets recipes posted there which are made with chocolate.  Everything is always better with chocolate.  A couple that I want to make are Extra Easy Chocolate Chess Pie and Chocolate Banana Bread.

When it came time to make a recipe, I was very busy and short on time so ended up making a version of 123 Cookies.  Maria had made these with both chocolate chips and white chocolate chips.  Because I wanted to use Special K Chocolatey Delight cereal which has little squares of chocolate in it, I decided to use butterscotch chips to make these.

They turned out more like what I would consider candy than cookies.  I think that was because I needed to use more cereal.  The recipe called for 3 cups broken up cornflakes.  I had only 3 cups total of the Special K before breaking the cereal up.  I think next time I will measure the cereal after crushing it slightly.  The Special K did work so I would say that any combination of chips and flaked cereal could be used to make this.  This opens up a whole realm of possibilities for the cereal as there are many flaked cereals out there.

I did not have quite enough creamy peanut butter so I used some crunchy peanut butter for part of the peanut butter.  The original recipe said to use only creamy, but it seemed to work OK.  You could not really taste the peanut butter, it just seemed to enhance the butterscotch flavor.

At any rate, the butterscotch cookie/candy was very good and did not last long around here.

123 Cookies
from Close to Home Blog
1 (12 oz.) pkg. chocolate, white chocolate, or butterscotch chips
1 c. peanut butter
3 c. broken flaked cereal (measured after breaking up)

Place chips in a large, microwave-safe bowl and melt according to directions on package.  Stir in peanut butter until well mixed.  Add cereal flakes and stir until well coated.  Drop by teaspoonsful onto waxed paper-lined baking sheets.  Place in the refrigerator until firm.  Makes about 3 to 4 dozen.

This recipe was fun and easy and made a crunchy, delicious treat which will be among my Christmas goodies this year. Thanks, Maria.

Wednesday, September 12, 2012

Ingredient Spotlight-Peanut Butter Brittle Cookies

Recently I was tearing out recipes and articles from some old magazines so that I could send the magazines for recycling.  Am I the only one who still tears recipes from magazines, I wonder.

One of the recipes that caught my eye was from a 2004 issue of Family Circle magazine.  (See, I said they were OLD magazines.)  The recipe was for a peanut butter cookie that had crushed peanut brittle added.  Thinking that was a good idea and being that I just happened to have some peanut brittle on hand that I had picked up at Dollar Tree, I made the cookies.  They were not quite as dense as most peanut butter cookies and had a subtle peanut brittle flavor with a little extra crunch, a very nice change.

I must warn that this recipes make a lot of cookies, somewhere around 7 dozen of the size that I made.  The original recipe called for using 1/4 c. dough per cookie which would have made Huge cookies.  I used a level tablespoon of cookie dough per cookie and still had 3-inch cookies which I find plenty big enough.

I crushed the peanut brittle in my mini food processor in three batches, then I put it in a zip-top bag and used my metal meat mallet to crush any remaining bigger pieces the food processor did not get.

IMG_3652-1

Peanut Butter Brittle Cookies
adapted from Family Circle magazine

4 –5 oz. peanut brittle
3 c. flour
1 t. baking powder
1 t. salt
1 c. (2 sticks) unsalted butter, softened
1 c. creamy peanut butter
1 c. light brown sugar, firmly packed
1 c. sugar, divided
2 t. vanilla extract
2 large eggs, at room temperature

Break peanut brittle into fairly small pieces and  pulse in food processor until finely crushed.  If you do not have a food processor, place pieces in a plastic zip top bag and pound with a metal meat mallet or hammer.  (There should be about 3/4 cup crushed brittle.)  Combine crushed brittle, flour, baking powder and salt in a medium bowl and mix well.  Set aside.  Place butter and peanut butter in a large mixer bowl and beat with an electric mixer until smooth.  Add brown sugar and 1/2 c. sugar.  Beat until light in color, about 2 minutes.  Add eggs and vanilla and beat until smooth, scraping down the side of the bowl.  With a mixer on low speed, add half of flour mixture and beat well.  Add remaining flour mixture and beat until well mixed.  The dough will be  stiff.  Place remaining 1/2 c. sugar in a shallow bowl.  Using a scoop that holds 1 tablespoon or a measuring tablespoon scoop out level tablespoons of dough and form into balls.  Roll balls in the sugar.  Place on ungreased baking sheet and flatten with the bottom of a glass.  (I do not have a glass so I use a 1-cup metal measuring cup and wipe it with a paper towel after flattening each cookie).  Bake at 375 degrees for 8 to 10 minutes or until edges have just begun to brown and cookies are set.  Remove from oven and let stand on baking sheet 1 to 2 minutes.  Remove cookies to a rack to cool.  Store cookies in an airtight container at room temperature up to 2 weeks.  (Believe me, these would never last that long in this house.)  Makes about 84 cookies.

I am linking to:  Ingredient Spotlight


Tuesday, August 7, 2012

Crazy Cooking Challenge-Peanut Butter/Chocolate Cheesecake Cups


It is time for another Crazy Cooking Challenge hosted by Tina over at Mom’s Crazy Cooking.  This month’s subject is Cheesecake.

Since Tina changed the guidelines last month, and we can now find our recipes anywhere, I decided to share a long time favorite of mine.  I don’t make a lot of cheesecake, but I do love these little Peanut Butter/Chocolate Cheesecake Cups.  Peanut Butter and Chocolate just go so well together.  I have been making this recipe for many years.  I clipped it from a Better Homes and Gardens magazine.


If I am buying cream cheese just for this recipe, I buy one 8-oz. pkg. and one 3 oz. pkg.  I, however, usually have 8 oz. pkgs. of cream cheese on hand and use 1 1/2 8 oz. pkgs. of cream cheese.  It doesn’t seem to make much difference in the final result.

You MUST use creamy peanut butter in this recipe.  I tried crunchy once, and it just did not work.  The peanut butter and chocolate mixture stayed separated.  I use a measuring tablespoon to distribute the batters into the muffin cups. I like to drop the chocolate mixture into the peanut butter mixture and just let it settle.  This usually results in a little ring of peanut butter batter showing around the edges of the chocolate.

For an elegant presentation, peel off the paper liners, invert the cups on a dessert plate and top with a dollop of whipped cream.

These are great to take to a party or a potluck.

Peanut Butter/Chocolate Cheesecake Cups
from Better Homes and Gardens magazine

3/4 c. crushed chocolate covered graham crackers
11 to 12-oz. cream cheese, softened  (may be low fat, but not fat-free)
1/2 c. sugar
1 t. vanilla
1/2 c. milk
2 eggs at room temperature and slightly beaten
1/2 c. semisweet chocolate chips, melted
1/3 c. creamy peanut butter

Line a 2 1/2-inch muffin pan with paper baking cups.  Place about 1 T. crushed chocolate covered graham crackers in the bottom of each cup, spreading evenly.  In a large mixing bowl, beat cream cheese until smooth.  Add sugar and vanilla and beat until fluffy.  Beat in milk.  Add eggs, beating until just blended.   (Do not overmix.)  Divide batter in half.  Stir melted chocolate into one-half the batter, mixing until smooth.  Stir peanut butter into the second half of the batter, mixing until smooth.  Place 2 T. peanut butter mixture in each muffin cup.  Spread evenly.  Spoon 2 T. chocolate mixture into the center of the peanut butter mixture and let it settle.  Bake at 325 degrees 20-25 minutes or until set.  Cool on a wire rack.  Place in a covered container and chill until serving time.  Peel off paper cups and invert onto a dessert dish to serve.  Top with a dollop of whipped cream.  Makes 12 cheesecake cups.

Linking to:  Crazy Cooking Challenge

Monday, July 16, 2012

SRC Reveal Day-Peanut Butter Banana Cream Squares

 I was so excited recently when, after waiting a nearly a year, I got an email asking if I still wanted to join The Secret Recipe Club.  Boy, did I!  So I signed up and received my very first assignment.  The blog I was assigned is Eat Laugh Love.

This is a fun blog with many interesting recipes.  Although some recipes are more sophisticated than what I usually eat, I found many recipes that I want to try.  Among them are Baked Egg Rolls, Roasted Cauliflower with Parmesan and Bacon, Company’s Coming Apple Cake, and Peanut Butter Chocolate Chip Blondes.

You will notice that the last two recipes listed are for sweets so it is no surprise that the recipe I chose to make is for a dessert.  When I saw the recipe for Peanut Butter Banana Cream Pie I knew that is what I would be making.

This recipe had a number of things going for it.  I love peanut butter, bananas, cream cheese and chocolate so what could be better than a combination of all of these?  I'm also inherently lazy so love quick, easy and make ahead recipes.  Lastly, we are having a heat wave which makes a frozen dessert seem even better.

Instead of making a pie, I chose to put this in an 8-inch baking pan.  To be sure there was enough crust to cover the bottom of the pan, I increased the crust ingredients by half.  The recipe posted here reflects that change.

I wanted lots of banana so cut my slices about 1/2 inch thick.  I still took only two bananas of the size that I had.

I made my homemade Chocolate Sauce because I think that it tastes much better, but purchased can be used.

This was very good, and we will be having it often at our house.

Peanut Butter Banana Cream Squares
Adapted from Eat Laugh Love
1 1/2 c. crushed vanilla wafer cookies (about 40 small ones)
6 T. brown sugar, packed
1/4 c. butter, melted
1/2 c. brown sugar
1/2 c. (4 oz.) cream cheese, softened (I used 1/3 c. less fat)
1/2 c. chunky peanut butter
1/2 t. vanilla extract
1 container (8 oz.) frozen whipped topping, thawed (I used light)
2 bananas, sliced
Chocolate sauce, homemade or purchased

In a bowl mix together cookie crumbs and brown sugar.  Add brown sugar and mix until all the crumbs are coated.  Pour into an 8-inch baking pan which has been very well sprayed with nonstick spray.  Bake at 350 degrees for  10 minutes.  Set on a wire rack to cool completely. When crust has cooled, beat the cream cheese, sugar, and peanut butter together until smooth.  Add the vanilla and mix well.  Fold in thawed whipped topping until everything is well combined.  Cover the cooled crust with the banana slices.  Spoon the peanut butter mixture over the bananas.  Smooth the top and drizzle with the chocolate sauce.  Cover and freeze at least 8 hours.  Let stand at room temperature 15 minutes before serving.  Makes 9 servings.

Linking to Food on Fridays

Wednesday, April 25, 2012

Ingredient Spotlight-Peanut Butter Banana Oatmeal

Happy Wednesday  and welcome to my new followers.  I see I have 99 today.  I feel a little give-away coming on when I reach 100.  Thanks to all who take the time out of their busy lives to read this blog.  I know that posting has been a little erratic lately, and I appreciate you stopping by.

Today's Ingredient Spotlight over at Eat at Home is bananas.  A banana is a wonderful, versatile fruit that comes in its own carrying case.  Such a wonder of nature.  For me personally a banana should be barely yellow.  I do not care to eat them after they have many brown spots.  I do love to put the riper ones in cookies, breads, and cakes, however.

Today I am sharing a recipe that is a nice change-up for regular breakfast oatmeal.  If you like peanut butter and bananas, this should be "right down your alley."  This is almost not a real recipe, and I found the idea at Taste of Home.  I like the crunch of the peanuts contrasted with the smoothness of the oatmeal and bananas in this, so use extra-crunchy peanut butter.  Of course, creamy peanut butter can be used instead.  All water or all milk can be used instead of the combination.  I use the combination and usually end up adding just a little milk when I eat the oatmeal.  I find that the less milk I need to add when serving, the hotter the oatmeal stays while I eat it.


Peanut Butter Banana Oatmeal
adapted from Taste of Home

1 1/2 c. water
1 1/2 c. milk
1/4 t. salt
1 1/2 c. quick-cooking rolled oats
1/2 t. vanilla
2 T. peanut butter, crunchy or creamy
4 t. sugar or to taste
2 fairly firm bananas, sliced

Combine water, milk and salt in a medium saucepan.  Bring to a boil.  Stir in oatmeal and cook 1 to 2 minutes or until desired consistency.  Remove from heat and stir in vanilla and peanut butter until well blended.  Add sugar to taste and mix well.  Pour into four serving bowls and top each serving with slices from half a banana.  Makes 4 servings.

Linking up to:  Ingredient Spotlight


Thursday, April 19, 2012

Improv Cooking Challenge-P B and J Streusel Bars

It is the third Thursday, and time again for Improv Cooking Challenge hosted by Kristen at Frugal Antics of a Harried Homemaker.   The combination this month is peanut butter and jelly.  I hope that peanut butter and jam will work as I rarely purchase jelly.

When I saw what this month’s combination was, I immediately knew that I wanted to make a bar cookie.  Of course, I always want to make cookies so this was certainly nothing unusual.  I also thought of a few more dessert ideas that I may pursue and post later.

I  started with a favorite peanut butter oatmeal bar recipe from Better Homes & Gardens, layered some jam on the top, and covered the jam with a peanut butter streusel.  I used strawberry jam, but any flavor could be used.  The original recipe used shortening, but I used butter.
 
I like Jif Extra Crunchy for this but any peanut butter can be used.  I almost always purchase whatever brand of peanut butter is on sale.


P B and J Streusel Bars
Adapted from Better Home & Gardens

1/2 c. butter, softened
1/2 c. sugar
1/2 c. brown sugar, packed
1/3 c. peanut butter
1 egg
1/2 t. vanilla
1/4 c. milk
1 c. flour
1/2 t. baking soda
1/2 t. salt
1 c. quick-cooking rolled oats
1 c. jam, any flavor
1/3 c. brown sugar, packed
1/3 c. flour
1/3 c. quick-cooking rolled oats
3 T. peanut butter
2 T. butter
1/4 c. chopped, roasted peanuts (opt.)

Cream together butter, sugar, brown sugar and peanut butter until well blended.  Stir in egg, vanilla and milk.  Mix well.  Combine flour, soda and salt.   Add to butter/sugar mixture and blend well.   Stir in rolled oats.  Spread mixture in a well-greased 9x13-inch pan.  Measure jam into a glass measuring cup.  Heat in microwave 30 seconds to 1 minute.  Spread jam evenly over the top of the batter.  In medium bowl combine brown sugar, flour and oats.  Add peanut butter and butter and cut into dry ingredients until particles are the size of small peas.  Add chopped peanuts.  Sprinkle mixture over the top of the jam.  Bake at 350 degrees for 30 to 35 minutes or until done.  Let cool and cut into squares.  Makes about 36 squares.


Be sure to check out all the other great recipes for peanut butter and jelly linked up for today’s party.

Next month’s Improv Cooking Challenge will be strawberries and cream.  If you would like to be part of the fun, you can find all the necessary information here.


Sunday, January 1, 2012

Peanut Butter Oatmeal Bars

A very Happy 2012 to all.  I hope everyone has a great year, and that all your wishes and dreams come true.

Since I am the Cookie Monster's grandmother, I am sure it comes as no surprise that the first recipe I am posting for 2012 is a cookie.  Peanut Butter Oatmeal Bars were one of my kids favorite cookies when they were growing up.  I had not made these in a very long time because the cookbook they were in had been misplaced.  I probably looked for it off and on for a couple of years.  (You have to know how big my cookbook collection is to understand why this would be so.)

Well, recently when looking for something else, I found the cookbook.  The first thing I did was make this recipe.  When my daughter came by and saw what I had baked, she couldn't believe it.  She was so excited you would have thought that she was 6 years old and not 47.  Needless to say, she took about a dozen bars home with her.

Now I figure if I post the recipe here, it will stay on the internet somewhere; and I can find it if I lose it again.

This recipe uses the biscuit method instead of the usual cookie method to make the dough.  I like to use chunky peanut butter in these and frost them either with Peanut Butter Frosting, Fudge Frosting, and even (ahem!) canned chocolate frosting.

The recipe comes from Better Homes and Gardens Homemade Cookies Cookbook, 1975.


Peanut Butter Oatmeal Bars
1 1/3 c. flour
1 c. brown sugar, packed
1/2 t. baking soda
1/4 t. salt
1/2 c. peanut butter
3 T. shortening
2 eggs, beaten
2 T. milk
1 t. vanilla
1/2 c. quick-cooking rolled oats

Stir together flour, sugar, soda and salt.  Cut in peanut butter and shortening until mixture resembles coarse crumbs.  Combine egg, milk and vanilla.  Add to flour mixture and blend well.  Stir in the oats and combine well.  Spread into lightly greased or foil-lined 9x13-inch baking pan.  Bake at 375 degrees 12 to 15 minutes.  Place pan on rack to cool.  When cool, spread with desired frosting.  Cut into bars.  Makes 48.

Peanut Butter Frosting
1 1/2 c. powdered sugar, sifted
2 T. butter or margarine, softened
2 T. peanut butter
1 to 2 T milk

Combine powdered sugar, butter or margarine and peanut butter.  Blend in enough milk to make frosting of desired spreading consistency.

Linking to:  Melt in Your Mouth Monday
Must Try Monday
Related Posts Plugin for WordPress, Blogger...