Image Map
Showing posts with label cream cheese. Show all posts

Sunday, October 12, 2014

Naan with Easy Cheesy Bean Dip-Secret Recipe Club


Sometimes when I am checking out the recipes at my assigned Secret Recipe Club blog I will come upon something that I have been thinking about making for awhile.  Such was the case with the blog Tasty Cheapskate, where I found not one but two different recipes for Naan and one for bean dip.  Since theses are something that I have been thinking about making, I decided that I need to get “off the fence” and just do it

Jeanie has been blogging since 2010 so has shared many great “tasty” and “cheap” recipes with her readers.  She feeds four children, one husband, and herself and shares my view that tasty food doesn’t have to mean expensive food

I did come upon a post that I want to point out that has nothing to do with food-How to Get Crayon Out of Washed and Dried Clothes Cheaply.  I have no children living here that I could blame that situation on if it happened now, but I would have loved having this information when it did happen when I had kids.

Now, back to the cooking.  There were two recipe for Naan,  One with yeast and Quick Naan made with baking powder.  The Quick Naan uses yogurt which I did not have on hand so I made the one with yeast.  It took a little time because of the rising, but the rest of the process was easy  I used all white whole-wheat flour instead of a combination of all-purpose and whole-wheat flour because I had it on hand.  The directions did not say how much or long to knead the dough so I kneaded it 100 times, turning the dough ball over after every 10 kneads.  After the first rising, I made 15 dough balls.  Mine may have been a bit smaller than Jeanie’s as she made 10.


I have a glass rolling pin so rolled the dough balls out between two sheets of waxed paper and was able to get them quite thin.  It took about 30 minutes to “bake” the Naan in a frying pan.  I would roll a new dough ball out while another one was “baking.”

I wanted something to eat with the Naan so made the Easy Cheesy Bean Dip.  I cannot begin to say how good these were together.  They definitely will a regular rotation at my house.

The bean dip recipe uses taco seasoning.  I never buy commercial taco seasoning as I always have all the necessary ingredients on hand to make it myself.  I use various homemade taco seasoning recipes and used the one Jeanie has on her blog.   I was hesitate to use the amount of salt called for since refried beans can be a little salty.  I did use that much salt and felt that the dip was just a little too salty for my taste.  I would recommend  omitting the salt in the seasoning recipe, tasting the dip and adding salt if it is needed.  Hubby is not much of a bean eater, and this makes a lot of dip so I am going to freeze some of it and see if that works.

Now I had a dilemma, should I post one recipe (and which one?) and just reference the other, or should I post them both.  I decided that it would be more convenient for my readers to post both recipes here instead of making them click around for the second one.

Of course there were lots and lots of other recipes on this blog that I am going to try.  Apple harvest is in full swing here and  I think Rebbeca’s Apple Cinnamon Rolls should be on my table soon.  There is a whole week of breakfast cookies posted back in 2010 that should be checked out.  Being one who has always liked fresh Brussels Sprouts, I loved the post on How Not to Hate Brussels Sprouts and am going to make them that way next time I have some on hand.

A visit to The Tasty Cheapskate will be well worth you time, and one thing you should check out is the Cheap Eats Challenge where Jeannie attempted to feed her family of six on $6 a day in 2011.


Naan
adapted from The Tasty Cheapskate
1 T. active dry yeast
1 c. warm water
14 c. sugar
3 T. milk
1 egg, beaten
2 t. salt
2 c. whole wheat flour
2 1/2 c. all purpose flour

In a large mixing bowl dissolve yeast in the warm water.  Stir in sugar, milk, egg and salt.  Mix in 1 to 2 cups flour.  Add another cup flour and then add flour 1/2 cup at a time until you can’t mix it with a spoon any more.  Turn out onto a floured surface ( I use a cookie sheet) and knead.  (I kneaded 100 times, turning the ball over after every 10 kneads.)  Let rise, covered in warm place until dough has doubled in size (about 1 hour). Punch down.  At this point you may knead in minced garlic or herbs if you like.  Make balls of dough about the size of golf balls.  Cover and let rise 30 minutes.  (This rising can be skipped if you’re pressed for time.)  Keep dough balls covered before rolling them out.  Heat a heavy bottom, oiled skillet until just above medium.  Roll dough balls out into rough circles and as thin as you can.  (I do this between two sheets of waxed paper, using new paper if the dough begins to stick.).  Place a dough circle in skillet and cook 2 to 3 minutes until air pockets begin to form.  Turn and cook on the second side another 1 to 2 minutes or until lightly browned.  Remove to pie plate or platter and repeat with remaining dough balls.  Stack cooked Naan to keep them warm.  Makes 10 to 15 pieces.  Let cool if not eating right away and store in a zip-top bag in the refrigerator or freeze.


Easy Cheesy Bean Dip

adapted from The Tasty Cheapskate
1 (8 oz.) pkg. cream cheese, softened (Place cheese in a zip-top bag and immerse bag in a bowl of hot water for 15 to 20 minutes to quickly soften the cream cheese.)
1 c. sour cream or Greek yogurt (I used sour cream)
1 (16 oz.) can refried beans
2 T. taco seasoning (I used one recipe of the homemade mix here)
1 1/2 t. onion powder
1 1/2 t. garlic powder
1 c. (8 oz.) shredded sharp cheddar cheese-divided
choice of chips, veggies, etc. for dipping (I used torn pieces of Naan)

In a medium mixing bow, blend everything together until well blended.  Spoon half the bean mixture into the bottom of a 9x13-inch baking pan.  Layer with half the cheese.  Repeat layers.  Baking at 375 for 20-30 minutes or until cheese is melted and bubbling at the edges.  May also be layered and cooked in a crockpot on low for about 4 hours.  Since I was eating this by myself, I placed some bean dip in a individual ramekin, sprinkled some cheese on the top and microwaved it for about 1 minute until the dip was hot and the cheese was mostly melted.  Makes about 10 servings.


Visit here to learn how to join in the fun of Secret Recipe Club.


Thursday, June 19, 2014

Cream Cheese Stuffed, Raspberry Glazed Chicken Breasts


 The ingredient for the Improv Challenge for June are raspberries and cream.  When you think of raspberries and cream, the mind automatically goes to something sweet.  When Kristen from Frugal Antics of a Harried Homemaker mentioned in her facebook post that the cream could be cream cheese, and she was excited to see if anyone would make a savory raspberry and cream dish; I thought why not.

I remembered that I had seen many recipes for cream cheese stuffed chicken breast, so maybe I could take that idea and go with a raspberry sauce/glaze to top the chicken.  This post is what I came up with, and we have had it for dinner twice now. 

I added garlic powder and sliced green onion to the cream cheese filling and made a sort of sweet/sour sauce/glaze for topping the chicken.  This wasn’t all that hard to make, and I think that it would make a nice dish to serve to guests.


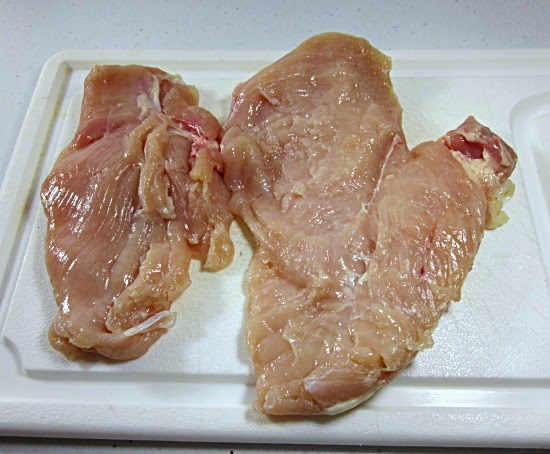
The chicken breasts that I purchased were quite large, and some of them included the tenderloin like the one above.  I sliced off the tenderloin and cut the remaining piece in half so got three pieces from one chicken breast.  This does make it a little hard to specify exactly how many chicken breasts are needed for this recipe so I am going to say 4 small chicken breast halves.

You can soften the cream cheese quickly by putting in a zip top bag and placing it in very warm water for about 10 minutes.


Cream Cheese Stuffed Raspberry Glazed Chicken Breasts
1 3-oz. pkg. cream cheese, softened (see tip above)
1/2 t. garlic powder
1 green onion, thinly sliced
4 small boneless, skinless chicken breasts
1 egg beaten with 1 T. water
1/3 c. panko crumbs
3/4 t. seasoned salt
1/4 c. butter
Raspberry Sweet/Sour Sauce (see recipe below)

Heat oven to 375 degrees.  In a small bowl combine softened cream cheese, garlic powder and sliced green onion.  Mix well.  Set aside.  Pound chicken breasts between two pieces of plastic wrap to 1/4-inch thickness.  Spread each breast with 1/4 of the cream cheese mixture.  Roll up and secure with toothpicks.  Combine egg and water in a shallow pie pan.  Place panko crumbs in another shallow pie pan.  Add seasoned salt and mix well.  Slice butter and place in a foil-lined 10x13-inch baking pan.  Place pan in oven to melt butter.  Coat a chicken breast with the egg mixture, roll in the panko mixture and place on a sheet of waxed paper.  Repeat with remaining chicken breasts.  Remove pan from oven and place chicken breasts in the melted butter.  Return to oven and bake for 20 minutes.  Turn chicken breasts over and bake for another 20-25 minutes until done.  Meanwhile prepare Raspberry Sauce.  Spread some of the sauce over the chicken breasts and bake another 5 minutes.  Serve remaining sauce to spoon over the breasts at the table.  Makes 4 servings.

Raspberry Sweet/Sour Sauce
1 1/2 c. fresh or frozen raspberries
1 t. minced garlic
3 T. brown sugar
1 T. balsamic vinegar
1 T. molasses
1 T. Worcestershire sauce
2 t. Dijon mustard
2 T. ketchup
1 T. lemon juice
1/8 t. salt
1/8 t. pepper

Heat raspberries and garlic together in a small saucepan.  When hot, add remaining ingredients.  Bring to a boil, lower heat and simmer 10 minutes until thickened. Strain, if desired.  (I don’t.)  Makes about 1 cup.


All the details for joining in this fun challenge are included in Kristen's Improv Page.

Wednesday, October 2, 2013

Banana Sour Cream Bars-12 Weeks of Christmas Treats


It is week 2 of 12 Weeks of Christmas Treats hosted by Brenda at Menu Planning Magic.  I felt a bit like Goldilocks this past week.  I wanted to post some new and different bar cookie recipes that, perhaps, were not already out there on the net.  Like Goldi's experience, none were "just right." 

Finally, I chose to make and post an old reliable banana bar cookie recipe.  It is a nice change from having banana bread.  I like to include banana bars and other, not so common flavors, on holiday cookie plates.  It makes for a nice contrast.  The bars can be "fancied up" by adding a half cup each of chopped, toasted nuts and chopped red and/or green candied cherries.

If I am in a hurry to get butter softened, I will thinly slice it into a bowl.  That way it softens very quickly.  I posted a trick to quickly soften cream cheese that works very well.

Banana Sour Cream Bars
1/2 c. butter softened
1 1/2 c. sugar
2 eggs
1 c. sour cream, regular or low-fat
1 t. vanilla
2 c. flour
1 t. baking soda
1 t. salt
2 large, very ripe bananas, mashed
1 (8 oz.) pkg. regular or low-fat cream cheese, softened
1/2 c. butter, softened
1 t. vanilla
3 1/2 c. sifted powdered sugar

Cream butter and sugar together until very fluffy.  Add eggs and beat well.  Stir in sour cream and vanilla.  Combine flour, baking soda and salt.  Stir into creamed ingredients, mixing well.  Fold in mashed bananas.  Pour into a greased 15x10x1-inch baking pan.  Bake at 350 degrees for 20-25 minutes until golden brown.  Cool in pan on rack.  When cool, combine cream cheese and butter in an electric mixer bowl.  Beat with mixer until well blended and smooth.  Add vanilla and mix to combine.  Add sifted powdered sugar  and mix until well blended and of spreading consistency.  Spread over cooled cookies.  Cut into bars.  Store covered in the refrigerator.  Makes about 36 bars.

There is still time to join us and share some of the Christmas treats you are making.  You can find all the information for joining in the fun in this post at Menu Planning Magic

Linking to these great parties:
Show and Share Wednesday
What's Cookin' Wednesday
Cast Party Wednesday
Wake Up Wednesday
Whimsy Wednesday
Wow Me Wednesday at Gingersnap Crafts
Wow Me Wednesday at Polkadots on Parade
Fluster's Creative Muster


To see what other bloggers have posted this week, check out the links below.

Thursday, August 8, 2013

Peach Nectar Poke Cake-Dessert Challenge


I was very happy when I learned that Sheryl from Lady Behind the Curtain had picked peaches and cream for this month’s Dessert Challenge.  Peaches are one of my favorite summer fruits.

I had been thinking about making a poke cake for some time, and this seemed like a good time to make one.  Many poke cake recipes use a cake mix and flavored gelatin, but I wanted to see what I could do with made-from-scratch ingredients.  I made the cake from the Basic Cake recipe I posted yesterday and chose to use peach nectar, pureed peaches and unflavored gelatin to make the filling.
Since I also needed to use cream, I went searching for a frosting recipe using whipped cream and found one over at allrecipes.  I changed it a bit to suit my taste.

This is a dessert that needs to be made ahead, at least one day for best flavor.  The cake needs to be made first.  If your choose to use a commercial cake mix, that is fine.  Just make it according to the package directions.  Another option is to make Homemade Cake Mix and make the cake from that.

After letting the cake cool, it is necessary to poke holes all over the top of the cake.  I like the holes to be about 1/4-inch and use a short length of 1/4-inch dowel that I keep in my kitchen.  The handles of some wooden spoons  will work also.

Make the peach filling and pour it over the top of the cake letting it seep into the holes.  Place the cake in the refrigerator to chill and allow the filling to set at least 4 hours.  The "pokes" didn't show up too well on the cake I made using a yellow cake.  Next time I will probably make a white cake or add a bit of food coloring to the filling.

Prepare frosting and spread on cake. (See my tip for quickly softening cream cheese here.)   Refrigerate at least 2 hours to set frosting.  Cover with plastic wrap and chill till serving time.

Peach Melba Poke Cake
1 prepared yellow or white cake (may be made from scratch, from a homemade mix, or a commercial mix)
1 (12 oz.) can peach nectar
2 fresh peaches
1/2 c. water
1 envelope unflavored gelatin
1 (8 oz.) pkg. cream cheese, softened (regular or low-fat)
3/4 c. sugar
1 t. vanilla
1 pt. (2 c.) whipping cream

Prepare cake using your choice of methods.  Bake and allow cake to cool.  Poke 1/4-inch holes all over surface of cake about 1-inch apart and going about three-fourths of the way through the cake.  Pour peach nectar in a medium saucepan.  Peel and slice peaches into a blender or food processor container.  Blend until smooth and consistency of applesauce.  Add peaches to peach nectar.  Place saucepan over medium heat and heat peach mixture to boiling.  While nectar is combing to a boil, pour unflavored gelatin in the 1/2 c. water and allow gelatin to soften.  Stir well.  Boil nectar/peach mixture about 5 minutes to allow it to reduce slightly in volume,  watching carefully and stirring often.  Remove from heat and add gelatin/water mixture.  Stir until gelatin is completely dissolved.  Pour nectar mixture over cake, allowing it to seep into the holes.  Place cake in refrigerator and chill at least 4 hours.   Place softened cream cheese, sugar and vanilla in an electric mixer bowl.  If using a stand mixer, fit it with the whisk attachment and mix on medium speed until mixture is smooth.  Scrap down the sides of the bowl.  While mixer is running, slowly pour in the whipping cream, beating until the mixture holds a stiff peak.  Stop and scrape the bottom of the bowl a couple of times.  (It may take a few minutes for the mixture to get to the proper consistency.)  Spread frosting over the top of the cake and chill at least 2 hours.  Cover with plastic wrap and chill until ready to serve.  Makes 12 to 15 generous servings.

To see what other Dessert Challenge bloggers chose to make with peaches and "cream", check out the links below.

If you would like to join in September's Dessert Challenge which will feature apples and cinnamon, visit Sheryl's Dessert Challenge page. 

Linking to these great parties:
Catch a Glimpse Party
Thursday's Treasurers
Showcase Your Talent Thursday
Tasty Thursday
Fantastic Thursday
Full Plate Thursday

Tuesday, June 25, 2013

Softening Cream Cheese Quickly


 I am one of those people who often decides to make a recipe at the last minute.  Now the problem is that I don't like to wait while things like butter and cream cheese soften to room temperature.  In the past, I have used the microwave to speed things up, but that creates the risk of melting not softening.

Recently I learned of a way to soften cream cheese quickly and easily.  Just put the cream cheese in a zip-top bag.  Zip the bag shut squeezing out as much air as possible, then place the bag of cream cheese in hot water.  Depending on the amount of cream cheese, it will soften in just a few minutes.  You can squeeze the bag as it softens to help the cheese soften faster.  In the photo I was softening 4 oz. of cream cheese, and it took about 10 minutes.  When the cream cheese has softened, I cut the bag open with kitchen scissors and scrape the cream cheese into the mixing bowl with a spatula.I have used this idea several times now, and I think it works very well.

This came from Tom Small, chef at Tacoma's Boathouse 19 who was appearing on a public television show KCTS Cooks Kitchen Classics, a fundraising program for the station.


Linking to these great parties:
Take a Look Tuesday
Get Your Craft On
Two Cup Tuesday
Tuesday Talent Show
Tasteful Tuesday
Show Me What You Got
Totally Tasteful Tuesday
Show Me What Ya Got


Saturday, June 22, 2013

Strawberry Cream Cheese Swirl Bread-Saturday Sweet

Today’s Saturday Sweet is Strawberry Cream Cheese Swirl Bread.  This is a moist, pinkish bread with swirls of white cream cheese marbled through it.  The recipe makes a large loaf, and it is nice to serve at bridal and baby showers.  It can be made ahead and kept  tightly wrapped in plastic in the refrigerator.  The bread can be frozen and will keep several months if well wrapped.  Since either fresh or individually frozen strawberries can be used in this recipe, I prefer to make the bread up fresh.

I did not include it in the photo, but I like to serve this with Strawberry Spread:  1 (8 oz.) pkg. cream cheese, softened and mixed with 1/4 c. strawberry jam.

Strawberry Cream Cheese Swirl Bread
1 egg
1 (8 oz.) pkg. cream cheese, softened (low-fat is OK)
1/4 c. sugar
1/2 t. cinnamon
1 3/4 c. flour
1 1/2 c. sugar
1 t. baking soda
1/2 t. salt
1/2 c. (1 stick) butter, melted
1 egg
1/3 c. water
1 1/2 c. fresh or individually frozen strawberries, mashed by hand or processed in a food chopper
1/2 c. walnuts, toasted

In a medium mixing bowl, beat egg well.  Add cream cheese, sugar and cinnamon.  Beat until smooth with an electric hand mixer or a wire whisk.  Set aside.  In a large mixing bowl, combine flour, sugar, soda and salt.  In a second bowl combine melted butter, egg and water.  Beat well.  Add mashed strawberries.  Mix well.  Mix strawberry mixture into dry ingredients stirring just until dry ingredients are moistened.  Stir in walnuts.  The batter will be thick.  Grease and flour a 5x9-inch loaf pan.  Spoon half of batter into the pan.  Pour cream cheese mixture over batter in the pan, smoothing out evenly.  Spoon remaining batter over cream cheese layer, covering it as much as possible.  Bake at 350 degrees about 1 hour and 10 minutes.  Cool in pan on wire rack for 10 minutes, remove from pan and cool completely before slicing, at least 2 hours.  Cut into slices with a thin sharp knife.  Store tightly wrapped in the refrigerator.  Makes 1 loaf, about 16 slices.

Linking to these great parties:
Weekend Potluck
Weekend Bloggy Reading
Strut Your Stuff
Share Your Creativity
Party Junk
I'm Lovin' It
Saturday Spotlight 
Sunday Funday 
Pin It Monday


Saturday, June 15, 2013

Stuffed Iceberg Lettuce Salad-Eating the Alphabet


I will not be posting a Saturday Sweet today as this is the day to post for this month's Eating the Alphabet Challenge hosted by Brenda at Meal Planning Magic.  You can, however, find a recipe for a Double Berry Giant Eclair in Thursday's post.

The letters for June are I and J, and they are, indeed, a challenge.  The only two vegetables I could think of were iceberg lettuce and jicama.

Although it is somewhat looked down upon now, when I was growing up in the late 40’s and 50’s, iceberg lettuce was the most common lettuce found at the grocery store so people ate a lot of it. Creative cooks dreamed up many ways to serve it.  After all, this was the era of peach and pear halves made into faces and bananas made into candles.


In my area of the country, a popular “ladies’ lunch” dish was Stuffed Iceberg Lettuce Salad.  This dish consisted of cream cheese and other ingredients that were combined and stuffed into a cored head of lettuce.  The whole thing was tightly wrapped, chilled for several hours or overnight, then sliced for serving.  Generally, the slice of lettuce was smeared with a mayonnaise-based red dressing.  Because the slice of lettuce was cut up and everything mixed together to eat it,  this was also sometimes called a Knife and Fork Salad.

In the spirit of reviving an old favorite, today I am sharing a recipe for Stuffed Iceberg Lettuce Salad.  I have included two dressing choices, one for vegetable salad and one for fruit salad.


When selecting a head of lettuce to stuff, look for one that is heavy for its size and that has the core centered as much as possible.

The stuffing mixture is very flexible so if I have an 8-oz. package of cream cheese on hand, I use half of it.  If I have to buy cream cheese, I sometimes just buy the 3-oz. package.  Either can be used.

Almost any ingredient that one wants can be mixed in with the cream cheese.  Vegetables such as grated carrot, minced onion, peppers, tomatoes, radishes, celery, cucumber are common.  For a fruit salad chopped fresh or canned fruit such as apples, cherries, peaches, pears, pineapple, mandarin oranges or strawberries can be used.  Usually nuts are added to this.  Chopped cooked chicken, ham, tuna, salmon or bacon can be added for a more main-dish salad.  Consider the recipe below just a basic guide.

Stuffed Iceberg Lettuce Salad
1 medium head Iceberg Lettuce
3-4 oz. cream cheese, softened (regular, low fat or fat-free)
2 T. shredded Cheddar
2 T. minced onion, regular or green
2 T. minced red pepper
2 T. chopped black olives
1/4 t. garlic powder
1/4 t. dill weed
salt and pepper to taste

Combine all ingredients except lettuce in a small bowl and mix until well blended.  Set aside.  Smack core of lettuce against the edge of a counter to dislodge it.  Twist and remove the core.  If cavity does not seem big enough to hold all the cream cheese mixture, reach in and remove additional lettuce with a clean hand.  Stuff the cream cheese mixture tightly into the lettuce cavity.  Wrap tightly with plastic wrap and chill several hours or overnight.  At serving time, remove from refrigerator.  Cut into thick slices with a very sharp knife.  Lay on serving plates and smear lettuce with a thick red dressing such as the ones below.  Makes about 4 servings.

Quick Red Dressing (for vegetable or main-dish salad.
1/2 c. mayonnaise
1/4 c. chili sauce or ketchup
2 T. pickle relish
1 t. lemon juice

Combine ingredients in a small bowl until well blended.  Chill to blend flavors.  Makes about 3/4 c.

Cranberry Dressing (for fruit salad)
1 c. jellied cranberry sauce
1 c. mayonnaise
2 T. lemon juice
1 c. whipped cream (opt.)

Beat cranberry sauce and mayonnaise with an electric mixer until well blended.  Stir in lemon juice.  Chill to blend flavors.  For a richer dressing, fold in whipped cream.  Makes 2 -3 c.

There is still time to join in the fun and help us finish up the rest of the alphabet.  You can find all the necessary details on Brenda's Eating the Alphabet page.

Click on the links below to see what other bloggers have dreamed up for the letters I and J.

Linking to these great parties:
Weekend Potluck
Weekend Bloggy Reading
Party Junk
Strut Your Stuff
Share Your Creativity
I'm Lovin' It
What'd You Do this Weekend
Marvelous Monday
Mix It Up Monday
Recipe Sharing Monday
Melt in Your Mouth Monday
On the Menu Monday
Make the Scene Monday
Mop It Up Monday
Manic Monday
Sweet Sharing Monday
Monday Funday


Wednesday, May 15, 2013

Cheesy Green Bean Wontons-Eating the Alphabet

The idea for this recipe came from a post for Asparagus Pockets by Sheryl over at Lady Behind the Curtain.  She used asparagus and crescent rolls.

This month’s letters for Eating the Alphabet Recipe Challenge, hosted by Brenda over at Meal Planning Magic, are G and H.  I knew that I wanted to make something new with green beans.  When I saw Sheryl’s post, I thought “Why not green beans and why not wontons?”  Thus, this recipe for Cheesy Green Bean Wontons was born.  Thanks, Sheryl, for the inspiration.

You could, of course, use cooked asparagus here instead of green beans.  Chopped broccoli and shredded carrots are another option.  Adding some cooked, finely chopped chicken, turkey or ham could turn the wontons into a main dish.  I am adding some chopped ripe olives next time I make these.

I used well-drained, canned green beans because that is all hubby will eat, but I think that crisply cooked frozen or fresh green beans would be even better.

I think dill goes well with green beans so I used that.  If you are not a dill person use something else.  Italian herbs would be good also.

The wontons can be served as an appetizer or a side dish, with or without a dip.  I made about 36 wontons and have been eating the remaining filling on toasted Sandwich Thins.

Cheesy Green Bean Wontons
1 (12 oz.) pkg. wontons
1/2 T. olive oil
1/3 c. minced red pepper
1/3 c. finely sliced green onion
1 lg. clove garlic, minced
1 (8 oz.) pkg. cream cheese, well softened (can be regular or low fat, and I used whipped cream cheese)
1 t. dried dill weed
1/2 t. garlic powder
1 (16 oz.) can cut green beans, well drained and cut into 1/4-inch pieces or 1 1/2 c. crisply cooked frozen or fresh green beans, cut into 1/4-inch pieces
olive oil

Heat olive oil in a small skillet.  Add red pepper, green onion and garlic and cook gently for about 5 minutes.  Set aside.  combine cream cheese, dill week and garlic powder.  Mix well.  Stir in pepper/onion mixture and green beans.  Mix well.  Place wontons on a foil-lines baking pan.  Place a heaping teaspoon of green bean mixture in the center of each wonton.  Moisten edges of wontons with water and bring them together to form a triangle.  When the baking pan is full, brush wontons lightly with olive oil.  Bake at 375 degrees 10-15 minutes or until the edges of the wonton’s are lightly browned, turning the wontons over at about 7 minutes.  Makes about 36 to 48 wontons.

Sharing at these great parties:

Check out the links below to see what creations other bloggers have shared today.

Sunday, May 12, 2013

5-Spice Stuffed French Toast with Buttermilk Syrup-Secret Recipe Club

Secret Recipe Club


My assignment for this month’s Secret Recipe Club was Bad-Girls-Kitchen.  This is both a one-person and a collaborative blog that was started in 2008.  That means there is a wealth of wonderful recipes, and my “to make” file grew by leaps and bounds when I searched through this blog.

There are so many wonderful recipes I want to make, especially Carrot Salad, Spiced Quinoa with Cherries, Instant Chai Mix, Carrot Hummus, Garlic Naan and on and on.

I knew that I would be home alone on Mother’s Day, wanted to make myself a treat, and chose to make Stuffed French Toast with Buttermilk Syrup so I actually made two recipes from the blog.

Min is right about the Buttermilk Syrup, it just may make me give up maple syrup completely.  This syrup is  ridiculously quick and easy to make, but I do have a couple of hints.  Use at least a medium saucepan to make this, as the sauce foams quite a bit when the soda is added.  I used a small saucepan, and the syrup almost foamed over.  I cut the butter into thick slices when I put it in the saucepan so that the butter will melt a little faster.  I think a nice variation for the syrup would be to add some spices to it.  5-Spice, Cinnamon, Nutmeg, Apple Pie Spice or Pumpkin Pie Spice would all be good.

I love it so much, I chose to use 5-Spice instead of cinnamon in the Stuffed French Toast.  Although I was making French Toast just for me, I made a full recipe of the filling which I plan to use as a spread on English muffins, bagels, or toast.  I am thinking of adding  a quarter of a cup of mashed berries to the filling sometime.

Because I was cooking for one, I used one egg and a quarter of the rest of the coating ingredients.  I had planned to use Texas Toast, but  my local bakery outlet store was out.  I bought a loaf of bread that was very much like homemade, but it may have been a bit soft for French Toast.  I let the sandwich sit in the egg mixture until almost all the egg was soaked up, turning the sandwich a couple of times.

Trying to be fancy, I chose to bake this in my waffle iron for waffled French Toast.  This worked OK, but the sandwich separated, and I had to use a fork to remove the bread slices from the grids.  I didn’t spray my grids with non-stick spray so that would probably have helped.  Not totally sure that it was worth the effort, though.

I served the French toast with the Buttermilk Syrup, a couple sausage patties, mini orange slices and a couple of strawberries.  This is a delicious breakfast for Mother’s Day or any day for that matter.

Thanks for two delicious dishes.  I have subscribed to this blog and expect to find more great recipes.

Buttermilk Syrup
from The Bed Girl's Kitchen

1 c. sugar
1/2 c. (1 cube) butter
1/2 c. buttermilk
1 t. baking soda
1 t. vanilla

Combine sugar and buttermilk in a medium saucepan.  Slice butter cube and add to saucepan.  Stir and bring to a boil over medium heat, continuing to stir often as butter melts.  When the mixture has reached a full boil, remove from heat.  Cool 1 minute and add vanilla and soda.  Serve warm or cool.  Store in the refrigerator.  Makes about 1 1/2 cups.

5-Spiced Stuffed French Toast
From The Bad Girl's Kitchen

8 sliced thick, sturdy bread
4 oz.s. soft cream cheese ( I used whipped)
1 t. 5-Spice or cinnamon
1 T. brown sugar
1/2 t. vanilla
4 eggs, well beaten
1 t. 5-Spice or cinnamon
1 t. vanilla
1/2 c. milk
1 T. butter

Combine cream cheese, 5-Spice or cinnamon, brown sugar and vanilla in a small bowl and mix well.  Spread 1/4 of the mixture on each of 4 slices of bread.  Top with remaining bread slices to make sandwiches.  Beat eggs well with a whisk in a small bowl.  Add 5-Spice or cinnamon, vanilla and milk.  Pour egg mixture into a 9x13-inch baking dish.  Add sandwiches to egg mixture.  Soak until almost all of the egg has been absorbed by the sandwiches, turning to soak evenly.  Slowly heat butter in a large skillet.  Add sandwiches and cook about two minutes on each side or until heated through and a golden brown.  Remove to plates, top with Buttermilk Syrup and enjoy.  Serves 4.

 If you are not familiar with it, Secret Recipe Club matches you up with another blogger each month and you secretly visit their blog, select a recipe, prepare and blog about it on a specific date each month.  All the details are on their blog.

Linking to these great parties:
Mop It Up Monday
Marvelous Monday
Make the Scene Monday
Melt in Your Mouth Monday
Mealtime Monday
Manic Monday
What'd You Do This Weekend?


Thursday, November 1, 2012

12 Weeks of Christmas Treats-Cranberry Cream Cheese Bars


graphic1-updated
We are at week six of this year’s 12 Weeks of Christmas Treats.  Hope your Christmas recipe arsenal is getting loaded with many great recipes.

I am continuing to make cookies using the Holiday Cookie Mix.  Although this is the sixth week of 12 Weeks of Christmas Treats, this is recipe number 7 made from the Holiday Cookie Mix.  The recipes that I have posted this far are:

Glazed Cinnamon Toffee Bars (Holiday Cookie Mix is here)
Buttermilk Rum Bars
Krispie Nut Bars
Chocolate Cottage Bars
Tropical Dreams
Tart and Tasty Lemon Bars

I made an error in the amount the Holiday Cookie Mix makes in my original post.  I said 12 cups, but it is actually about 16 cups.  I have made the correction in the original  post. One batch of the mix made all the listed recipes.  I have now started with a second batch of mix.

If you have ever purchased too many cans of cranberry sauce at holiday time, here is a way to use some of it up.  I developed this recipe to do just that.  These have a shortbread-like crust, a tart and creamy filling, and a crispy topping.  The can be cut into small bars to serve as cookies or into larger squares to serve as a dessert.

Either jellied or whole berry cranberry can be used.  A nice variation to this is to add a couple of finely chopped apples to the cranberry/cream cheese mixture.  The cream cheese can also be mixed with different flavor preserves to make other variations of these cookies.  Although I did not do it for the bars in the photos, next time I think that I will add a bit of red food coloring for added color to the filling.

Cranberry Cream Cheese Bars
2 1/2 c. Holiday Cookie Mix
1 pkg. (8 oz.) cream cheese, very soft (may be low fat)
1 can (16 oz.) cranberry sauce
2 T. flour
a few drops of red food coloring (opt.)
2 c. Holiday Cookie Mix
1/2 c. quick oats
1/2 c. chopped toasted walnuts

Pat the 2 1/2 cups cookie mix evenly into a foil-lined 9x13-inch baking pan.  Bake at 350 degrees for 12 to 15 minutes.  Remove and let cook 5 to 10 minutes.  Beat cream cheese,   cranberry sauce and flour together until well blended.  The mixture will not be smooth if using whole berry sauce.  Spread mixture over the baked crust.  In a medium bowl combine 2 cups cookie mix, quick oats and walnuts and mix until well blended.  Sprinkle evenly over cranberry/cream cheese mixture.  Pat topping down gently.  Bake at 350 degrees 30 minutes until topping is golden brown.  Makes about 36 bar cookies or 12 to 15 dessert squares.  Store in refrigerator.

12 Weeks of Christmas Sweets is hosted by Brenda from Meal Planning Magic.  There is still time to join us, and you can find all the necessary information in her post here.

Check out the links below for all the delicious recipes shared this week.

Saturday, September 1, 2012

Frozen Chocolate Coconut Almond Joy

Here is another sweet recipe for a Saturday.  When I received my Foodie Penpal package this month, I received a package of these cookies.

IMG_3431-1

I did not even know that coconut Oreos were available.  Well, I ate a few, and they were very good.  So good I decided that I wanted to make a dessert with some of them.  Chocolate and almonds always go well with coconut so I created this.

IMG_3536-1 

I used the cookies to make the bottom crust, then added a layer of cream cheese, powdered sugar, whipped topping and coconut.  I topped this layer with sliced almonds and then put chocolate no-machine ice cream on the top.  Tried this on hubby, and he approved.

Although this is a very easy recipe, there is chilling time involved, and it must be made ahead.

You won’t need the entire package of the cookies, so feel free to eat the excess.

Frozen Chocolate Coconut Almond Joy
1 pkg. Coconut Oreos (make 1 3/4 c. cookie crumbs)
1/4 c. butter, melted
1 pkg. (8 oz.) cream cheese, softened (I use 1/3 less fat)
1 c. powdered sugar, sifted
2 c. frozen whipped topping, thawed
1 to 2 t. coconut extract (optional, but I use it)
3/4 c. sweetened flaked coconut, toasted in oven until moisture has evaporated (watch carefully)
3/4 c. sliced almonds
2 c. whipping cream
1 can (14 oz.) sweetened condensed milk (can be fat free and you can make your own.
2 to 3 T. cocoa, depending on how chocolatey you like your ice cream

Combine crushed cookies and melted butter until well blended.  Press into the bottom of a 9x13-inch pan.  Chill 30 minutes.  Combine softened cream cheese and powdered sugar until well blended.  Fold in whipped topping.  Stir in coconut extract and coconut.  Spread cream cheese mixture on top of chilled cookie crust.  Sprinkle sliced almonds over the cream cheese mixture.  Press almonds into cream cheese mixture carefully with your hand.  Chill at least 30 minutes.  Whip cream with an electric mixer until stiff peaks form.  In another bowl combine sweetened condensed milk and cocoa until well blended.  Fold whipped cream into condensed milk mixture.  Spread whipped cream mixture over cream cheese mixture.  Cover and place in freezer at least 6 hours before serving.  This is very rich and will serve at least 12 to 15 people.  Enjoy.

Linking to Weekend Potluck
Sweets for a Saturday
Strut Your Stuff Saturday
Weekend Bloggy Reading
I'm Lovin' It Party
Busy Monday

Wednesday, August 22, 2012

Ingredient Spotlight-Taco Corn and Bean Salad


IMG_3373-1

Corn is the Ingredient Spotlight over at Eat at Home today.   I have always liked the so-called Frito Corn Salad that may or may not have originated with Paula Deen, but I wanted a salad that could stand in as a meatless main dish.

I added beans for more protein and taco seasoning to “up the flavor factor”.  I reduced the amount of mayonnaise and added sour cream and cream cheese.  Since I don’t like green peppers, I used red peppers and then green onions to supply the green color.  I also added chopped ripe olives.

Canned corn, cooked, frozen corn or fresh corn, cooked and removed from the cob can be used for this dish.  About 4 cups or frozen or fresh corn will be needed.

Use your favorite beans for this.  I like pinto or red beans, but black ones add a really nice color contrast.

I make my own taco seasoning to save money and avoid unwanted chemicals and preservatives, but a commercial packet may be used.  There are many recipes for homemade taco seasoning on the internet.  Just Google and keep trying them until you find one your family likes.

Although most recipes have the Fritos stirred into the salad, I find that they become soggy if there is any salad left over.  When I make this for eating at home I just set the crushed corn chips out in a bowl and let people top each serving.  If am taking this to a potluck, I sprinkle the crushed chips on top of the salad.  If there is any salad left over, I tip the bowl and let the corn chips fall into a shallow container.  I put them in a plastic bag and store them in the refrigerator.  When ready to use, I put them on a glass pie plate and microwave them a minute at a time until the corn chips are crisp again.

This salad is best made at least several hours ahead of serving.  I like to make mine the day before.

IMG_3377-1

Taco Corn and Bean Salad
2 cans (16 oz.) cans whole kernel corn, well drained or 4 cups cooked frozen or fresh corn kernels
1 can (16 oz.) pinto, kidney, red or black beans, well drained and rinsed
1 c. chopped red pepper
1/2 c. chopped red onion
1/3 c. sliced green onions
1 can (3.8 oz.) sliced olives, well drained and halved
1 (3 oz.) pkg. low fat cream cheese, very soft
1/2 c. Low-fat sour cream
1/2 c. low fat mayonnaise
1 T. chili powder
1/2 T. ground cumin
1 t. salt
1 t. freshly ground black pepper
1/2 t. paprika (smoked if you have it)
1/4 t. garlic powder
1/4 t. onion powder
1/4 t. dried oregano, crushed
1/4 t. red pepper flakes (opt.)
2 c (8 oz.) shredded sharp cheddar cheese or Mexican blend
1 (10 1/2 oz.) bag Fritos, regular or Chili Cheese corn chips (I usually don’t need a whole bag)

 a large mixing bowl combine corn, beans, red pepper, red onion, green onion and olives mix well.  In a medium mixing bowl combine the very soft cream cheese, sour cream and mayonnaise.  Mix until well blend.  Add the chili powder, cumin, salt, pepper, paprika, garlic powder, onion powder, oregano and red pepper flakes, if using.  Stir until spices are well combined with the cheese/cream/mayo mixture.  Spoon mixture over the corn/bean mixture and stir until everything is coated with the dressing.  Add shredded cheese and stir until well blended.  Cover tightly and refrigerate until serving time.  Just before serving, crush enough corn chips to completely cover the top of the salad.  Sprinkle corn chip on the salad.  Serves 8 to 10.

Tuesday, August 7, 2012

Crazy Cooking Challenge-Peanut Butter/Chocolate Cheesecake Cups


It is time for another Crazy Cooking Challenge hosted by Tina over at Mom’s Crazy Cooking.  This month’s subject is Cheesecake.

Since Tina changed the guidelines last month, and we can now find our recipes anywhere, I decided to share a long time favorite of mine.  I don’t make a lot of cheesecake, but I do love these little Peanut Butter/Chocolate Cheesecake Cups.  Peanut Butter and Chocolate just go so well together.  I have been making this recipe for many years.  I clipped it from a Better Homes and Gardens magazine.


If I am buying cream cheese just for this recipe, I buy one 8-oz. pkg. and one 3 oz. pkg.  I, however, usually have 8 oz. pkgs. of cream cheese on hand and use 1 1/2 8 oz. pkgs. of cream cheese.  It doesn’t seem to make much difference in the final result.

You MUST use creamy peanut butter in this recipe.  I tried crunchy once, and it just did not work.  The peanut butter and chocolate mixture stayed separated.  I use a measuring tablespoon to distribute the batters into the muffin cups. I like to drop the chocolate mixture into the peanut butter mixture and just let it settle.  This usually results in a little ring of peanut butter batter showing around the edges of the chocolate.

For an elegant presentation, peel off the paper liners, invert the cups on a dessert plate and top with a dollop of whipped cream.

These are great to take to a party or a potluck.

Peanut Butter/Chocolate Cheesecake Cups
from Better Homes and Gardens magazine

3/4 c. crushed chocolate covered graham crackers
11 to 12-oz. cream cheese, softened  (may be low fat, but not fat-free)
1/2 c. sugar
1 t. vanilla
1/2 c. milk
2 eggs at room temperature and slightly beaten
1/2 c. semisweet chocolate chips, melted
1/3 c. creamy peanut butter

Line a 2 1/2-inch muffin pan with paper baking cups.  Place about 1 T. crushed chocolate covered graham crackers in the bottom of each cup, spreading evenly.  In a large mixing bowl, beat cream cheese until smooth.  Add sugar and vanilla and beat until fluffy.  Beat in milk.  Add eggs, beating until just blended.   (Do not overmix.)  Divide batter in half.  Stir melted chocolate into one-half the batter, mixing until smooth.  Stir peanut butter into the second half of the batter, mixing until smooth.  Place 2 T. peanut butter mixture in each muffin cup.  Spread evenly.  Spoon 2 T. chocolate mixture into the center of the peanut butter mixture and let it settle.  Bake at 325 degrees 20-25 minutes or until set.  Cool on a wire rack.  Place in a covered container and chill until serving time.  Peel off paper cups and invert onto a dessert dish to serve.  Top with a dollop of whipped cream.  Makes 12 cheesecake cups.

Linking to:  Crazy Cooking Challenge

Sunday, July 15, 2012

Eating the Alphabet-Curried Leak and Veggie Spread


Here it is time for another Eating the Alphabet post.  This month we are doing K or L.  I chose L and decided to make something with leeks.

I have not used leeks often, but after searching for recipes using leeks and developing a couple myself, I will use them more.  I sort of went on a “leek kick” and will be posting a couple more recipes using leeks soon.

For today’s post, I chose Curried Leak and Veggie Spread.  I saw a recipe over at allrecipes for a Leek Dip.  It sounded good, but by the time I got done, what I made did not resemble that original recipe at all.

To prepare the leek, slice it into thin slices and chop fine.  Put into a bowl of water and swish around to remove any grit or dirt.  Remove from the water and rinse in a colander.  Turn into a clean towel and squeeze to remove excess water.

If you don't like curry powder or fennel seeds, use another herb or just leave them out.  I just happen to like curry, but this is perfectly good without it.

To serve this, I like to split pita bread, cut it into triangles, brush it with olive oil, and toast them in a pan on the stove or in the oven.  This is also good with any kind of cracker or melba toast.

Note:  The veggies in this will begin to release their water so this is best eaten in a day or three.  After that, you are apt to have a dip.  Still good, but no longer spreadable.

Curried Leek and Veggie Spread
1 (8 oz.) pkg. cream cheese (I use 1/3 less fat), softened
1 c. creamy salad dressing like Miracle Whip (low fat is OK)
1/2 c. sour cream, I use low fat
1 leek, white and light green park, finely chopped
1/4 c. sliced green onions
1/2 c. finely chopped red pepper
1 rib celery, finely chopped
1/2 c. finely chopped carrot
! T. lemon juice
1/2 t. curry powder
1/2 t. fennel seed
salt and pepper to taste, if desired
6 strips bacon fried crisp and crumbled or 1/4 c. ready-cooked real bacon bits

Combine all ingredients together in a bowl and mix very well.  Place in a covered container and place in refrigerator.  Chill at least 2 to 3 hours to allow the flavors to blend.  Makes about 2 cups.  Serve with pita bread triangles, crackers or melba toast.

For Eating the Alphabet each month we post a recipe starting with a specific letter of the alphabet.  Next month the letters will be M, N, and/or O.  I invite you to join in the fun.  It is hosted by Brenda from Meal Planning Magic.  Just hop on over and sign up.

Check out the links below to see what the other "Eating the Alphabet" bloggers have posted this month.

Thursday, March 15, 2012

Improv Cooking Challenge-Boursin Smashed Red Potatoes

Improv Challenge

There will be two posts from this Grandma today.  I am also participating in Eating the Alphabet and that gets posted on the 15th this month also.  Look for a second post.  Hint:  It involves carrots.

When I started thinking about a potato and cheese dish, I could not get Boursin cheese out of my mind.  I just was not sure what type of potato dish I would use it in.

Well, a funny thing happened.  We get America’s Test Kitchen on Saturdays here.  My husband happened to be in the house when they were making Smashed Potatoes.  He thought they looked good.  I said I hadn’t made them because he doesn’t usually eat potato skins.  Well he said that the potatoes looked good enough that he would be willing to try them.  I thought, OK, how about smashed potatoes with Boursin topping; and so an idea was born.

I make my own Boursin, but it certainly can be purchased at most grocery stores.  It is fairly expensive to buy and easy to make at home, so give it a try.

It turned out that the recipe from America’s Test Kitchen was for very small potatoes not more than 2-inches across they said.  I went on a hunt for other smashed potato recipes.  I liked the method that Simply Recipes used to cook her Smashed Potatoes.  That involved baking them in the oven with some butter.  I adapted her method, but added some additional baking time.  I also want the potatoes topped with the Boursin, Cheddar cheese, bacon, and green onion so they would be more like a thick potato skin.

The potatoes can be baked ahead and refrigerated.  The toppings can be added and the potatoes baked some more to serve them.

Pototoes 1

This is very flexible recipe.  The amount of potatoes used  is determined by the size of the potato, the number of people being served, and the appetite of those people.  I am, therefore, going to list the ingredients by what is needed for the number of potatoes used.

Boursin Smashed  Red Potatoes
1 or 2 red potatoes per person depending on size of potatoes used
1 T. butter cut from cube of butter for each four potatoes
1 T. melted butter for each four potatoes
1 T. Boursin cheese for each potato
1 T. grated sharp Cheddar cheese for each potato
1/2 slice bacon cooked and crumbled for each potato
chopped green onions as desired

Place washed and dried potatoes in a baking dish or pan that can be covered.  Slice a tablespoon of butter from a cube for each 4 potatoes, cut into 4 pieces and place a piece of butter on each potato.  Cover and bake potatoes at 350 degrees for 20 minutes.  Remove potatoes from oven and roll around so that all surfaces of each potato is covered in butter.  Cover potatoes, return to oven and bake until tender, abut 45 minutes.  Remove potatoes from oven and smash with a potatoes mashed until they are about half their original size.  Brush 1 tablespoon of butter on every four potatoes.  Return to oven for 15 minutes. (This crisps up the skin and makes the potatoes more like potato skins.)  Top each potato with 1 T. Boursin cheese.  Return to oven for 10 minutes to allow cheese to soften.  Spread cheese over the top of each potato.  Sprinkle each potato with 1 T. grated Cheddar cheese and 1/2 slice cooked, crumbled bacon.  Return to oven 5 to 10 minutes until Cheddar cheese is melted.  Remove from oven and sprinkle with chopped green onions if desired.  Serve with sour cream if desired.

Potatoes 2

If you haven't joined in the fun and would like to be part of  Improv Cooking Challenge, you can find all the information right here.  In April we will be doing peanut butter and jelly.  Now that should be a fun one.

Visit the links below to what other bloggers made with the ingredients of potato and cheese.

Linking to Ingredient Spotlight

Monday, March 12, 2012

DIY Groceries-Homemade Boursin Cheese

Good Monday.  Welcome to my new followers.  Thank you for following and thanks to all who take the time out of their busy lives to read my posts.  I hope that what you find here is useful.

Later this week I will be posting a recipe which uses Boursin Cheese.  So today I thought I would post a recipe for homemade Boursin Cheese.  You can, of course, purchase this at the grocery store; but homemade is fresher and is less expensive.

If you grow your own herbs, I would highly recommend using them in this recipe.  Just double the amounts given.  I, myself, can barely grow my perpetual onions.

This is a compilation of several recipes, and I have adjusted the seasonings to fit my tastes.

I don’t make this often since having it around causes fights between my mouth and hand.  You know the one, I am walking by the fridge, and mouth says, “Let’s have some of that cheese.” Hand says “No, we don’t need it.”  Mouth say, “Yes, we do.”  Hand says, “No, we don’t.”  On it goes until one or the other wins.  Most of the time that is the mouth, and the cheese is soon gone.

BoursinCheese1

Boursin Cheese
1 (8 oz.) cream cheese, softened (may use low fat)
2 oz. (1.2 stick) butter, softened
2 T. grated parmesan cheese (the real stuff)
1 large clove garlic, minced
1 t. dried dill weed, crushed
1/4 t. dried marjoram
1/4 t. dried basil
1/4 t. dried chives
1/4 t. freshly ground black pepper
1/8 t. dried thyme, crushed
1 T. dried parsley

Place cream cheese and butter in a mixing bowl.  Add minced garlic and parmesan cheese.  Mix well.  Add remaining ingredients and mix until well blended.  Pack into an airtight container and refrigerate several hours before using.  Makes 1 1/2 cups.  Keeps about a week.  This is good with crackers and also apple  slices.

Wednesday, March 7, 2012

Crazy Cooking Challenge-Baked Cream Cheese Spaghetti

Photobucket


This month's assignment for the Crazy Cooking Challenge was to find  and make a dish that contained spaghetti and a red sauce.  We prefer baked spaghetti, and I found Baked Cream Cheese Spaghetti at  Plain Chicken.  She has another one called Baked Spasagna (love the name) that I considered also, but I had all the ingredients to make the first one so decided that it would be a good one to go with.  Update:  Just yesterday she posted a recipe for Easy Spasagna which is a simplified version of the Baked Spasagna.  Since they all sound delicious, I will be making all three of them at some point.

Of course, I can never leave well enough alone so I did make some changes.  I like to add additional vegetables to dishes like this so I added chopped onion, celery, carrots, red and yellow peppers.  I am also a cheesehead so had to add some additional cheese.   I would love sliced black olives added to this, but hubby doesn’t like them, so I will have to save that for when I make this for a church potluck.

I broke the spaghetti in half before I cooked it, but had some trouble when mixing in the cream cheese.  I may not have let the cream cheese soften enough.  Next time I will break the spaghetti into thirds.

I used Ragu Sauce 4 Cheese flavor.  I use 1/3 c. water to rinse out the sauce jar.  This little bit of water, put in the empty sauce jar and shaken, gets all the sauce out of the jar and doesn't affect the flavor of the sauce.  I have included that 1/3 c. water in the recipe.

I liked this dish a lot and will be making it again.


IMG_2515-1

Baked Cream Cheese Spaghetti
adapted from Plain Chicken
12 oz. spaghetti
1 lb. lean ground beef
1/3 c. chopped onion
1 stalk celery, chopped
1/3 c. chopped carrot
1/3 c. chopped yellow pepper
1/3 c. chopped red pepper
1 (28 oz.) jar prepared spaghetti sauce
1/3 c. water
1 (8 oz.) pkg. cream cheese (low-fat is OK)
1 t. Italian seasoning
1 clove garlic, minced
1 (8 oz.) pkg. shredded Italian cheese or mozzarella, divided
1/2 c. parmesan cheese, grated (the refrigerated kind)

Cook spaghetti according to package directions.  While water is heating and spaghetti is cooking, brown ground beef, onion, celery, carrots, red and yellow peppers until brown.  Add spaghetti sauce.  Rinse out sauce jar with measured out water and add to skillet.  Drain cooked spaghetti.  Put spaghetti back in pan and mix in cream cheese, Italian seasoning and garlic.  Mix until spaghetti is thoroughly coated.  Place a layer of sauce/ground beef mixture in bottom of a greased 9x13-inch baking pan.  Cover with spaghetti mixture.  Sprinkle 1 c. of cheese over the spaghetti.  Spread remaining sauce mixture over spaghetti.  Cover and bake at 350 degrees for 20 minutes.  Remove cover and sprinkle remaining cup of cheese and parmesan cheese over the top.  Return to oven for 10 minutes until cheese is melted.  Remove from oven and let rest for 10 minutes before serving.  Makes at least 8 servings.

IMG_2507-1

Participating in this challenge is great fun.  One can easily sit out any month if one is too busy or not interested in the subject.  For information about participating in the challenge just click on over to Tina's blog.


Tuesday, August 30, 2011

Cooking with the Journal-Corn 'N' Bacon Dip

IMG_0038-1

Here is a handy little recipe for a great dip to use with vegetables, crackers, or chips.  It has a wonderful corn, garlic, bacon flavor and is made with ingredients one usually had in the pantry and refrigerator.  It was originally called a “chip” dip, but we rarely eat that kind of snack around here any more.  I usually serve it with various veggies and/or crackers.

I now use Greek Yogurt for half the sour cream to make the dip a little healthier.  I like more garlic, so usually use at least three cloves.  The original recipe called for an 8 oz. can of whole kernel corn.  I don’t buy that size so I just use a 16 oz. can of either whole kernel or cream-style corn instead.  I think that it has more corn flavor with the cream-style corn.   Cooked, frozen corn can also be used.  This means there is more corn (and it’s a veggie, remember?) in the dip.    If made with whole kernel or frozen corn and half sour cream/half Greek yogurt, the dip will be stiffer, almost a spread consistency.  If made with all Greek yogurt and cream-style corn, the dip will be "gloppier".  (Is that a real word? )  The precooked, crumbled bacon bits seem to hold up better in the dip if it will be stored for a few days.  I always fry up some fresh bacon and crumble it for a garnish on the top.

IMG_0996-1

Corn ‘N” Bacon Chip Dip
Cooking for Company
Farm Journal Books, 1968

1 (8 oz.) pkg. cream cheese, softened
1 c. dairy sour cream, low fat is fine (can use half to all Greek yogurt)
1/4 c. mayonnaise, low fat is fine
2 cloves  or more garlic, minced
1/2-1 t. Tabasco sauce or Sriracha Hot Chili Sauce
8 slices bacon, crisp fried and crumbled or about 1/2 c. precooked, crumbled bacon bits
1 16 oz. can whole kernel corn, drained or 1 1/2 c. frozen corn, cooked or 1 can (16 oz.) can cream-style corn

Gradually blend sour cream and mayonnaise into softened cream cheese.  Mix together very well.  Stir in remaining ingredients.  Chill at least 1 hour to blend the flavors.  Makes 3-4 c.  This will keep for a week or so in the fridge unless I have gone at it with a spoon.

Linking to Tuesday Time-Out Link Party
Totally Tasty Tuesdays
Tuesday Talent Show
Tasty Tuesday

Wednesday, August 3, 2011

Ingredient Spotlight-Frozen Peaches and Cream Crisp-GF

Since I am the self-proclaimed queen of layered desserts, when peaches were the Spotlight Ingredient a few weeks ago, I began thinking about creating a new one.  Unfortunately local fruits are very behind here this year, and California peaches were just beginning to hit the super markets.  I decided to wait, so posted the Peachy Keen Barbecue Sauce at that time.

I continued to think about something with peaches, and when I found the Easy No-Machine Ice Cream recipe, I knew I had a base to work with.  I then decided to use an Oatmeal Crust from an old cook booklet called The Quaker Oats Wholegrain Cookbook put out in 1979.  I wanted the flavor of peaches and cream (my favorite way to eat peaches), so I added a cream cheese/powdered sugar/frozen whipped topping layer and now present Frozen Peaches and Cream Crisp.

The oat base has no flour in it so this dessert can be eaten by my gluten-free friends if gluten-free oats are used.   An additional 1/2 c. of oats, wheat germ, or unprocessed bran can be used instead of the nuts for those who do not like nuts or have allergies.  I would try whipped cream (1/2 c. unwhipped) or Greek yogurt for the frozen whipped topping in the cream layer if I did not want to use the topping.  If a thicker “cream” layer is wanted, double the ingredients.

I have Gladware baking pans with lids that I use to make this, but I don't know if they are still available.  If a pan is used that may be needed before the dessert is eaten up, line the pan with a piece of heavy duty foil, letting the foil extend beyond the short ends.  When the dessert is completely frozen, lift it from the pan using the foil as handles.  Wrap foil around dessert then wrap tightly with plastic wrap.

I prefer to add 1 to 2 chopped peaches to the ice cream layer.  My hubby, however, bought cling peaches which were so difficult to remove from the pit, I did not add any to the dessert in the photo.  Any other pureed fresh fruit or berries can be used in place of the peaches.  Do not puree the fruit too smoothly.  I use fresh fruit as much as I can, but well-drained frozen or canned fruit can be used in the winter.  Though not necessary, I added a couple drops each of red and yellow food coloring to get the peach color.

This is definitely a “make ahead” dessert and makes 15 servings so is great for a party.  Of course, it keeps well in the freezer so there doesn’t need to be 15 people to eat it at one time.  At our house, I make this up, and we eat it over a couple of weeks.

Frozen Peaches and Cream Crisp

2 c. quick rolled oats
1/2 c. finely chopped nuts (I used walnuts)
1/2 c. firmly packed brown sugar
1/2 c. (1 stick) butter, melted
1 pkg. (8 oz.) cream cheese softened (can be 1/3 less fat, but I’m not sure why one would bother considering the other ingredients)
1 c. powdered sugar, sifted
1 c. frozen whipped topping,thawed
1 can (14 oz.) sweetened condensed milk (or make your own)
1 c. pureed peaches (about 4 small peaches)
2 c. (1 pt.) whipping cream, whipped till soft peaks form
1-2 additional peaches, peeled and chopped
1-2 drops each red and yellow food coloring

Combine oats, nuts, brown sugar, and melted butter mixing well.  Measure out 1 c. and spread evenly in an 8-in. square pan.  Do not press down.  Put remaining mixture into a 9x13-in. baking pan (preferably one with a cover) and press down evenly to form a crust.  Bake both pans at 375 degrees 8-12 minutes until golden brown.  Remove from oven.  Set crust pan aside to cool 30-45 minutes.  When cool enough to touch, crumble mixture in 8-in. pan with your fingers and set aside.
In a medium bowl combine softened cream cheese and powdered sugar stirring until well blended.  Fold in whipped topping until well blended.  Spread mixture over cooled oat crust.  Place in freezer for 30 minutes.
Peel, chop and puree peaches, using a blender or food processor.  In a large bowl mix peach puree and sweetened condensed milk until very well blended.  Gently fold in the whipped whipping cream until very well combined.  Fold in chopped peaches.  Add the red and yellow food coloring and mix well, adding additional coloring until the desired shade is reached.  Pour this mixture over cream cheese mixture in pan.  Sprinkle the reserved oat mixture over the top.  Cover tightly with a piece of plastic wrap.  Place in freezer and freeze at least 6 hours.  To serve, remove from freezer, cut into squares with a moistened kitchen knife and place on dessert plates.  Makes 15 servings.  For extended storage cover dessert tightly.

Linking to
Made From Scratch Tuesday
Ingredient Spotlight
Cast Party Wednesday
These Chicks Cooked
Foodie Wednesday
Recipes I Can't Wait to Try
Sweets for a Saturday
Strut Your Stuff
Related Posts Plugin for WordPress, Blogger...